Introduction to Flux AI: Quick Guide by ThinkDiffusion

In early August 2024, FLUX AI by Black Forest Labs emerged as a dynamic new player in the world of generative art. Official evaluations indicate that FLUX, an open-source text-to-image suite, outperforms many leading models in the field. It has swiftly established itself as an invaluable tool for designers, artists, and content creators in today's rapidly evolving creative landscape. Let's explore its capabilities!
What is Flux?

Flux is a powerful model that can create detailed and realistic images from descriptions, text prompt, or other inputs. It's very flexible and works well with ComfyUI and Forge, both versatile interfaces for creating AI art. This makes it accessible not only to experts but also to beginners who might not have a technical background.

The image quality that FLUX produces is unmatched. It does a great job of understanding and following even the most complicated textual descriptions. It is amazing how well FLUX can handle accurate renders, abstract art, typography and a lot of other artistic styles and types of content.

Text recognition and typography in Flux is insane.
Webinar: Intro to FLUX with Sebastian Kamph
Download the workflows for the webinar here:
Three Flavors of Flux AI

Image Credit: Reddit - MangledAI
Flux AI comes in three flavors, each built for different needs:
Flux Schnell: The Fastest. This is the basic, quick version similar to SDXL Lightning that uses a low number of steps, definitely optimized for speed. This model focuses on reducing generation time, possibly at the expense of some flexibility or advanced features, slightly compromising image quality to achieve faster generation times.
Flux Dev: Flexible & high quality. When compared to Schnell, Dev excels at being more specific with its prompts, which is great for experimentation and prototyping. It prioritizes flexibility and ease of use over speed.
Flux Pro: This is the premium edition, designed for enterprise and expert usage. This model aims to balance high-speed performance with advanced features and quality. It provide a competitive speed, possibly slower than Schnell but faster than Dev, while still maintaining high-quality output. It incorporates advanced algorithms and optimizations to ensure superior quality.
💡
Flux Pro can only be accessed via Black Forest Labs API and with its authorized partners Replicate, fal.ai and mystic.
Model Quantization
Using the official flux1-dev.safetensors and flux1-schnell.safetensors model requires a machine with high VRAM and RAM. Model quantization is a technique that significantly reduces storage requirements, optimizing memory usage, speeding up computation, and lowering power consumption.
Below are some of the quantized variations and their comparisons:
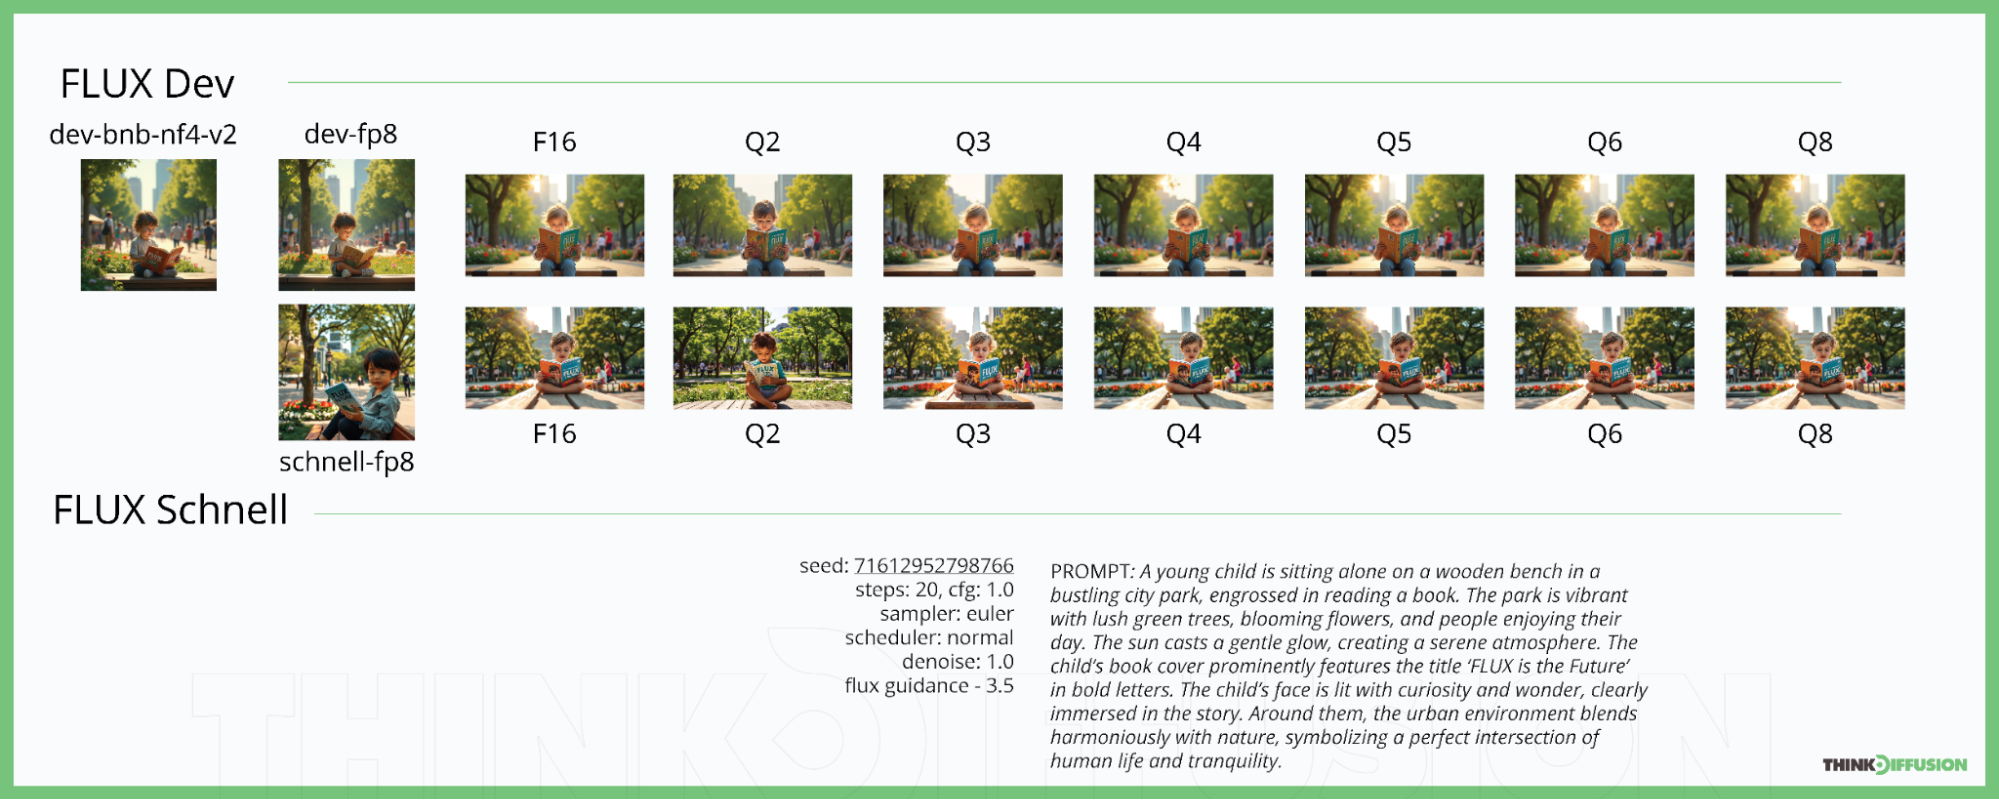
BNB-NF4-V2 - also known as Normalized Float 4, a quantized version released by @lllyasviel. Designed to be as efficient as possible, it delivers unmatched speed without sacrificing accuracy. You can speed up your workflows and do complicated jobs in a lot less time with this tool. It works well with less than 12GB VRAM.
FP8 - also known as Float Point 8 released by @Comfy-Org and @Kijai, is much smaller than the original models and can run on 8GB VRAM without a noticeable drop in the quality of creating important text and details.
F16, Q2, Q3, Q4, Q5, Q6, Q8 - also known as Georgi Gerganov Unified Format (GGUF), quantized versions developed by @city96. With more than 12GB of VRAM, the Q8 version creates a picture output with similar quality to FP16 at twice the speed. The Q4 version, on the other hand, can run on 8GB VRAM and gives you slightly better generation quality than NF4.
Clip Model
In order for FLUX workflows to work, you need to use a clip model like t5xxl_fp8_e4m3fn.safetensors or t5xxl_fp16.safetensors. Clip models from SDXL such as Clip L and Clip G are also used for the FLUX.
Google made T5xxL to handle a lot of different natural language processing jobs. It's great at jobs like translation, summarization, answering questions, and text generation. OpenAI is also working on Clip models, which learn visual ideas from how they are described in natural language.
How to Use FLUX
Platform Recommendation
It's highly recommended to use ComfyUI or Forge for FLUX text-to-image generation. In this guide we're going to use ComfyUI because it offers the most versatile interface.
One-Time Setup
Download the workflow above and drag & drop it into your ComfyUI window, whether locally or on ThinkDiffusion. If you're using ThinkDiffusion, it's necessary to use at minimum the Turbo 24gb machine, but we do recommend the Ultra 48gb machine.
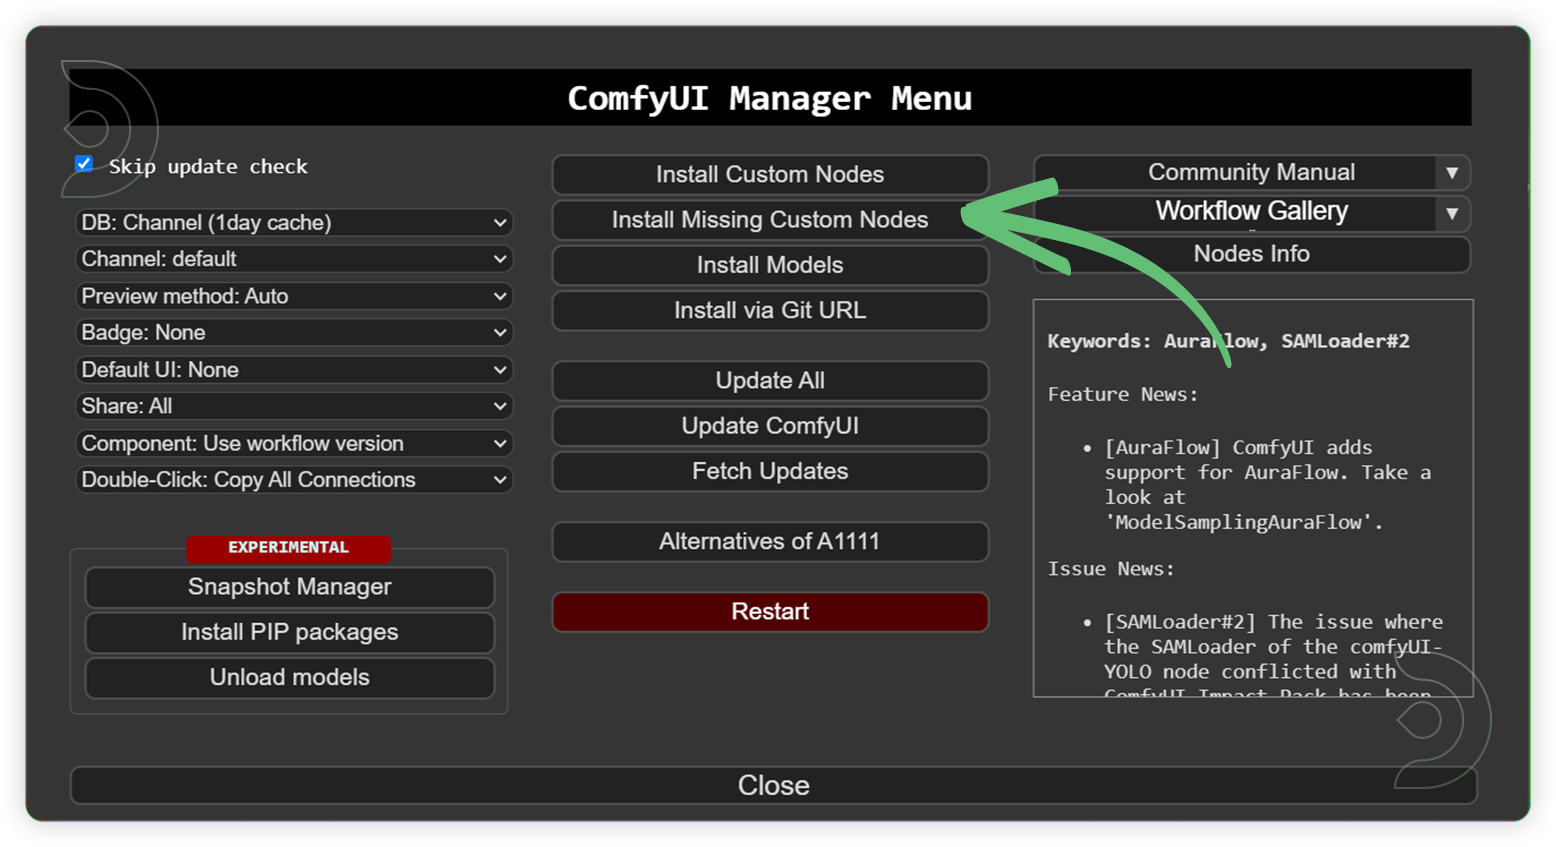
Custom NodesIf there are red nodes in the workflow, it means that the workflow is missing some required nodes. Install the custom nodes in order for the workflow to work.
Go to ComfyUI Manager > Click Install Missing Custom Nodes
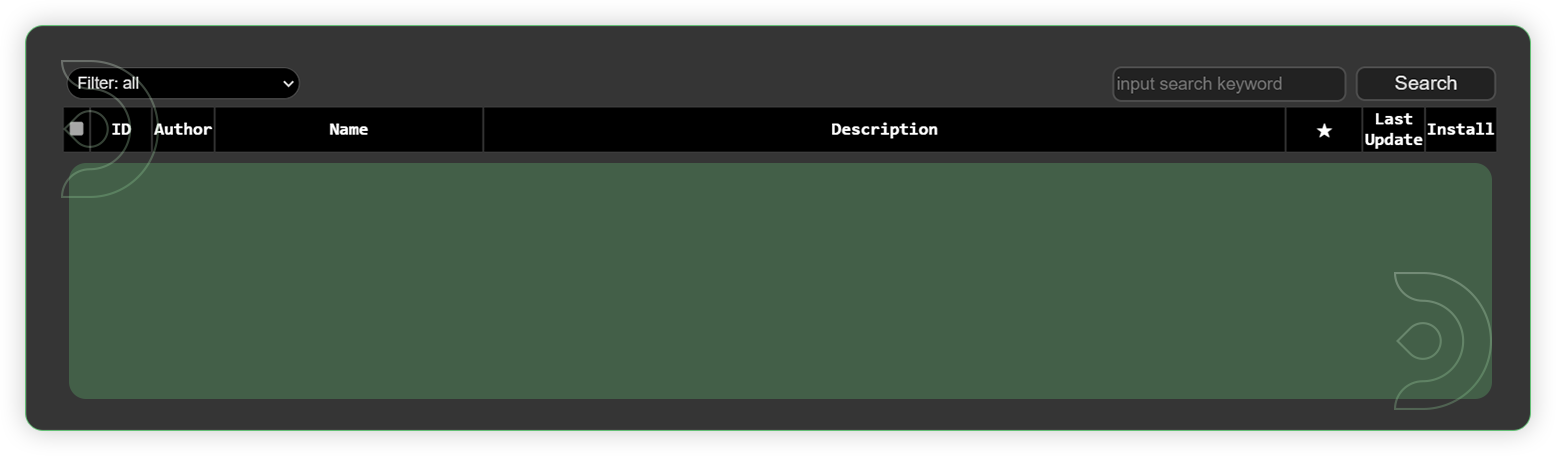
Check the list below if there's a list of custom nodes that needs to be installed and click the install.
Download the recommended models (see list below) using the ComfyUI manager and go to Install models. Refresh or restart the machine after the files have downloaded.
Go to ComfyUI Manager > Click Install Models
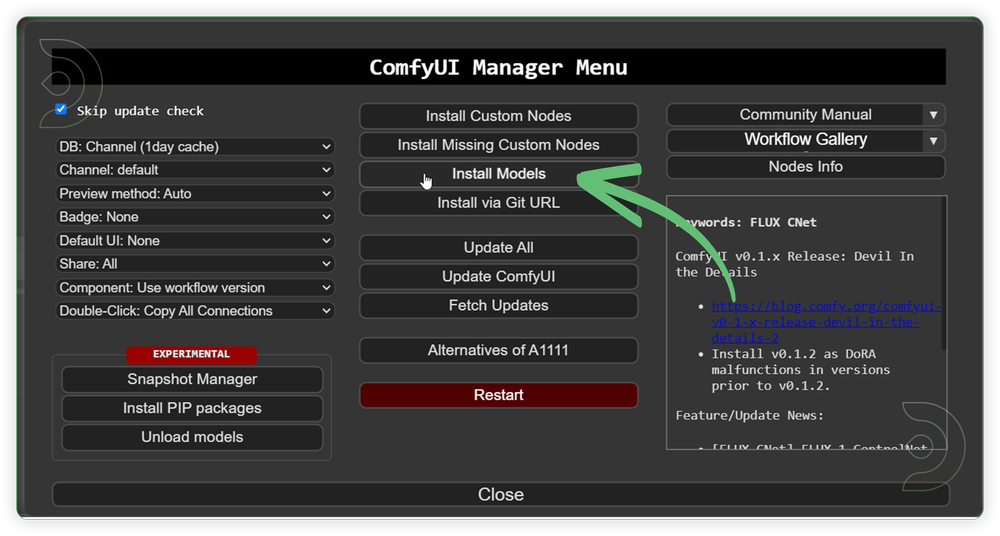
When you find the exact model that you're looking for, click install and make sure to press refresh when you are finished.
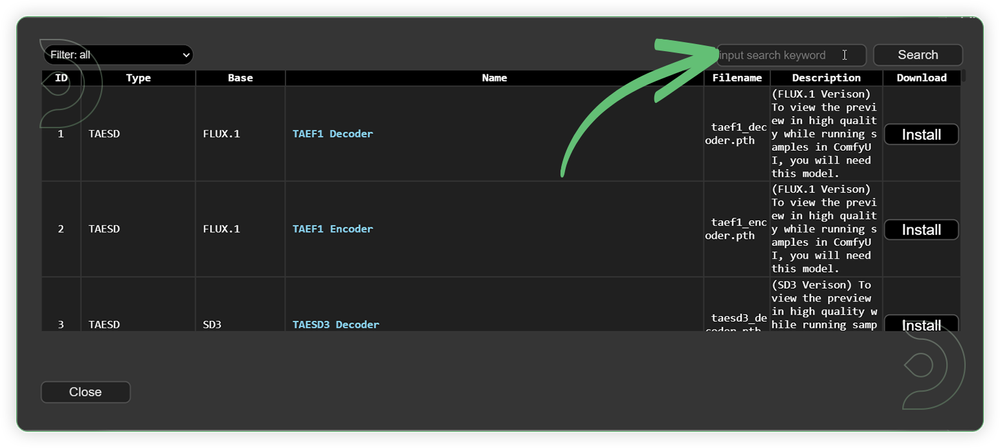
Use the model path source if you prefer to install the models using model's link address and paste into ThinkDiffusion MyFiles using upload URL.
Model NameModel Link Addressflux1-dev.safetensors
📋 Copy Path
flux1-schnell.safetensors
📋 Copy Path
flux1-dev-fp8.safetensors
📋 Copy Path
flux1-schnell-fp8.safetensors
📋 Copy Path
flux1-dev-bnb-nf4-v2.safetensors
📋 Copy Path
flux1-dev-F16.gguf
📋 Copy Path
flux1-dev-Q2.gguf
📋 Copy Path
flux1-dev-Q3.gguf
📋 Copy Path
flux1-dev-Q4.gguf
📋 Copy Path
flux1-dev-Q5.gguf
📋 Copy Path
flux1-dev-Q6.gguf
📋 Copy Path
flux1-dev-Q8.gguf
📋 Copy Path
flux1-schnell-F16.gguf
📋 Copy Path
flux1-schnell-Q2.gguf
📋 Copy Path
flux1-schnell-Q3.gguf
📋 Copy Path
flux1-schnell-Q4.gguf
📋 Copy Path
flux1-schnell-Q5.gguf
📋 Copy Path
flux1-schnell-Q6.gguf
📋 Copy Path
flux1-schnell-Q8.gguf
📋 Copy Path
ae.safetensors
📋 Copy Path
t5xxl_fp8_e4m3fn.safetensors
📋 Copy Path
t5xxl_fp16.safetensors
📋 Copy Path
clip_l.safetensors
📋 Copy Path
Guide Table for UploadRecommended Models
Node’s Value Name
Node
ThinkDiffusion Upload File Directory
flux1-dev.safetensors
unet_name
Load Diffusion Model
…/comfyui/models/unet/
flux1-schnell.safetensors
unet_name
Load Diffusion Model
…/comfyui/models/unet/
flux1-dev-fp8.safetensors
unet_name
Load Diffusion Model
…/comfyui/models/unet/
flux1-schnell-fp8.safetensors
unet_name
Load Diffusion Model
…/comfyui/models/unet/
flux1-dev-bnb-nf4-v2.safetensors
ckpt_name
CheckpointLoaderNF4
TD Preloaded model
flux1-dev-F16.gguf
unet_name
Unet Loader (GGUF)
…/comfyui/models/unet/
flux1-dev-Q2.gguf
unet_name
Unet Loader (GGUF)
…/comfyui/models/unet/
flux1-dev-Q3.gguf
unet_name
Unet Loader (GGUF)
…/comfyui/models/unet/
flux1-dev-Q4.gguf
unet_name
Unet Loader (GGUF)
…/comfyui/models/unet/
flux1-dev-Q5.gguf
unet_name
Unet Loader (GGUF)
…/comfyui/models/unet/
flux1-dev-Q6.gguf
unet_name
Unet Loader (GGUF)
…/comfyui/models/unet/
flux1-dev-Q8.gguf
unet_name
Unet Loader (GGUF)
…/comfyui/models/unet/
flux1-schnell-F16.gguf
unet_name
Unet Loader (GGUF)
…/comfyui/models/unet/
flux1-schnell-Q2.gguf
unet_name
Unet Loader (GGUF)
…/comfyui/models/unet/
flux1-schnell-Q3.gguf
unet_name
Unet Loader (GGUF)
…/comfyui/models/unet/
flux1-schnell-Q4.gguf
unet_name
Unet Loader (GGUF)
…/comfyui/models/unet/
flux1-schnell-Q5.gguf
unet_name
Unet Loader (GGUF)
…/comfyui/models/unet/
flux1-schnell-Q6.gguf
unet_name
Unet Loader (GGUF)
…/comfyui/models/unet/
flux1-schnell-Q8.gguf
unet_name
Unet Loader (GGUF)
…/comfyui/models/unet/
ae.safetensors
vae_name
Load VAE
…/comfyui/models/vae/
t5xxl_fp8_e4m3fn.safetensors
clip_name
DualClipLoader
…/comfyui/models/clip/
t5xxl_fp16.safetensors
clip_name
DualClipLoader
…/comfyui/models/clip/
clip_l.safetensors
clip_name
DualClipLoader
…/comfyui/models/clip/
Reminder💡
Refresh or restart the machine after uploading the files in ThinkDiffusion's My Files.
💡
If you have downloaded the ae.sft model, just rename it to ae.safetensors. They are the same although different sources are using different names.
💡
You can upload models by copying the link address of download button/icon from Civitai or Huggingface and paste into the Upload section of ThinkDiffusion My Files using the copied URL.
Procedures
Now that the hard work is out of the way, let's get creative. You need to follow the steps from top to bottom. The workflow is a one-click process after everything has been set up.
💡
Select a 1 workflow only when running a prompt. Use the Group Bypasser switch node that can be found in the center.
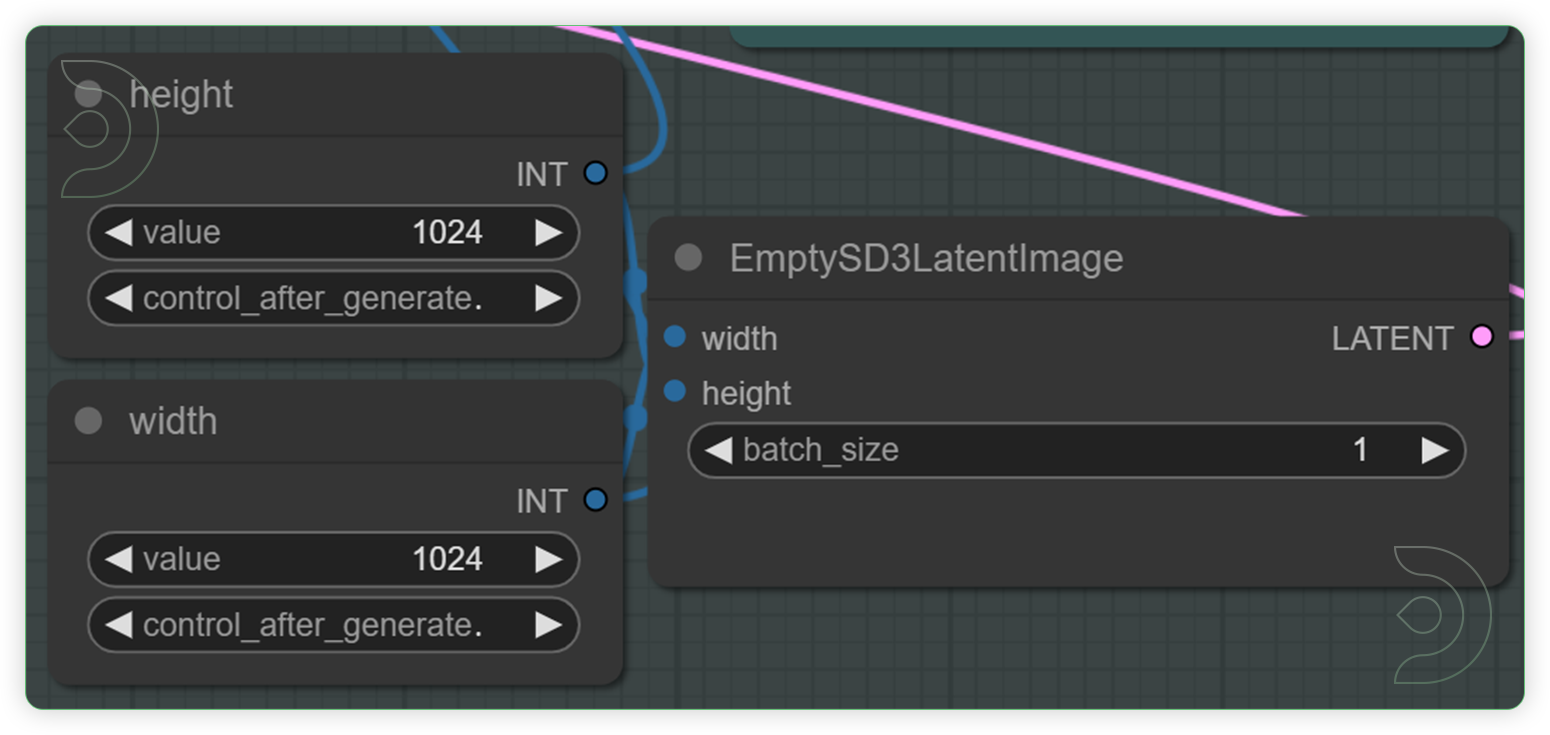
Guide for Original Models WorkflowStepsDescription / ImpactDefault / Recommended ValuesRequired ChangeSelect a Flux modelSpecifies the name of the U-Net model to be loaded. This name is used to locate the model within a predefined directory structure, enabling the dynamic loading of different U-Net models.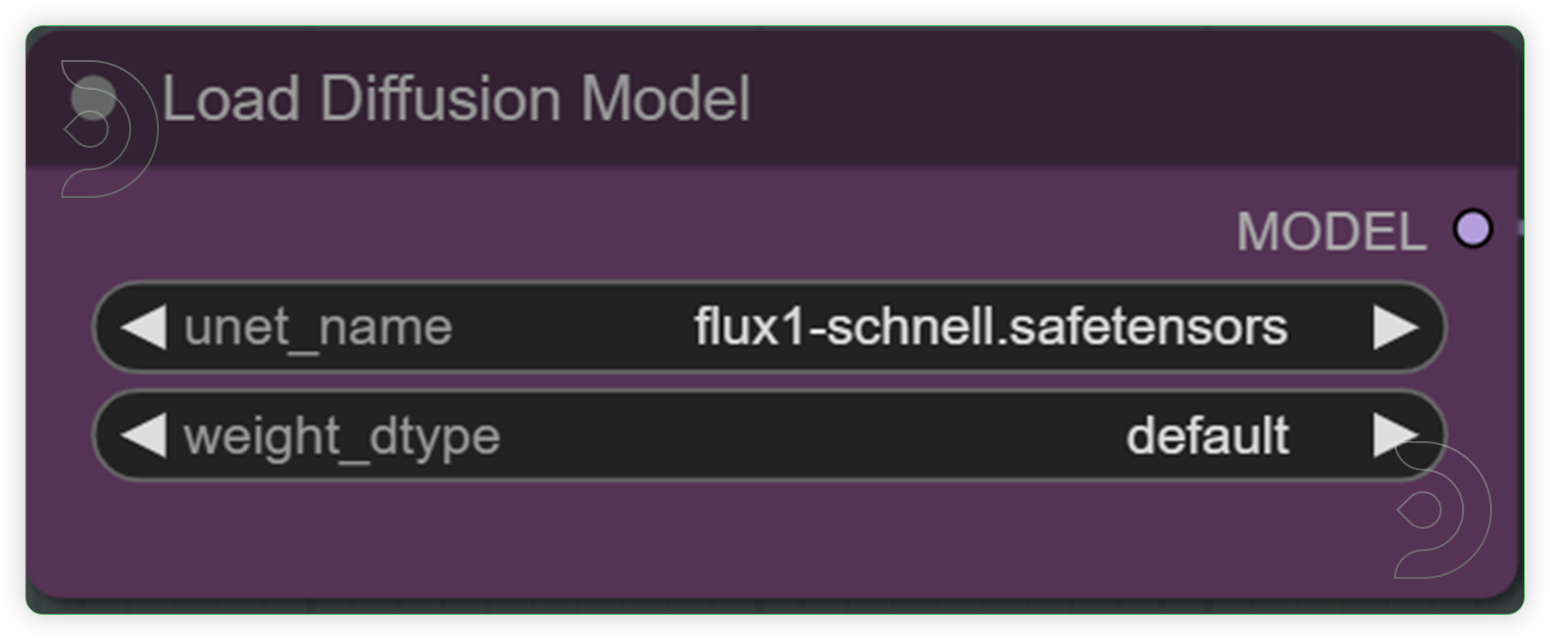 YESCheck and Select your desired dimension and batch sizeSet the height and weight and this will be the basis for the generation output dimension. Batch size refers to the number of output per batch process.
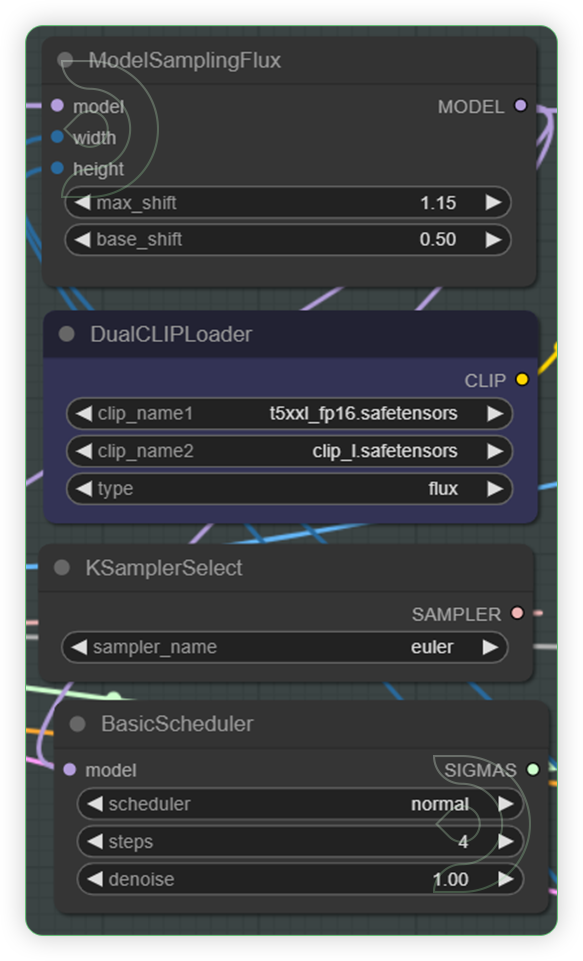
 YESCheck the 4 nodes and set your preferred clip model.ModelSamplingFlux adjusts the model's sampling behavior based on resolution and other parameters. DualCLIPLoader node is designed for loading two CLIP models simultaneously, facilitating operations that require the integration or comparison of features from both models. Highly recommend the euler and normal.
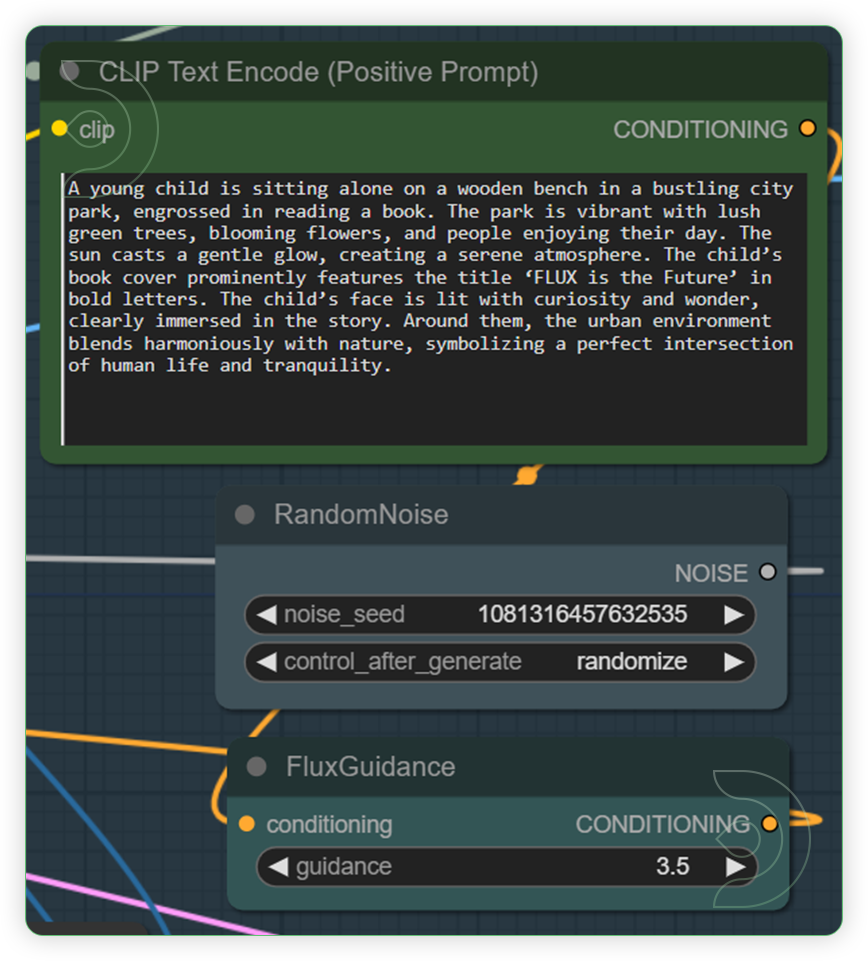
 YESWrite a text prompt for Flux. Check the seed and its default fluxguidance.The CLIP Text Encode node can be used to encode a text prompt using a CLIP model into an embedding that can be used to guide the diffusion model towards generating specific images. FluxGuidance assists in the image generation process. It is compared to the CFG (Control Flow Guidance) of Stable Diffusion, with the video script noting that it has a default value set lower than the CFG, affecting the generation process.
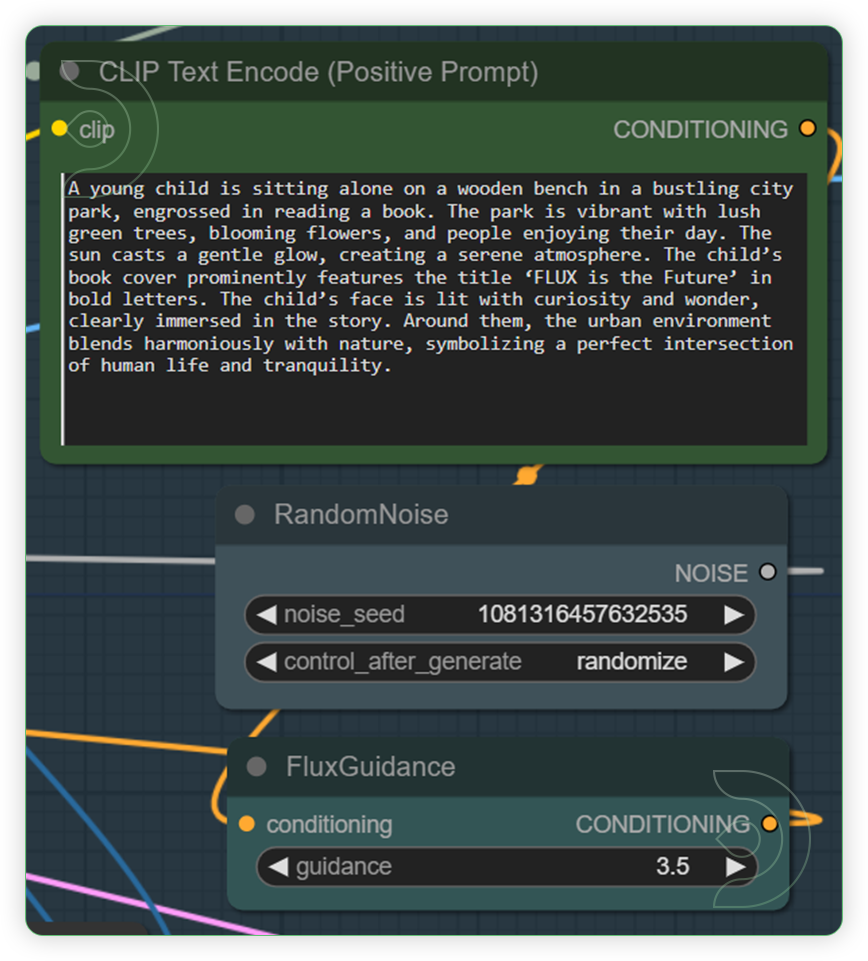 YESRun the Queue Prompt
StepsDescription / ImpactDefault / Recommended ValuesRequired ChangeUse the Fast Bypasser for selecting a 1 Flux model.Specifies the name of the U-Net model to be loaded based on the customized Fast Bypasser widget. This name is used to locate the model within a predefined directory structure, enabling the dynamic loading of different U-Net models. Enable only 1 model to process.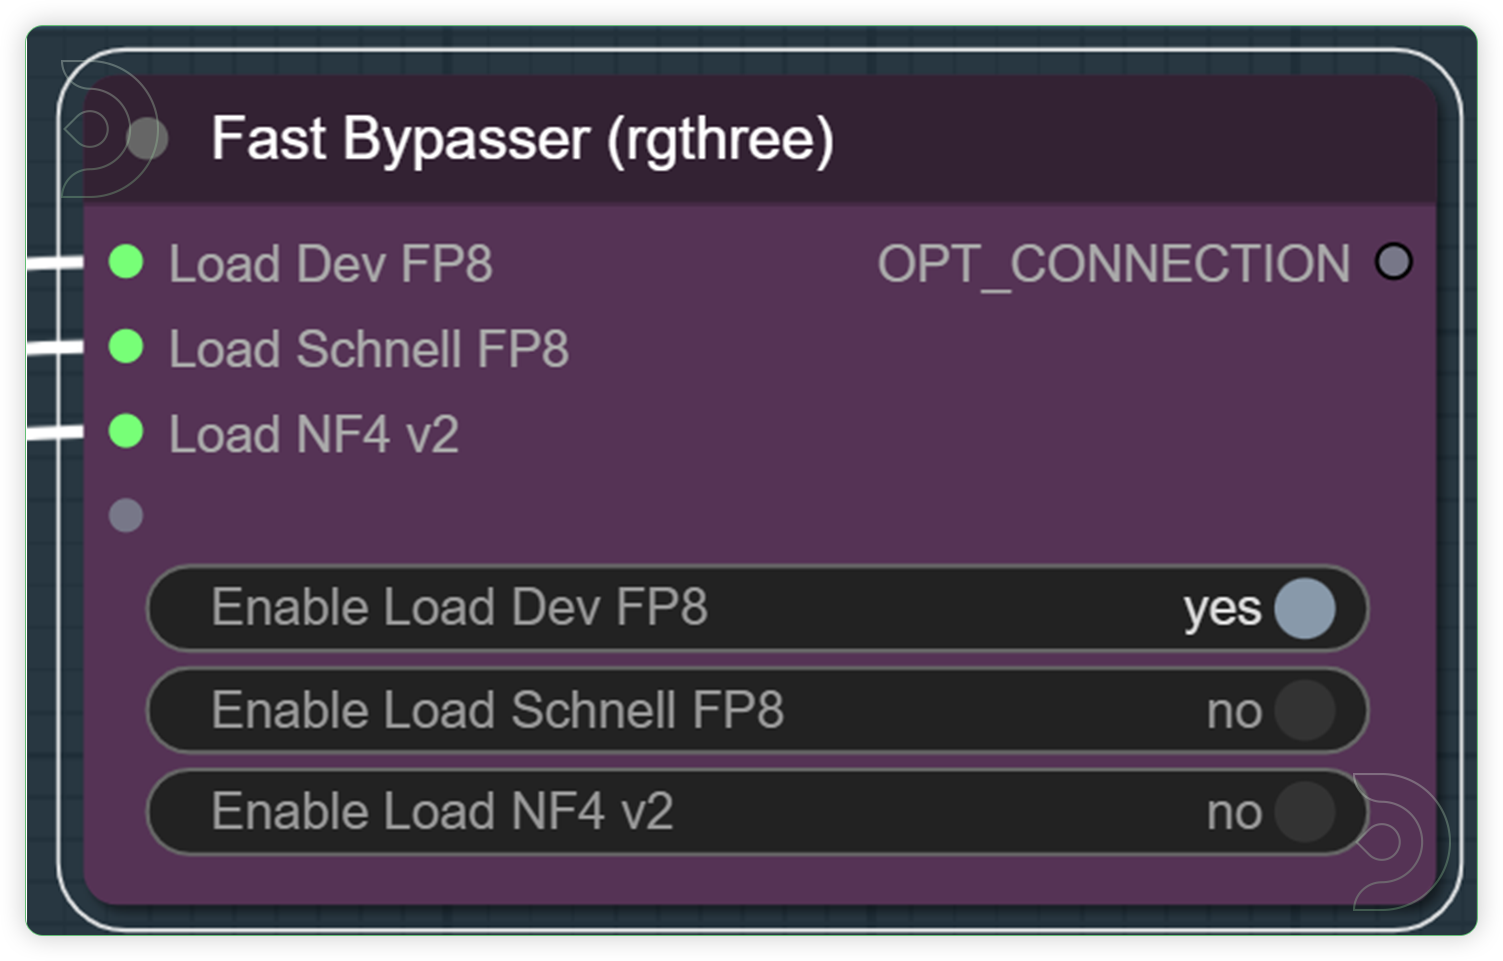 YESCheck and Select your desired dimension and batch sizeSet the height and weight and this will be the basis for the generation output dimension. Batch size refers to the number of output per batch process.
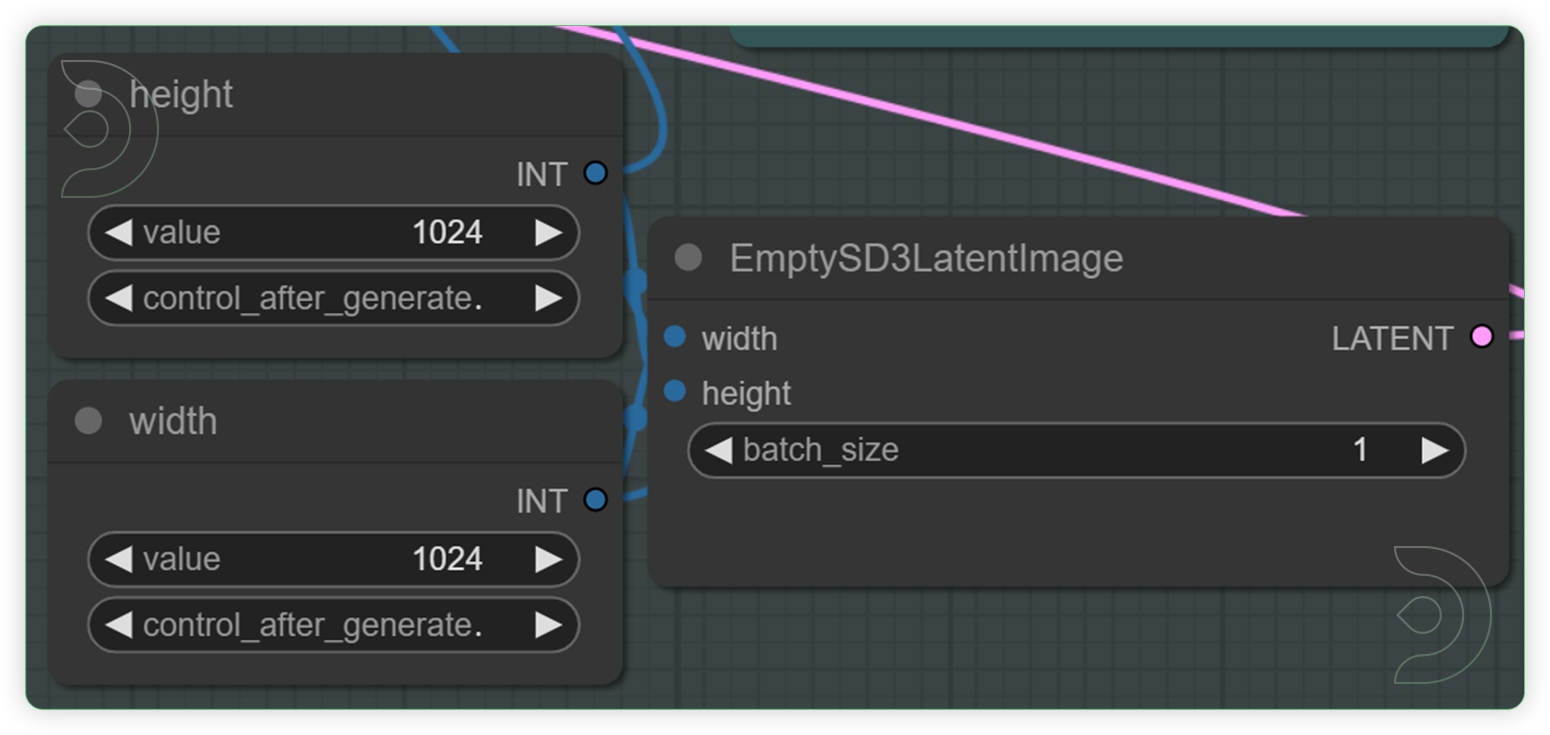 YESCheck the 4 nodes and set your preferred clip model.ModelSamplingFlux adjusts the model's sampling behavior based on resolution and other parameters. DualCLIPLoader node is designed for loading two CLIP models simultaneously, facilitating operations that require the integration or comparison of features from both models. Highly recommend the euler and normal.
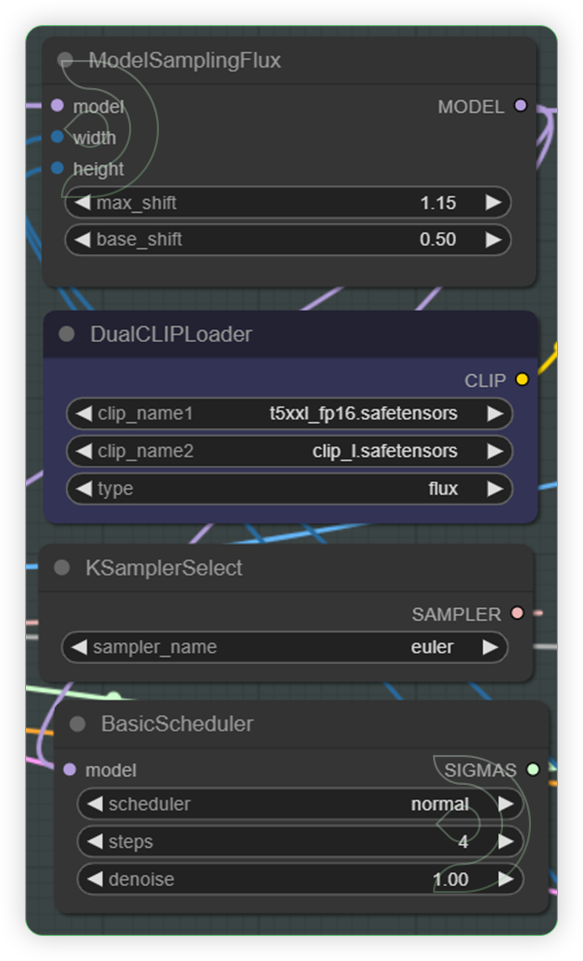 YESWrite a text prompt for Flux. Check the seed and its default fluxguidance.The CLIP Text Encode node can be used to encode a text prompt using a CLIP model into an embedding that can be used to guide the diffusion model towards generating specific images. FluxGuidance assists in the image generation process. It is compared to the CFG (Control Flow Guidance) of Stable Diffusion, with the video script noting that it has a default value set lower than the CFG, affecting the generation process.
 YESRun the Queue Prompt
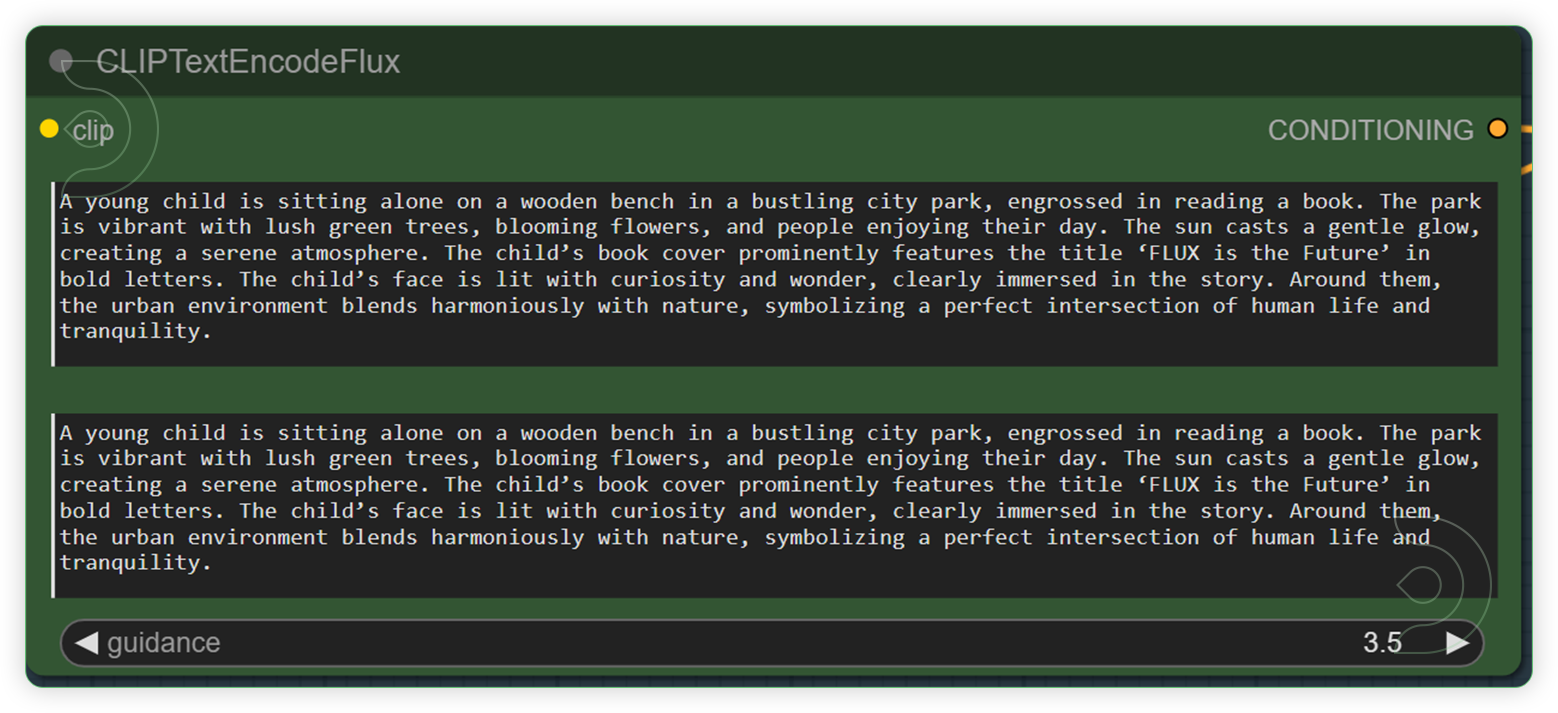
StepsDescription / ImpactDefault / Recommended ValuesRequired ChangeSelect a Flux model by using the Unet Loader GGUF and a select a 2 Clip model.Specifies the name of the U-Net model to be loaded. This name is used to locate the model within a predefined directory structure, enabling the dynamic loading of different U-Net models. DualCLIPLoader node is designed for loading two CLIP models simultaneously, facilitating operations that require the integration or comparison of features from both models. Highly recommend the euler and normal.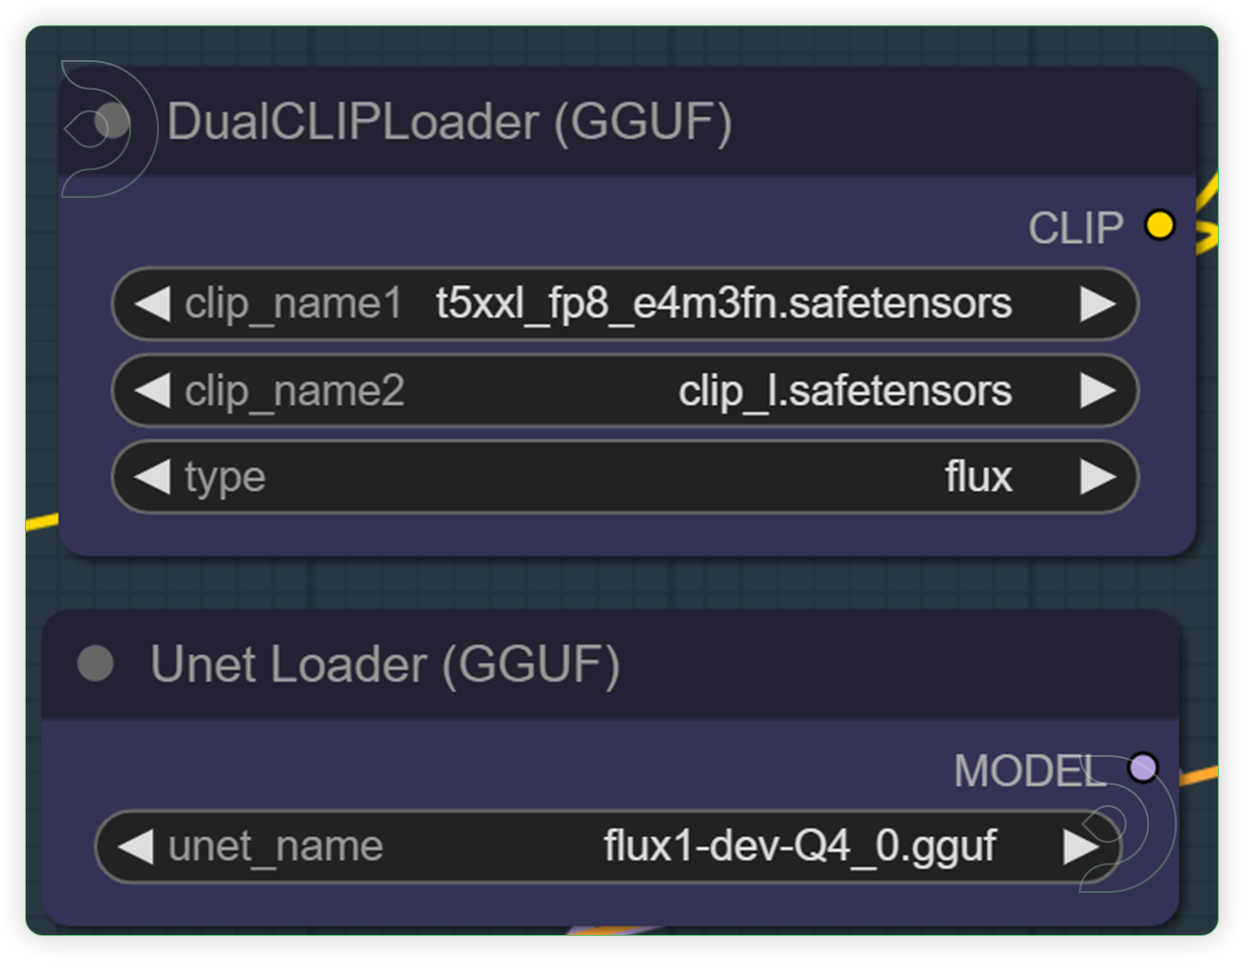 YESWrite a text prompt for Flux. Check the seed and its default fluxguidance.The CLIPTextEncodeFlux node can be used to encode a text prompt using a CLIP model into an embedding that can be used to guide the diffusion model towards generating specific images. Guidance assists in the image generation process. It is compared to the CFG (Control Flow Guidance) of Stable Diffusion, with the video script noting that it has a default value set lower than the CFG, affecting the generation process.
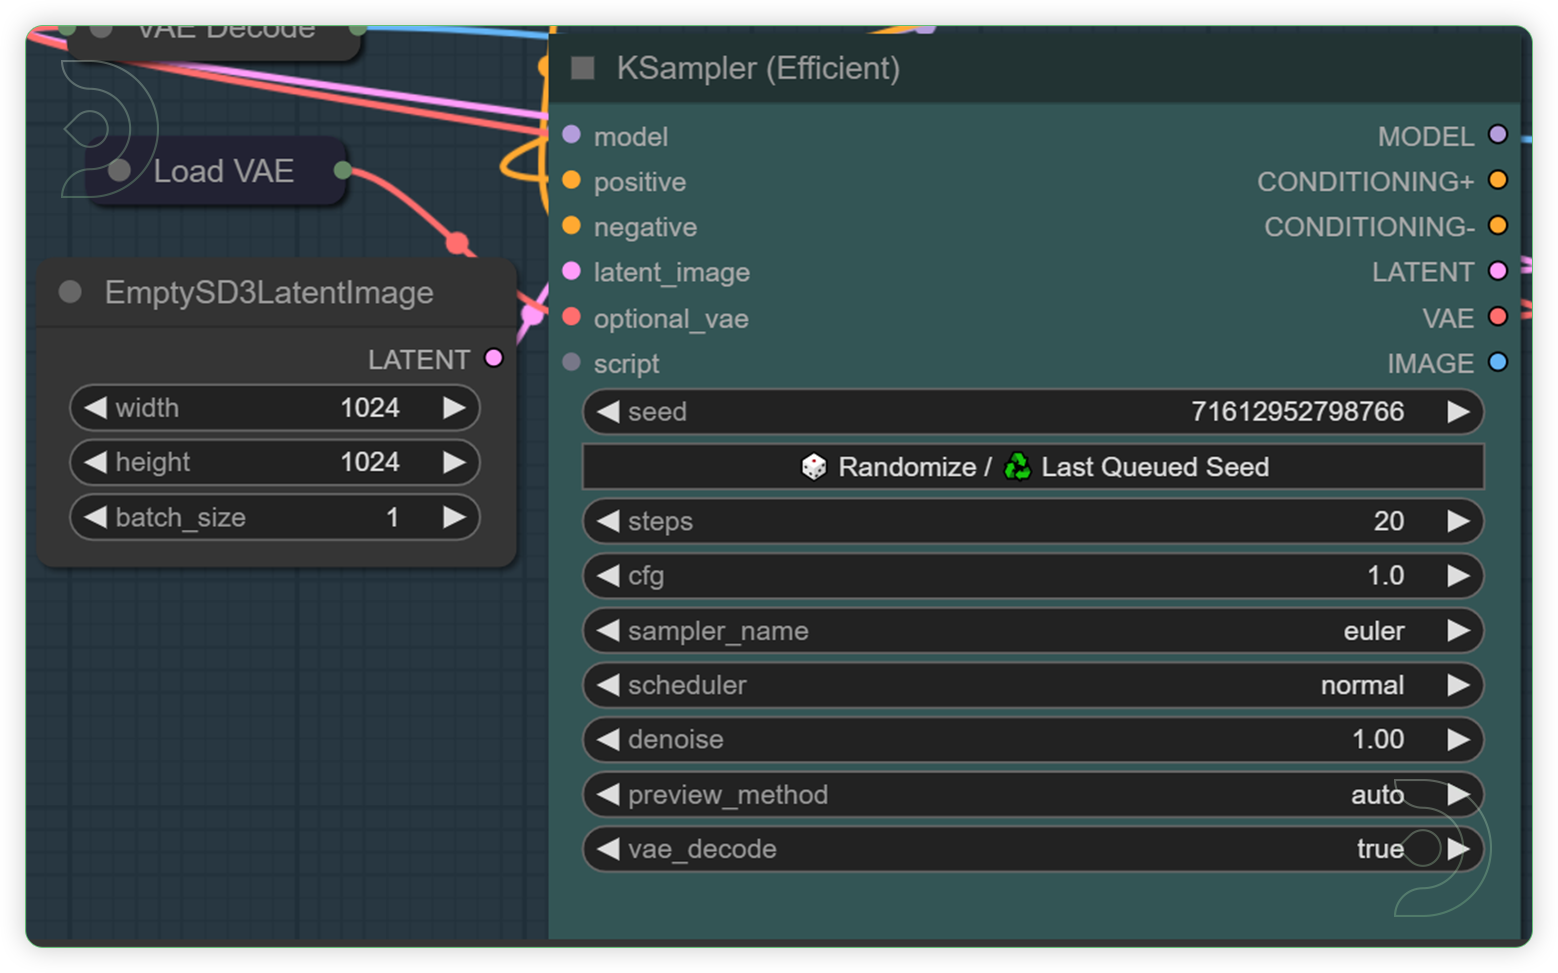
 YESCheck the Ksampler and Resize NodeA modded KSampler efficient with the ability to preview/output images and run scripts. A node where you can set the Steps and CFG.
 YES
YES
💡
If you have less than 32GB of System RAM, use the t5xxl_fp8_e4m3fn text encoder instead of the t5xxl_fp16 version.
💡
fp8 degrades the quality a bit so if you have the resources the official full 16 bit version is recommended.
Flux AI Prompt Examples
You can check the examples below together with its prompt settings.




Resources

Original article can be found here: https://learn.thinkdiffusion.com/introduction-to-flux-ai-quick-guide/