If you found this useful, please click the :heart: and post your own image using the technique with a rating. Thanks!
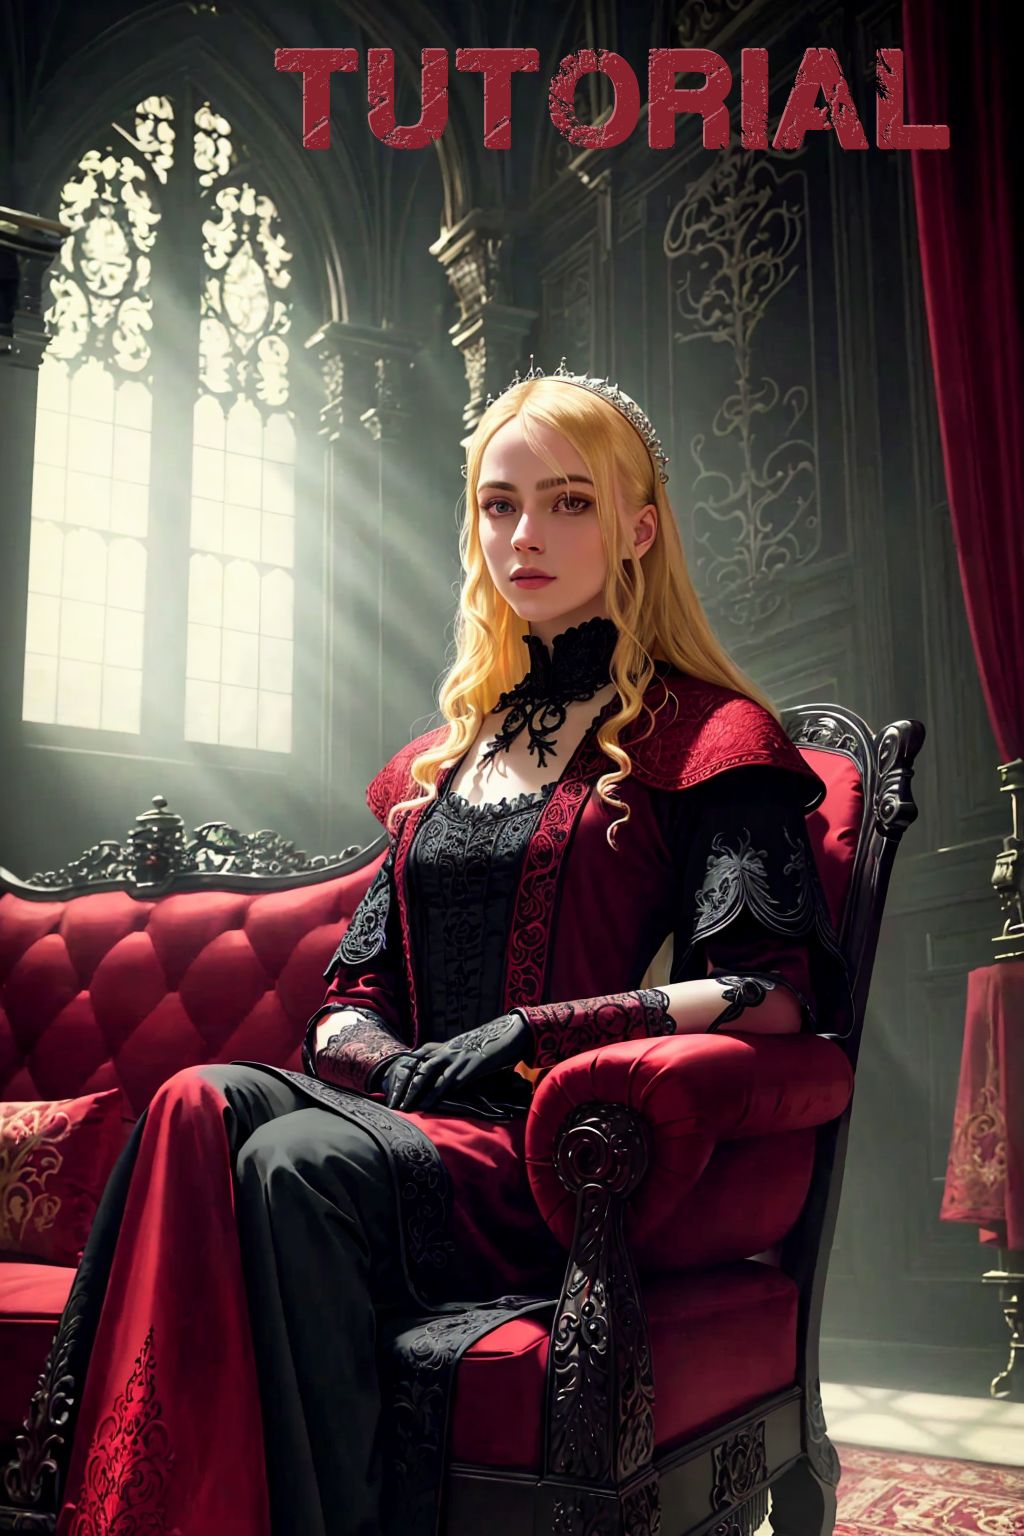
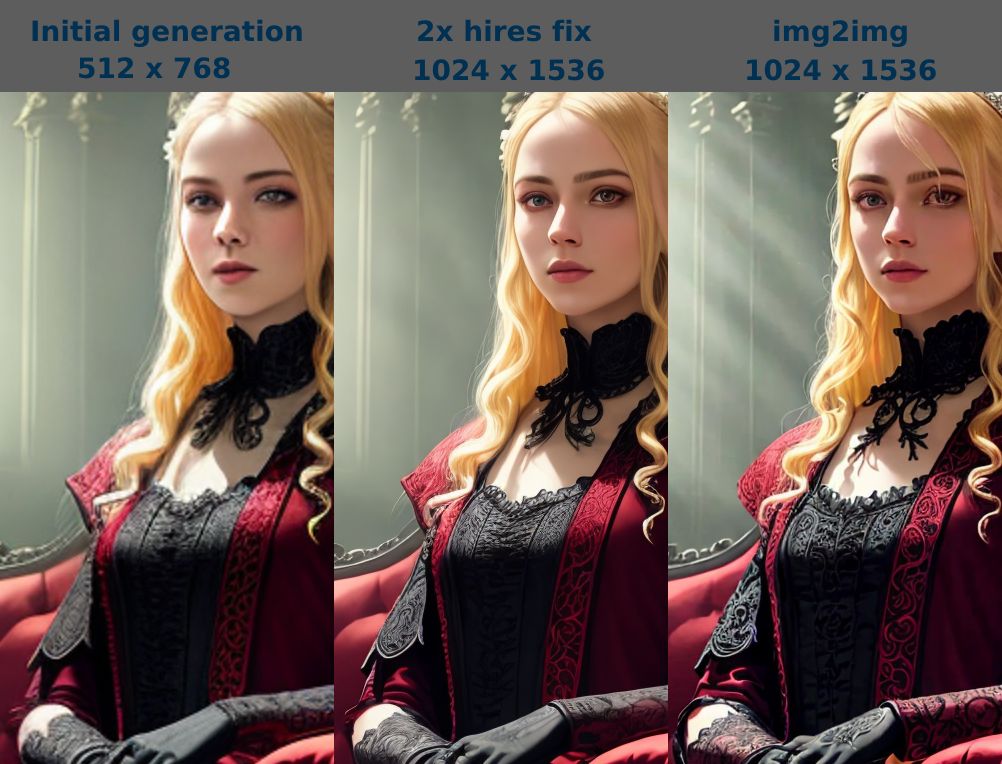
To help with some confusion on how I get my preview images for my models, I created this tutorial. It's a really great technique for creating very sharp details and high contrast in any image with any model. Without having to upscale it even larger. (see a side by side comparison in the model images)
Step 1:
I start with a good prompt and create a batch of images. When using a Stable Diffusion (SD) 1.5 model, ALWAYS ALWAYS ALWAYS use a low initial generation resolution. The model's latent space is 512x512. If you gen higher resolutions than this, it will tile the latent space. That's why you sometimes get long necks, or double heads. However, depending on newer models, their training, and your subject matter, you can get away with 768 in some cases. But if you get strange generations and don't know what's wrong, bring your resolution withing the 512x512 zone. To get the higher resolution images, you use hires fix, explained in Step 2.
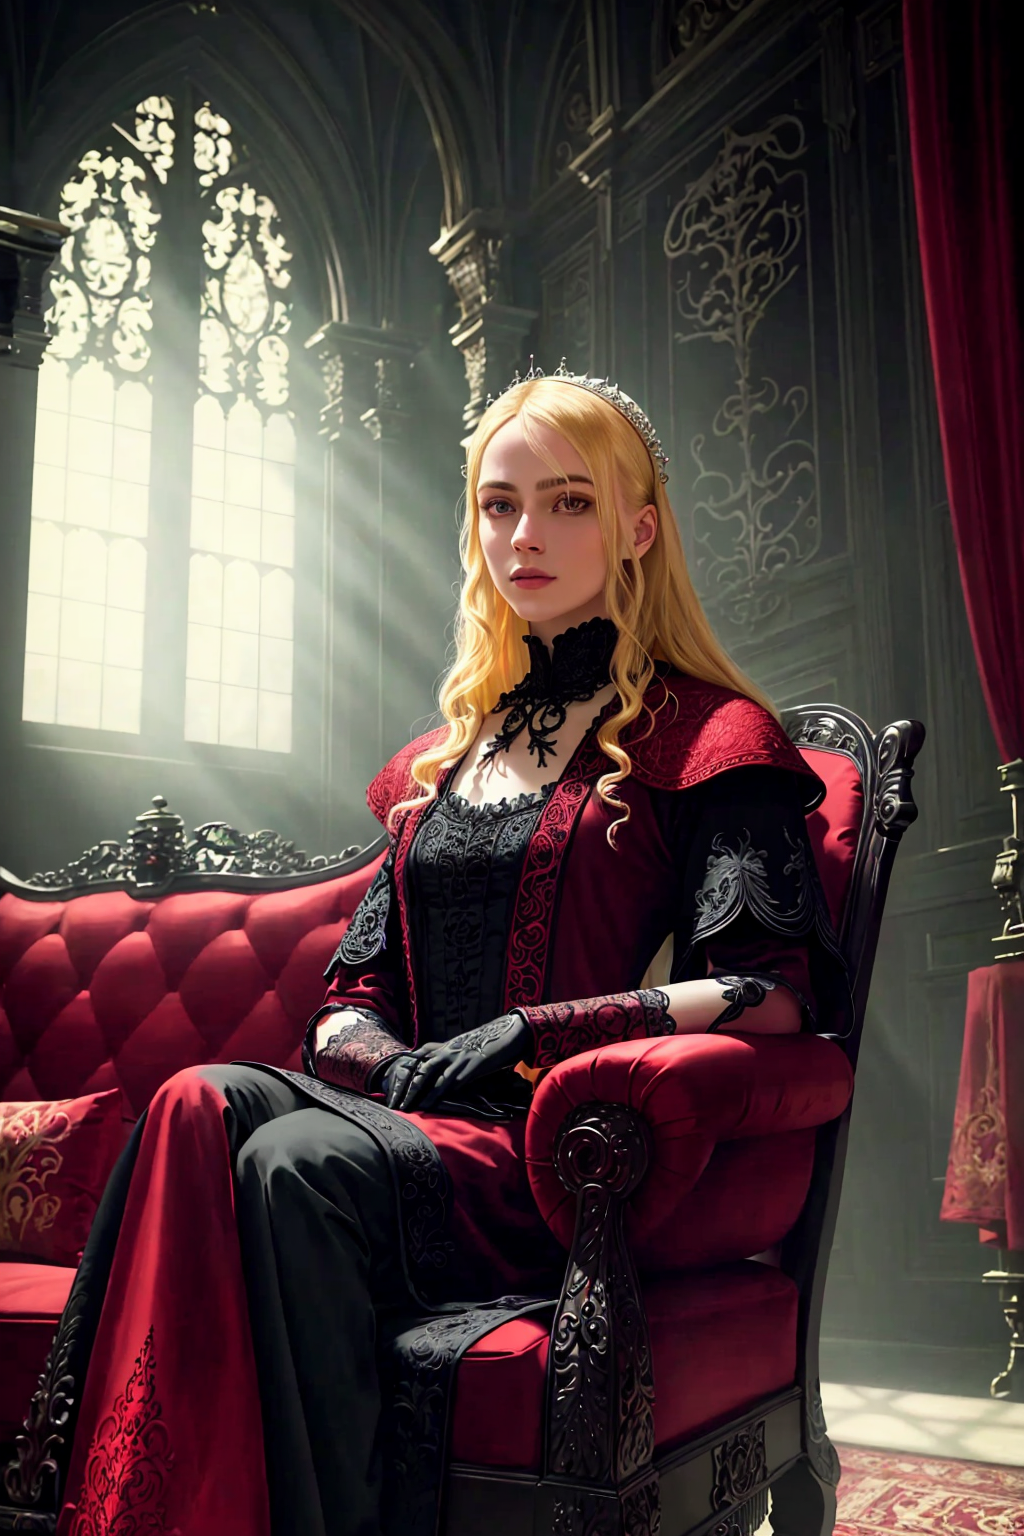
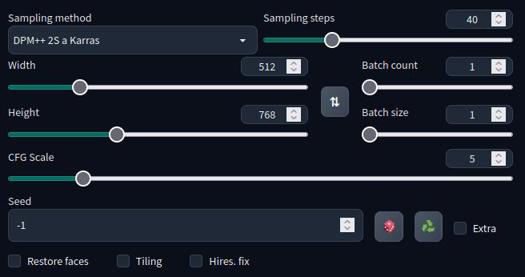
In this tutorial, I use the very superior and legendary A-Zovya RPG Artist Tools version 2 model. It's quite capable of 768 resolutions so my favorite is 512x768. Posting on civitai really does beg for portrait aspect ratios. In the image below, you see my sampler, sample steps, cfg scale, and resolution.
Additionally, I'm using the vae-ft-mse-840000-ema-pruned.ckpt for VAE and the 4x_foolhardy_Remacri.pth for my upscaler. Any upscaler should work fine, but the default latent upscalers are very soft, and the opposite of this tutorial. The vae and upscaler is included in the files of this tutorial for you to download. The VAE goes in your /stable-diffusion-webui/models/VAE folder and the upscaler goes in your /stable-diffusion-webui/models/ESRGAN folder.
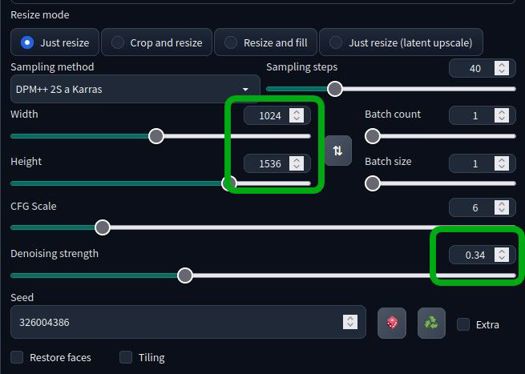
Step 2:
Once I find the image I like, I put the seed number in the seed box. Like in the picture below, I leave everything the same including the initial resolution.
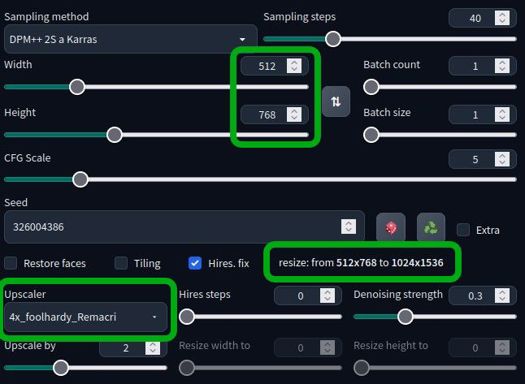
When you click the Hires. fix checkbox, you get more options. I choose my upscaler and upscale by 2. You can see the resize dialogue shows it will gen a 512x768 image, but then regen over that initial image to the higher resolution of 1024x1536. This gives it better details and a chance to fix things it couldn't do in smaller resolutions, like faces and eyes.
Then I select a denoising strength. The range is from 0 to 1. The smaller the number, the closer it will stay with the original generation. A higher number will allow it to make up more details which can fix things, and sometimes break things. So adjust the slider to your preference. I usually go from 0.25 to as high as 0.5. Any higher than that, I probably didn't like the original generation to begin with and now I'm going to get something wildly different.
Step 3:
Your image will show up in the box to the right as usual. Click on the "send to img2img" box as shown below.
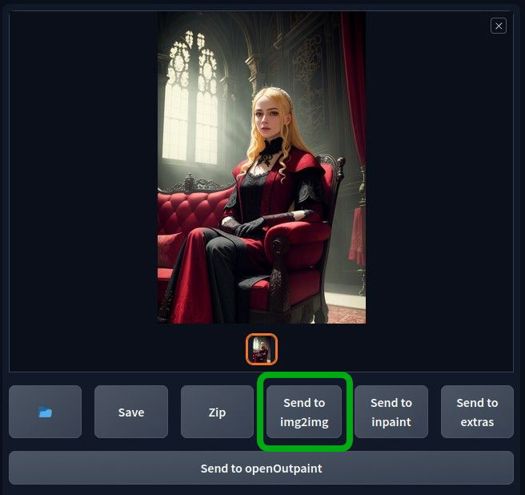
Once you're on the img2img page, make sure your prompt is exactly the same. Make sure all other settings are exactly the same also. It will sometimes give you a different sampler and CFG scale.
Make sure you have selected "just resize", the same settings from the previous image including the seed number. The ONLY difference here will be the resolution, it should be the larger size you hires fixed to, and the denoising strength. Most video cards can handle this in img2img. If you get vram errors, try using --xformers and/or --no-half in your startup script. For extreme cases, you could also use --medvram. Otherwise, a weaker card will just take more time than a more powerful one, but at this point, you're giving final polish to a good cherry-picked image.
Denoising strength: the higher this number, the more contrast and sharpness will be added. Too low and you'll see no difference. To high and it will shred the image into confetti. This number will vary from image, subject matter, details and even the model you use. For my use, I get good results from 0.12 to 0.35.
And that's it, PLEASE PLEASE PLEASE post some ultra sharp images you made and rank this tutorial. Feedback and encouragement is what fuels creators to make more and post their stuff. Support those that you like.
Obligatory donation chant:
Do you have requests? I've been putting in many more hours lately with this. That's my problem, not yours. But if you'd like to tip me, buy me a beer. Beer encourages me to ignore work and make AI models instead. Tip and make a request. I'll give it a shot if I can. Here at Ko-Fi
Description
FAQ
Comments (88)
Great and easy to understand tutorial! Does this also work for colab webUI?
yeah should, same program. automatic1111
Hey, for people who like to fiddle around with detail and have extremely detailed pictures i recommend looking into multidiffusion-upscaler-for-automatic1111. The extension has several features that are really good. For example you can upscale images in img2img. It allows tiling images, which let's you have bigger images and more detailed with less ram usage. It pretty much replaces hires. fix for me at least.
I think it can be found from the webui extension, available tab. There is info on the github page how to use it. I could make some form of guide on it if people are interested.
I knew about super upscaler, does something similar. I didn't know about that one though. Thanks, I'll check it out.
@Zovya Let me know what you think, been fiddling with it for month if you got any questions about it. Might do guide for it tomorrow if i have time
@potatovision842 I rarely use this upscaling workflow personally. If I use AI, it's while I'm painting so it's just a lot of inpainting. But the site sure could use more tutorials. I say go for it!
@Zovya It works for inpainting too :P. But yeah, i recommend checking it out.
Thanks for reminding me about that. I've heard of multidiffusion and tiled vae but I've never tried it. I would appreciate a guide/how-to.
@dita I'll try to fiddle something tomorrow, i'll tag you when it is up :)
@potatovision842 awesome. Me too please?
@potatovision842 Me too please!
I'm interested!
@9ball I´m also interested
@nanunana @9ball @hurkapalca @randallaware @dita @Zovya guide up, it's not perfect. Sick currently so had nothing better to do :)
@potatovision842 Thanks, potato. I'll take a look shortly.
I'm glad you posted this, because it leads into a question I've had for a little while now.
I recently tried using an img2img loopback to keep feeding the img2img result back into img2img in order to increase the detail and refine the features, etc. But what I found was that for every step of that, the contrast grew stronger and stronger, and after 5 iterations, it was blown out all to hell and back. I had my denoising set to 0.4. I was using very similar sizes. I believe it was on 640x512, upscaled to 1280x1024. In that instance, I didn't use hires fix, because I find it often takes far longer than if I do a batch of 10 or so txt2img, find one I like, then upscale it in img2img.
Can you give me any hints on how to avoid increasing the contrast with img2img? The initial txt2img output had great color and contrast. Bumping up the contrast one time would have been okay, but with a loopback like that, it was just way, way too much. I even tried adding "high contrast" to the negative prompt, although I knew when I did that it wouldn't actually help. And it didn't.
I appreciate any suggestions you might have. Thanks.
where is the 4x_foolhardy_Remacri.pt that can download link? thx!
You can find all the upscalers here: https://upscale.wiki/wiki/Model_Database
Now pay up putting some good images on the gallery :)
@bla Be aware that only the mirror works for the download now
that's why I included it in the download zip. might not always be available.
As someone with a pathetic 8gb of vram (thanks nvidia for keeping that tradition going even into the 40 series) I'd like to bring some attention to tiled vae/diffusion. It allows me to upscale 2-3x even when the image is already 1536x1536 after highresfix which isn't possible without it. So for anyone in a similiar boat to mine, check those extensions out.
Great tutorial. Actually sending the image to img2img is what makes a huge difference in the final quality, and it is applicable to any model.
Thanks for the guide!
I tried outputting the image with R-ESRGAN 4x+ Anime6B and grapefruitVAE_v1 (as normal upscaler is ok), but it didn't seem to be sharp enough. (This may be due to the model.) The tutorial itself was very easy to understand.
---added---.
It seems that prompts that are too short lose some of their subtlety. Clothes look wet, background disappears, etc.
Thanks. Could just be the image too. I've noticed some just won't apply very much of the style to it. I think it has something to do with the amount of available contrast in the image. Also, make sure you're using the same seed and all, that's the big thing that applies the effect.
@Zovya I'll do a fixed seeded image for comparison later. The upload doesn't seem to be working.
May I ask if you will only use the i2i in the end and don't send to extras for upscale it further?
upscaling will make it sharper. but also bigger. you could theoretically upscale it to make it sharper then downsize again. the technique I use, and the reason I use it is because it sharpens it AND increases the contrast to give it a nice style, all while not having to deal with an overly large image file. preference I suppose. I mainly have this to explain how I got my images in the preview of my model.
@Zovya ok! i get it. thx!
I couldn't located some of the files necessary to follow this guide. Bummer.
there's a link to the model I used, the vae and upscaler are in the files download for this post.
Thanks for this. I was getting some good results before and was aware of the 512 latent space limits, but this is a great guide to have on hand!
you betcha!
Great Tutorial Zovya. Keep up the good work. :)
thanks!
where do I put the files and make it work?
the tutorial shows where to place each file.
Amazing tutorial, thank you Zovya for taking the time to do this!
thanks!
This has changed the way that my "car photography" generations, look. Thank you so much!
What about controlnet tile resize and ultimate sd upscale?
You helped me a lot. Tanks man <3
I'm getting the VRAM error on the img2img step (actually I was getting it on the hires fix generation step too, but I solved this with a Tiled VAE extension).
"If you get vram errors, try using --xformers and/or --no-half in your startup script"
Could you elaborate on this?
check the automatic1111 page, they list a number of commands you can use, and how, as a suffix when starting the program.
When I use the VAE it really ruins details like hair etc compared to using no VAE and they aren't adding back in during the img2img process. Is there something I'm missing?
I'm following your instructions closely and seem to be having trouble. When I get to the hires fix step and blow the image up, it seems to wash out almost all of the color. When I send it to img2img and continue further it washes it out to point of being nearly grayscale or black and white. Any tips for maintaining color?
hmmm, that's a new one to me. sounds like the VAE isn't working on hires fix. I'm not aware of a setting that could cause that.
Interesting. I'll redownload the VAE and Upscaler and try again.
@micker did you find a fix for it?
I've had the same problem, you can fix this by enable the setting "Apply color correction to img2img results to match original colors." in the settings tab -> stable diffusion. (the same location where you can select the VAE)
where i can find Foolhardy Remacri upscaler ?
big blue download button in the top right
@Zovya Haha I read the tutorial and didn't realize it was bundled in. I guess I didn't read it very close.
How do I turn on VAE after I put it in the folder?
The VAE goes in your /stable-diffusion-webui/models/VAE folder.
Go into your settings -> user interface -> Quicksettings list and add sd_vae to the list. Save and reload and you should have a dropdown letting you choose your VAE.
Excellent model!!!! I have been struggling to get a good gen from my LoRa custom trained model, and I was successful in doing so with this model which is getting me very clean sharp images after a few tweaks here and there.
nice
Is there anything like this for the deforum side? Like video generation?
perhaps. the main concept here is re-img2img over itself with the same seed to get the high-contrast sharpen effect. I'm not familiar with deforum, but surely there's a process where that can happen.
Thanks man!! The detailed instructions with screenshots are awesome!
Hey man, thank you. That was incredibly kind and generous of you to take the time to construct that tutorial, and present it (at least to me) an incredibly easy (fully detailed) step-by-step. I really appreciate it (and I know others do to). Bravo
Thanks!
Hi, for the 4x-UltraSharp Upscale, I could just click "Send to extras" and match the # can't I?
Yeah if you just want to upscale the image. The process I'm showing here is to sharpen and give the image more contrast without having to make a big image.
@Zovya Ah okay, that makes more sense to me. Thank you! Great work by the way :)
The tutorial method takes a bit more but produces better images. You can try with different images.
Thank you.
Thank you, thank you, thank you. You have no idea how helpful this is to all those people new to SD, myself included.
Thank you so much - great tutorial, thank you for sharing your knowledge!
Right off the bat here, a detail that is left out is how to get the menu to set up the VAE at all, thus--
settings
user interface
scroll down to the quicksettings
add in: sd_vae,
(start typing, the drop down should find it)
Restart the UI
Thank you!
OMG! You are my angel! Thanks a lot!
For all the praise I heap on checkpoints that adapt to the things I want to make, THIS tool is the actual keys to the kingdom. This is the one 10/10 'must have' thing that exists that everyone must learn how to use. Basically every piece I've ever composed that I'm proud of has gone through a hires fix using this upscaler model.
And I don't use SDXL yet because I get far better results IMO using this technique.
Thank you.
Great tutorial
Just to be clear, when moving to img2img you aren't increasing the size once more? I'm using SDnext and I can either resize to a specific resolution (as in your tutorial), or I can upscale again. You don't suggest a secondary upscaling?
help plz the remacri upscaler wont show up on the list for me despite putting it in the correct folder
reload your ui
STILL a great process and your checkpoint/model is always spot on. I will occasionally ad "ADetailer" to the process, but not often needed.
you are amazin
Thanks for the quick tutorial.
2016x1360 and 1360x2016 resolution, without upscale. https://www.youtube.com/watch?v=RUax6GaR36k
I created high-resolution video using this model.
2016x1360 without upscale
4032x2720 4k upscale
https://www.youtube.com/watch?v=RtHUywiOHh0
vertical 1360x1840
1360x1360 = Wan2.2
2016x1360 = Vace 2.2
4033x2720 = FlashVSR
vram 24gb or more
RAM 64gb or more is required to attempt this
If the RTX Super series is released, this is a type of video that can be rendered relatively easily.
Details
Available On (1 platform)
Same model published on other platforms. May have additional downloads or version variants.