


Flux.2 (Dev/Klein) AIO workflow
Flux.2's use cases are almost endless, and this workflow aims to be able to do them all - in one!
- T2I (with or without any number of reference images)
- I2I Edit (with or without any number of reference images)
- Edit by segment: manual, SAM3 or both; a light version with no SAM3 is also included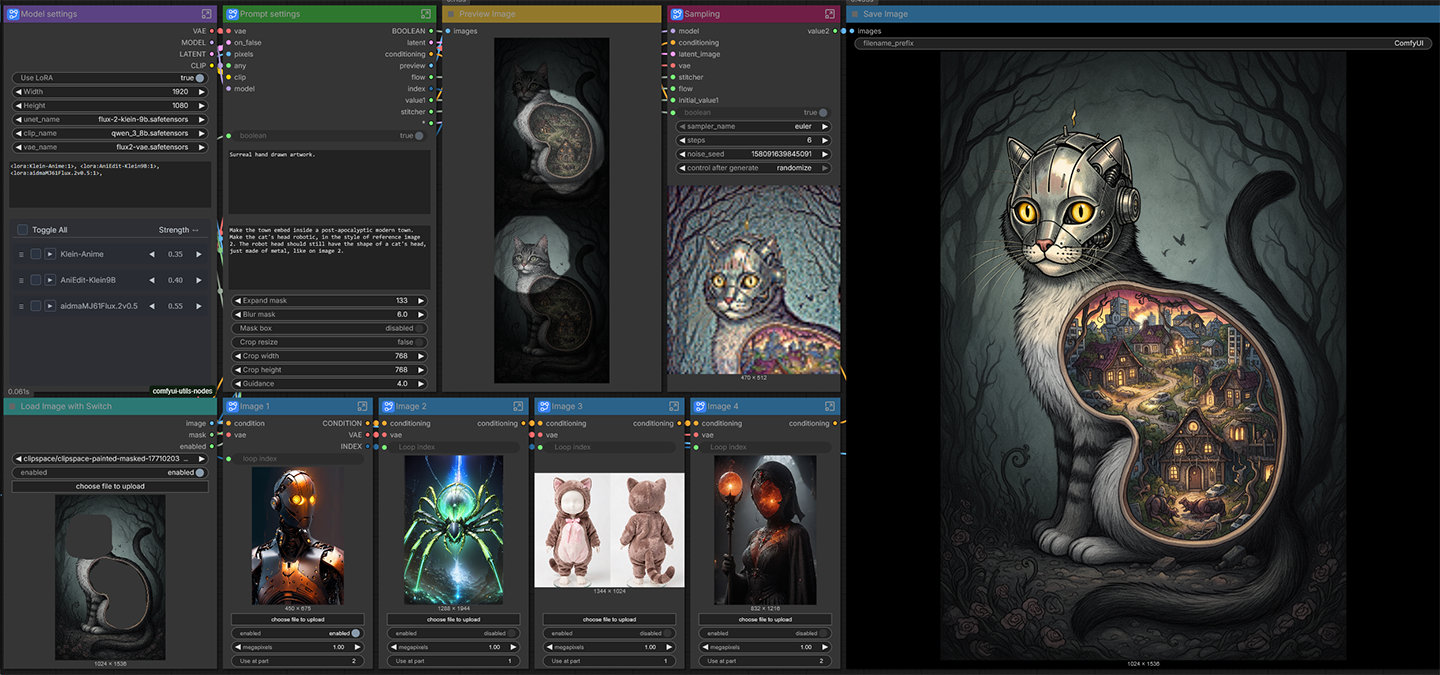
How to use (the full SAM3 model features in italic)
Load image with switch
This is the main image to use as a reference. The main things to adjust for the workflow:
- Enable/disable: if you disable this, the workflow will work as text to image.
- Draw mask on it with the built-in mask editor: no mask means the whole image will be edited (as normal). If you draw a single mask it will work as a simple crop and paint workflow. If you draw multiple (separated) masks, the workflow will make them into separate segments. If you use SAM3, it will also feed separated masks versus merged, and if you use both manual masks and SAM3, they will be batched!
Model settings (Model settings have different color in SAM3 version)
You can load your models here - along with LoRAs -, and set the size for the image if you use text to image instead of edit (disable the main reference image).
Prompt settings (Crop settings on the SAM3 version)
Prompt and masking setting. Prompt is divided into two main regions:
- Top prompt is included for the whole generation, when using multiple segments, it will still preface the per-segment-prompts.
- Bottom prompt is per-segment, meaning it will be the prompt only for the segment for the masked inpaint-edit generation. Enter / line break separates the prompts: first line goes only for the first mask, second for the second and so on.
- Expand / blur mask: adjust mask size and edge blur.
- Mask box: a feature that makes a rectangle box out of your manual and SAM3 masks: it is extremely useful when you want to manually mask overlapping areas.
- Crop resize (along with width and height): you can override the masked area's size to work on - I find it most useful when I want to inpaint on very small objects, fix hands / eyes / mouth.
- Guidance: Flux guidance (cfg). The SAM3 model has separate cfg settings in the sampler node.
Preview segments
I recommend you run this first before generation when making multiple masks, since it's hard to tell which segment goes first, which goes second and so on. If using SAM3, you will see the segments manually made as well as SAM3 segments.
Reference images 1-4
The heart of the workflow - along with the per-segment part.
You can enable/disable them. You can set their sizes (in total megapixels).
When enabled, it is extremely important to set "Use at part". If you are working on only one segment / unmasked edit / t2i, you should set them to 1. You can use them at multiple segments separated by comma.
When you are making more segments though, you have to specify which segment to use them.
An example:
You have a guy and a girl you want to replace and an outfit for both of them to wear, you set Image 1 with the replacement character A to "Use at part 1", image 2 with replacement character B set to "Use at part 2", and the outfit on image 3 (assuming they both want to wear it) set to "Use at part 1, 2", so that both image will get that outfit!
Sampling
Not much to say, this is the sampling node.
Auto segment (the node is only found in the SAM3 version)
- Use SAM3 enables/disables the node.
- Prompt for what to segment: if you separate by comma, you can segment multiple things (for example "character, animal" will segment both separately).
- Threshold: segment confidence 0.0 - 1.0: the higher the value, the more strict it will be to either get what you want or nothing.
Description
FAQ
Comments (26)
Your nodes are so organized. Brb, gonna spend the next few months trying to understand all the details xD
Thank you!
And I get that, whenever I see a very complicated workflow trying to understand them takes time :)
I tried to keep it as simple as I possibly could - but given how many things it can do, even that leaves a pretty complex workflow.
I'm struggling to make the workflow works :
Prompt execution failed
Node 'EmptyMask' has no class_type. The workflow may be corrupted or a custom node is missing.: Node ID '#14:504'
i have installed : ComfyUI_LayerStyle with the usual method
Is your Comfy up to date?
I'll try and see which one is that exactly.
Faceing the same error. Comfy is up to date.
Can not find this custom-node:
"properties": {
"cnr_id": "pr-was-node-suite-comfyui-47064894",
"ver": "ea935d1044ae5a26efa54ebeb18fe9020af49a45",
"Node name for S&R": "Text Load Line From File"
@Piepas Hello!
There has been a very crazy, very fast chain of Comfy updates these last 2 weeks or so.
When I have the time, I will remake this workflow - it seems like about 3-4 node packs have been properly included as core, or other workaround logic nodes with workaround were introduces, so it should substantially decrease the incompatibility issues when I properly replace them.
Hello, excuse me — were you able to use it? I’m having an issue where ComfyUI does not import the custom node "MaraScottIsEmptyOrNone_v1" even though I already installed it through the Manager. The folder "comfyui_marascott_nodes" does appear inside the "custom_nodes" directory.
When I open the workflow, it shows this message:
This workflow uses custom nodes that you have not installed yet.
MaraScottIsEmptyOrNone_v1 in subgraph "Prompt settings"
Hello!
Have you downloaded it very recently?
The day before yesterday I swapped that node from MaraScott nodes to one in EasyUse (already a part before) to avoid this error, since others have also noted the MaraScottNodes have a problem with the most recent pack.
So now the most recent pack shouldn't have that - if for some reason I uploaded the wrong version and it's there again, please notify me again - I'm planning on checking up on it after I get home, but I might forget!
Thank you so much for adding this workflow! I am having an issue (SAM3 version) with this error when loading the final image. I am attempting to change an image I already have with your example prompt, and have masked her, the preview comes up, and I have the bottom four images disabled (although they are outlined in red, which usually means an issue...). When I try to run the final image, Comfy shows:
Prompt execution failed
Prompt outputs failed validation: LoadImageWithSwitch: - Custom validation failed for node: image - Invalid image file: 832afeba346f9082614cac0200fb44a9.jpg LoadImageWithSwitch: - Custom validation failed for node: image - Invalid image file: 427c1062eb1eff1e92b5651281b062a8.jpg LoadImageWithSwitch: - Custom validation failed for node: image - Invalid image file: 9484f87353afabda910c1187a48e7600.jpg LoadImageWithSwitch: - Custom validation failed for node: image - Invalid image file: 7790f93a3ba3f7876c8e9aeceb0a795e.png
I found the custom node that includes "LoadImageWithSwitch," and the recommended version 1.4.2 isn't available on the list. The newest available is 1.4.1 in addition to nightly. Is the issue my version of the Utility nodes pack (includes LoadImagesWithSwitch), or that I'm not using any images in addition to the initial image with the segmentation and the prompt?
I appreciate your time and support! Thank you.
I figured out that dumb error. The input image had switched from enabled to disabled. However, I'm running into "Prompt has no outputs," now. Do I need to put in the plastic and the metal textures in the images at the bottom in order to get an output?
@oraclecollective25371
Hello!
Can you screenshot me your nodes as they are?
Update: I'll upload my before/after images in the gallery using the prompt that you had in the workflow.
@yorgash Sure thing (I'm the same person... bouncing back and forth between my boyfriend's computer and my own). Ooh, it looks like I have it figured out by tinkering around on my own for some of it. I didn't understand that I needed to load images into the four lower image loaders even if I'm not using them. On the main PC yesterday (I'm using a Chromebook connected to our network to run it today), the images weren't loading to the bottom four nodes for some reason.
I can usually figure most things out, but Oraclecollective has more of a background in IT, etc. He's out of town working, and I'm the one who has more time to work on things. If you are okay with it, I'll let you know if something falls apart on me >.> I'm so excited for this workflow!
When I mask and add "make the model wear the bag from image 1" it does nothing in the masked area
That shouldn't happen, making one wear a bad on any reference image has more than 99 percent success rate.
Have you set the reference image enabled and "use at part" correctly?
In this case, since we're talking a single mask, it should be "part 1".
@yorgash Yes I added reference image, then the clothing image in "Image 1" node, changed the use at part to 1, bypassed rest of the image nodes
I added the prompt "swap the clothing of the model in reference image with the clothing in image 1" in both prompt fields, it wasnt working when i put it in 1 field
Also the "enabled" switch isnt working thats why i had to bypass the rest of the image nodes
@mubdihussainshah Can you send me a screenshot of how you set the nodes up?
I have tested this on more than 7 different PCs with different ComfyUI versions, I think problems like the enable switch not working should not be a common issue, even though we all know Comfy can have weird differences, I made it pretty compatible compared to most workflows that are at least half as complex.
@yorgash https://i.postimg.cc/PqL4W92S/image.png Here is the SS of the workflow and here is the JSON https://pastebin.com/1nwgqi94
@mubdihussainshah I'll give it a try tomorrow, but one thing is that for the three bypassed image reference nodes you should be able to load any image, and then you can set it to disables without bypassing them.
@yorgash Oh okay thanks, let me know if you ge tthe time to go over.
This was exactly what I was looking for!! I've tried other workflows with Klein for InPaint, but they altered the ENTIRE image even when using a mask. This one only affects the areas covered by the mask, and it works perfectly with reference images. Thankss 🙌🙌
You're welcome!
I almost exclusively use this for generating, inpainting, editing.
Wow, this is an insanely well built workflow. Excellent Job!
Tried to use this as a novice, it's hard...
1) Light version, in attempts to run TXT2IMG throws warnings in console: "WARNING: LoadImage.IS_CHANGED() got an unexpected keyword argument 'enabled'" . It then generates absolutely random images that completely ignore my prompt. Idk how to fix this (and LLM doesn't help)
2) sam3 version relies on RES4LYF extension, which seems to be broken (at least on a modern portable ComfyUI on my side) - it causes mismatches in KSampler not only in this workflow but also in others that don't even use RES4LYF (so the workflows don't work)
This is a great workflow, but I have one, big ask: how in the world do you change the final image resolution without uploading a "blank" into the "Image with Switch" node?