


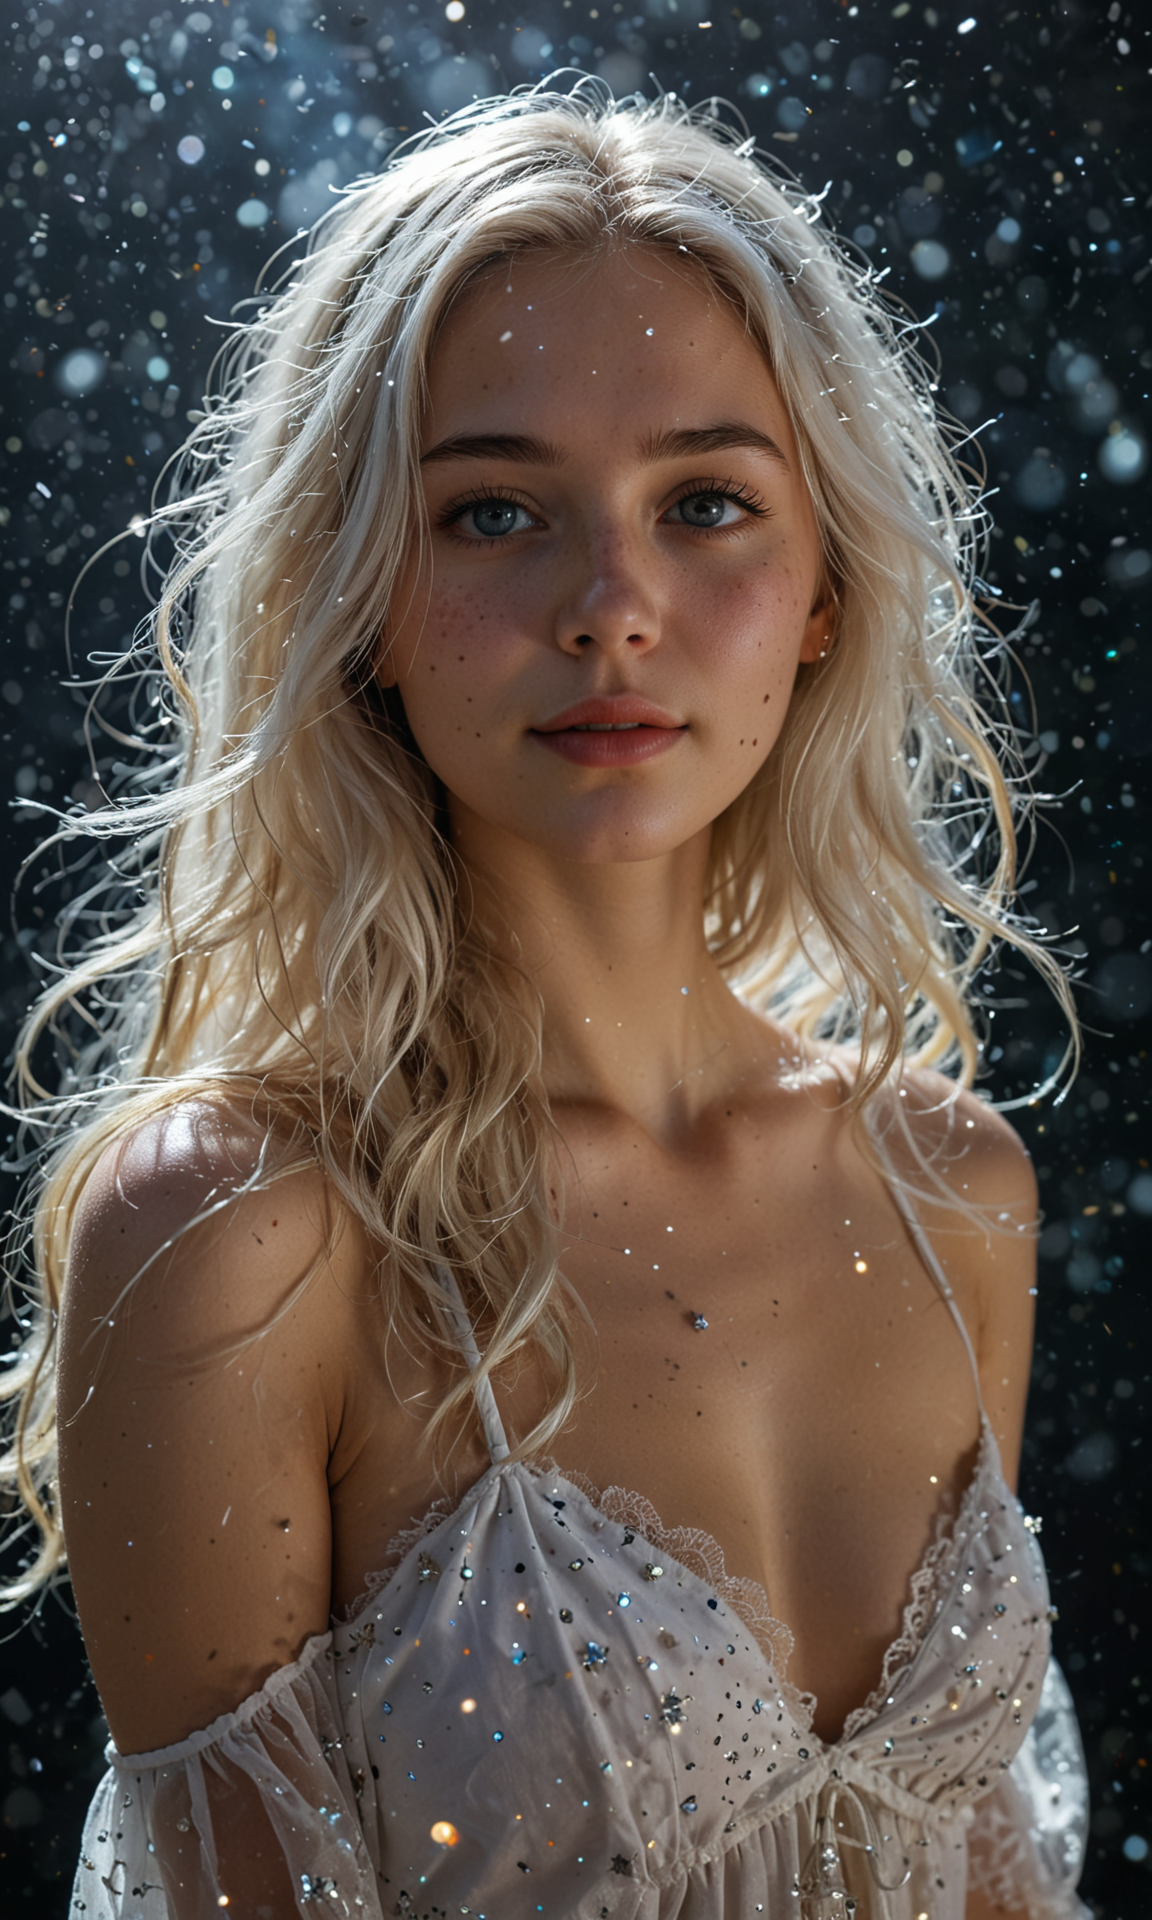
New Goal
I was tempted to start a new model name as my original goal was 4 steps and skin texture. This new model is best around 11-15 steps, but skin detail is still good (though if you are comparing to some FLUX models you will be disappointed). What started to get me about realistic models was the lack of support for non-real prompts; if I wanted to prompt a non-real skin color like blue or purple / and eye colors (like red or purple) I couldn’t. So, my focus this time was realistic, but capable of producing fantasy / sci-fi.
I spent a ton of time on this but I'm not charging... so tips are appreciated.
Illustrious
This is my foray into Illustrious models. I was so close to finishing a Pony v3 version and maybe I still will, but I don’t see as much interest in it these days (feedback is welcome). Anyways, Illustrious is a hard model to develop a realistic style for. I was originally drawn there because of the light contrast in v-pred... And I tried to create a version but after so many failed attempts I gave up for now. I still think there’s some good lighting control in this version but not as good as v-pred could have gotten. But lots of Illustrious models have either too smooth skin or this weird film grain that looks splotchy so wanted to give it a try.
I’ve trained this model from the ground up, training on about 1500 images which I manually tagged. My aim is to give a lot of control words to users... I’m still trying to find the right balance of tokens vs natural prompts and padding, so tags might not always work. It is also a DMD2 model, so trade off on CFG guidance vs Steps. I definitely will be tinkering with this in the future on newer releases.
THIS IS A HIGH RESOLUTION MODEL. It is trained on 1280 pixel images.
Settings
VAE: VAE is now baked in.
Sampling Methods: Euler A gives best results this time around, wanted to keep it simple. LCM can work too but it tends to smooth out details like skin and textures, but you might want this. One trick is to use LCM as main sampler and then Euler A for Hires to add a bit more detail back.
Schedule Type: Karras works best, Align Your Steps and Turbo works pretty good too.
Steps: As mentioned above, I balanced this around 11-15. If you want to get to 4-5 range, you can mix in <lora:dmd2_sdxl_4step_lora:0.4>. However, there are some sacrifices in details and your ability to use much range on CFG (which is already limited).
CFG Scale: Between 1 - 2. The lower the number, the more neutral and realistic the colors, higher is a little bit more vibrant. But let me warn you, if you use a low number it hinders your ability to use a negative prompt if that is important to you. At 1, negative prompt is disabled, at 1.5 I had a hard time getting the negative prompts to be consistent. I found at 2 that it actually starts to listen. If you use the 4-5 range above, you’ll be limited to 1 - 1.25 (again limiting negative prompt).
Resolutions: This is a high resolution model, so it’s best at scale 1280, however, you can absolutely still use it at 1024.
1280x1280
1152x1408
1024x1536
896x1664
Hi-Res. fix: Because the resolution is already high, I would limit your Upscale By ratio to 1.25. You can do 1.5 if you want to but it will be slow. I use 4x_NMKD-Superscale-SP_178000_G as my upscaler of choice. Steps match sampling. Denoising at 0.25. Pretty standard.
TAG GUIDE
This guide is a reference, it does not mean the model will follow it all the time and it is not comprehensive as Illustrious itself has tons of tags.
QUALITY
You don’t need all the masterpiece, very awa, year 5000 filler tags. Use if you want, but it’s a waste of a token if you ask me. If you want you can use anything with the word quality / resolution, like best quality, high quality, amazing quality, high resolution, or bad / low quality in negative. They are not needed, the quality should be pretty good out of the box.
CAMERA
Zoom:
Closeup / Portrait, Medium Shot, Cowboy Shot, Full ShotThis one frustrates me and will try to keep improving, I had more tags but they are very inconsistent.
Angle / Orientation:
High Angle / From Above
Low Angle / From Below
Side View
Back View / From Behind
Upside Down (head is closes to camera than body)
Titled Angle, Dutch Angle (Had this working and now it’s not)
Focus: Say the part of the body you want to focus on for a closeup. Examples:
Feet Focus, Face Focus, Back Focus, Breast Focus, Butt/Ass Focus... You get the idea.STYLE
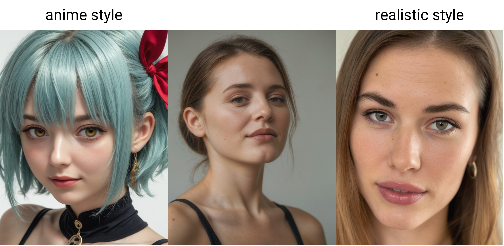
Realistic Style, Anime StyleBase Style (don’t have to add anything): Just my own personal style I like and is default
Realistic Style: More photo like, more skin blemishes, skin detail, less cleft chins, more variety in ethnicity
Anime Style: Smoothed out skin, larger eyes, variety in hair colors and styles and facial expressions
Cosplay
This is still experimental, I had it working so well in my not released Pony 3 model. Sigh. Anyways, if you add the tag cosplay, it will take the character and have someone look like they are dressing up as that person, rather than it look just like them. Still working on this, more successful if you use the realistic style
No People
I’m realizing I didn’t do a great job of this so this is one area for improvement, but if you want to get rid of people showing up, here are a few tips:
Use the subject you want and then photography. Examples:
Food Photography, Landscape Photography, Macro Photography, Product Photography, Wildlife PhotographyNo person, No PeopleLighting
They don’t all work all the time but give them a try:
dim lighting
Dark lighting / room
studio lighting
natural lighting
soft lighting
candlelit lighting
indoor lighting
outside lighting
bright lighting
moody lighting
dramatic lighting
stage lighting
[color] lighting / filter. Best paired with Dim Lighting and Dark Room / Lighting 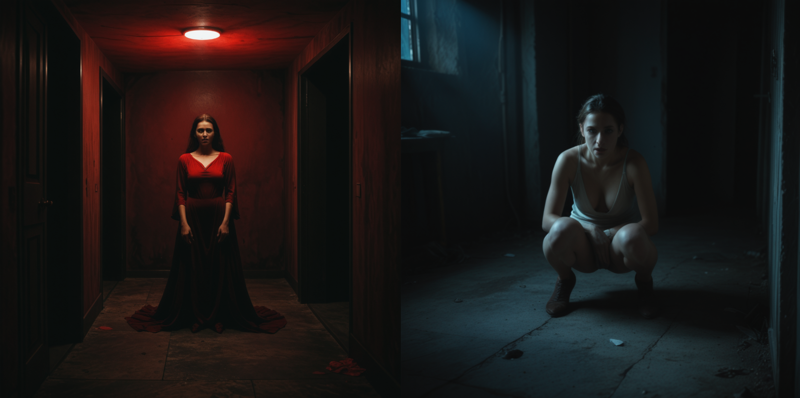
BODY
Skin Color:
fair skin, light skin, pale skin, olive skin, tan skin, medium skin, dark skin, black skin, white skin, grey skin, red skin, orange skin, yellow skin, green skin, blue skin, purple skin

Sizes / Shapes:
Thin, Petite, Slender, Slim, Curvy, Chubby, Fat, Athletic, Muscular, Thick Thighs, Thigh GapBreast Slider:
flat chest, small boobs, perky breasts, medium boobs, large boobs, huge boobs. Can use boobs or breastsButt Slider:
small butt, large / round butt, big / huge buttFacial Control:
High Cheekbones
Sharp Face
Round Face
Long Face
Cute Nose (gives more of a rounded nose)
Parted Lips
Open Mouth
Full Lips (puffy lip look)
Tongue Out
Eyes Closed
Makeup / Markings:
Eyeliner
Blush / Blushing
[color] lipstick
Lipgloss (shiny)
Tattoo / Tattoo on [body part]
Freckles
Eye Color:
Blue Eyes
Green Eyes
Red Eyes
Pink Eyes
Purple Eyes
Orange Eyes
Yellow Eyes
Black Eyes
Brown Eyes
Grey Eyes
Amber Eyes
Hazel Eyes
Heterochromia
Glowing Eyes
Expressions:
Happy / Smiling
Sad
Neutral Expression
Serious Expression
Sexy Expression
Playful Expression
Angry
Surprised Expression / Shocked Expression
Poses:
Standing, Sitting, Kneeling, Squatting, Doggy Pose, Laying on Stomach, Laying on Side, Arm Support (leaning on an arm), Leaning Back, Handstand, Leg Split, Leg(s) Up (Leg if you just want one, Legs if you want both), Yoga Pose, Bent Over, Legs Spread, m-pose (laying back and legs are spread with knees up), Bent KneeAnthro (Furry) / Creatures
It is really hard to get a model to do either a real creature, or a furry. I think I have it 80% there. Pony was really good at Anthro, but terrible at creatures. If you want a boy version, it is better to use the tag male, but I didn’t train much on male furries, sorry.
[Creature] = Just creature

[Creature] Girl / Woman = A woman dressed up as that creature.

[Creature] Girl / Woman, anthro / anthropomorphic = Changing into that creature (mileage may vary and could be a complete furry)

[Creature] Girl / Woman, furry = Well... A Furry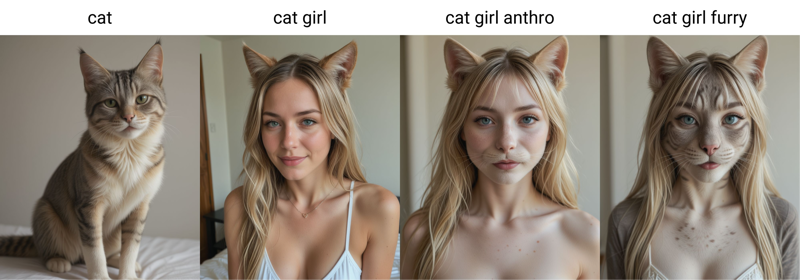
I trained on lots of creatures but it’s not as robust as I’d like, robust meaning, be able to extend to things you haven’t trained (Pony was really good at this), so your mileage may vary.
Also trained on non-real creatures:
Slime Girl, Tieflings, Elves (including dark elves, and night elves), Demons / Succubus, Fairies, Giantess, Monsters, Goblins, Orcs, Dwarves, Lamia (half snake, but pair with half snake half girl for better results), Oni, Robots, probably missing some...PONY
Goal
I really enjoy the SDXL Lightening models, for their speed and image quality. However, I didn’t like the fact that SDXL seem to smooth out the skin to where it seemed too “perfect”, a little too plastic for my liking. One of the best workarounds is to generate in SDXL and then use ADetailer with a 1.5 model for the face. My goal was to see if I could get close to generating faces without that extra step or at least not switch models. This model was developed for photography only, not for anime or art, there are better models out there for those.
PONY VERSION 2
I feel like I relied too much on hires fix and did not give enough focus to regular image quality in the last release. I’ve fixed that this time around; you’ll see the first several image examples are normal quality. By fixing this, the high quality (hi-res fix) images turn out even better than before (some examples there too). Also with this release, I relaxed the settings so as to allow a greater degree of freedom. Lots of good Pony models out there, but they don’t seem to be TURBO models, this gives you the choice between fast (4 steps) and good quality, or regular speed (15+ steps) for great quality. You don’t even need a long prompt or all the score prompts, first image is as basic a prompt as you can get.
Settings
VAE: Baked in
Sampling Methods: LCM works best. Euler A can work in a pinch now at certain settings but, it’s not as good as LCM, as the skin texture looks a little fake but feel free to try (hi-res fix seems required). Stay away from DPM.
Schedule Type: A lot more options, at 4 steps, DDIM or Karras. If you do more than 10 steps, you can also use Beta and Normal, 15 or more can also add SGM Uniform.
Steps: From 4 steps on. If you want more details without turning hires fix on, feel free to increase this.
DDIM / 4+
Karras / 4+
SGM Uniform / 15+
Beta / 10+
Normal / 10+
CFG Scale: 1 - 1.5. I actually like 1.25 the best, but feel free to find what works best for your style.
Other: Everything else should be the same as any other SDXL model, such as resolutions, loras, controlnets, etc.
PONY VERSION - DPM
I had a request to create a DPM version for those that can't do LCM. For the record, I think LCM produces a better image, but I understand DPM is more common.
Settings
VAE: Baked in
Sampling Methods: DPM++ SDE or DPM++ 2S a
Schedule Type: Karras or DDIM
Steps: 4 Steps. Can go to 5 if you want.
CFG Scale: 1 - 1.5 (1 as base, 1.2 if you want to brighten up the image)
Since this model is the same setting recommendations as my SDXL 4-step one, the Lion image is an example of using the SDXL model and then using Pony Version DPM to do the Hi-Res Fix.
PONY VERSION - LCM
Alright, I finally got around to creating a Pony version. SDXL has some amazing capabilities, but Pony is more flexible with prompts and character Loras. That is why every showcase photo I chose to show a character Lora to show what it can do. I’ve included other images showing off the model itself in a separate upload below.
Settings
VAE: Baked in
Sampling Methods: LCM! This is different from other models, but it gives great detail in the skin and it's super-fast. You can use Euler A in a pinch if you don't have access to LCM, but it gives more artifacting.
Schedule Type: Karras! Again, different from the last one. If you use Euler A, use either SGM Uniform or Beta (DDIM if you're feeling risky and want a more muted color palette).
Steps: 4 Steps. Finally got it down to a true 4 step model.
CFG Scale: 1 - 1.2 (1 as base, 1.2 if you want to brighten up the image)
Other: Everything else should be the same as any other SDXL model, such as resolutions, loras, controlnets, etc.
Hi-res: Settings are the same, LCM and Karras, but it’s also only 4 steps and because the speed of this is so fast, I just always render with Hi-res fix enabled and a denoise set at 0.3
Mixing: Something I also enjoy doing is taking my SDXL model (though I made an LCM version if anyone is interested in that) and setting that to the initial checkpoint and then setting the Hires. Fix checkpoint as the Pony version. It works wonders and I uploaded one example of that in the second list of images.
4-STEP VERSION
Had some requests for a 4-step model, so I created this one. I can't say it's a true 2.0 version as I had to stabilize it with a tad bit of mixing, but I think it's closer to 2 than my next version and I tried to make it better in most generations. More notes below, but at a summary, while this can do 4-steps, I find 5-steps gives a touch more clarity but clearly you are free to test it out yourselves.
I don't know if people are familiar with 4-step Lightening models, so below are my recommendations for this model, as they are different from the other 8 step versions. Curious to see which version people like better (continue an 8-step version or just switch to 4 steps). I find 8-steps does give sharper results at a base level, however, the extra step reduction means faster processing and upscaling works very well so certainly a time saver. I've included a mix of base level images, upscale images (out of box upscaling), and then I've also included 2 examples of img2img upscaling.
My Settings
Again, feel free to experiment, these are just mine
VAE: Baked in
Sampling Methods: List in order of my favorites: DPM++ 2S a, DPM++ SDE, DPM++ 2M SDE Heun, DPM++ SDE, DPM++ 2M. Not a huge fan of Euler or Euler a as the results either look too blurred or too sharp, but again, feel free to experiment.
Schedule Type: SGM Uniform!
Steps: 4-8, 5 being the sweet spot for me. 7-8 can give sharper details but the skin starts to look fake.
CFG Scale: 1 - 1.2 (1.5 if you really want to push it but you start getting artifacts after that), just stick with 1
Other: Everything else should be the same as any other SDXL model, such as resolutions, loras, controlnets, etc.
Img2Img Upscaling / Style Changing
I've included two examples of upscaling and I feel Upscaling gets a bad rap for upscaling as most good upscale methods were really designed for 1.5 models (like ultimate SD upscale). However, I just wanted to show two examples using Automatic1111, but I think ComfyUI could work too (though I didn't include those).
Ultimate SD upscale
The first (Cyberpunk girl) is putting the image in img2img and then using the Ultimate SD upscale. Results will vary because it does not like SDXL, but if your base image can be done in one pass (rather than tiled which gives bad results at the seems and I've tried increasing the padding, mask blur, Half tiles, chess, results aren't consistent), then you can get decent results. Set to Just Resize, and same sampling as above.
Prompt: You don't need much in the prompt, even something as simple as "detailed" can work.
Target Size: Scale to image size but make sure your base image is within the regular SDXL size outputs above.
Scale: 1.25 - 1.5 (Any higher and it will start creating bad seems)
Upscaler: Use your favorite, I like 4x_fooldhardy_remacri, 1x-ITF-SkinDiffDetail-Lite-v1, but out of the box R-ESRGAN 4x+ can work too (though skin looks a little fake).
Tile Wdith: Set to whatever your image width is, so if you have a 768x1280 image, set it to 1280
Tile Height: I just keep it at 0, but feel free to set it the same as image or other consistent SDXL setting.
Denoise: 0.2-0.6, really depends on type of image. There are two aims here, are you looking to upscale the image or are you just trying to make change the style of a picture to this model? If you're just wanting to increase resolution or size, keep the denoise low. The lower the number, the less you are changing. Generally, I start at 0.3 but 0.5 looks good too.
Mask Blur: 8,16
Padding: 32,64,128
Out of the Box, SD Upscale / ControlNet
(Beach girl), I kind of prefer this method as it seems to give more consistent results but you have to do your upscaling in stages (whereas Ultimate SD does the stages for you). This gives you more control over each pass. Just pick SD upscale on the img2img tab under Scripts. Set to Just Resize, and same sampling as above.
Prompt: Detailed can work as mentioned above if you're doing a low denoise, if you go higher, you'll want to use Interrogate CLIP on your image first to create a similar prompt.
Tile overlap: 128
Scale Factor: 1.25 - 2
Upscaler: Same as above
Denoise: Same as above. I like to upscale my images in stages, so I'll start low, and slowly start changing the images, probably 2-3 times if it's an anime image, maybe only 1 time if it's already photorealistic.
ControlNet: Using controlnet gives better results, can stick with a basic OpenPose, but Depth and Canny work as well. Just make sure you get the SDXL models. I keep the settings at default.
If your goal is to change the style and you're doing multiple passes, you'll want to resize the image back down after each pass to the original size either through an external tool or using the Resize to (just resize (latent upscale)) to the base.
8-Step Version
Model
I created a large dataset of around 400 high quality images from my custom 1.5 model. I then turned that into a lora style and then blended it back into a model that was blended from the two below. The result is that skin textures have more texture, more imperfections, cracks, pores, details, etc.
RealVisXL V4.0 - V4.0 Lightning (BakedVAE) | Stable Diffusion Checkpoint | Civitai
Pixel Alchemy - H v2.0 | Stable Diffusion Checkpoint | Civitai
Photo Examples
I am not the best when it comes to creating good prompts, so many are borrowed, and many are from a random prompt generator. I've included some basic prompts as well to show that the verbose of some of the prompts is not necessary, even a simple prompt can generate high quality images.
Like most SDXL models, adding in score_9, score_8_up, score_7_up, score_8 to the positive prompt and adding a combination of score_1, score_2, score_3, score_4, score_5, score_6 in the negative can improve image quality.
My Settings
Feel free to find your best settings, these are just mine.
VAE: Baked in
Sampling Method: DPM++ SDE or DPM++ 2S a
Schedule Type: Karras
Sampling Steps: 8
Image Sizes: 1024x1024, 768x1280, 832x1216
CFG Scale: 1-3 (2 is usually the sweet spot)
Clip Skip: 1-2 (I know most SDXL models set this to 2, and you can too, but since this is focused on photography it doesn’t matter much).
HiRes
Upscaler: Your choice but I like 4x_NMKD-Siax_200k
Hires Steps: 8
Denoising Strength: 0.3-0.6
Hires CFG Scale: 2
Upscale By: 1.5
Description
4-Step version
FAQ
Comments (3)
I don't know why your checkpoints aren't a bigger deal. I've been blown away by every version of CR. Amazing work.
That's very kind of you! Pony and Flux get all the attention these days, but really appreciate it!
Man you're models are just awesome, I'd love to have a chat with you, I'm really blown away by your work !
Did you learn everything by yourself ? 😯