
Please do not use for harming anyone, also to create deep fakes from famous people without their consent. Not intended for making profit. I don’t take responsibility of your actions for using this guide.
------------------------------------------------------------------------------------------
This guide only follows educational purposes.
If you enjoy the work I do and would like to show your support, you can donate a tip by purchasing a coffee or tea. Your contribution is greatly appreciated and helps to keep my work going. Thank you for your generosity!
https://ko-fi.com/gswan
https://www.buymeacoffee.com/gswan
------------------------------------------------------------------------------------------
This isn't a guide on how to install stable diffusion, but you can find the version I'm using and install instructions here: https://github.com/AUTOMATIC1111/stable-diffusion-webui
You will need the following models to follow along with this:
sd-v1-5-inpainting.ckpt - https://huggingface.co/runwayml/stable-diffusion-inpainting
f222.ckpt - https://rentry.co/sdmodels#zeipher-f222-female-nude-better-anatomy
Here's a quick guide on the workflow. we're able to invent new parts of the image that didn't exist before.: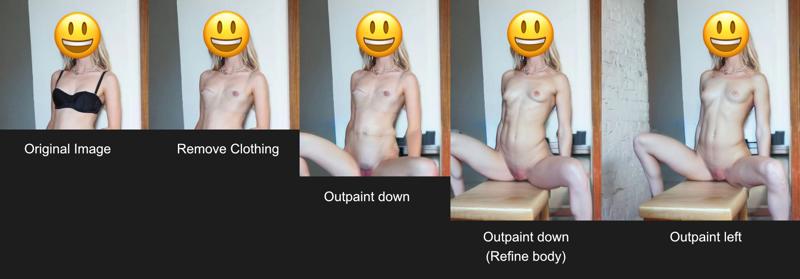
This all takes a bit of time and patience, but the results are well worth it. This one was actually a rush job so I had something to sue for this example, and it still looks pretty decent! A lot more time could be spent refining it, but I think it's enough to get the message across.The best part is, this method works on people who are fully clothed, so you don't need an image of them wearing a bikini. Anything will do
Here's the basic steps I use to achieve something like this:
Before doing anything, make sure to go to settings and check "Apply color correction to img2img results to match original colors." Also check "Save a copy of image before applying color correction to img2img results." This can come in handy, as sometimes the nude looks great in the preview, until it finishes and colour corrects back to the colour of the clothes that were once there. If this happens, go to your image folder and use the non colour corrected version.
Another important thing to note is that you may want to avoid using large images. I've found best practice is to just open the image on your monitor and use the snipping tool to grab a screenshot of it. Then you can check "Inpaint at full resolution" and everything will work great. Going in with higher res images can sometimes lead to unexpected results, but sometimes it works too so do whatever you want.
First use sd-v1-5-inpainting.ckpt, and mask out the visible clothing of someone. Add a prompt like "a naked woman." Sometimes it's helpful to set negative promps. I use "clothes, clothing, cloth." Set to fill. Sampling method=Euler, steps=80 (Sometimes 80 is too high, so feel free to try 40 as well), CFG=7, Denoising=0.75
Switch to f222.cpkt. Mask the entire body. Set to original. Sampling method=Euler, steps=80, CFG=7, Denoising=0.3 (Go lower to keep it closer to what's already there, higher to generate a slightly better version. Just don't go too high or you'll get something different all together).
For outpainting (creating parts of the image that don't exist) switch back to sd-v1-5-inpainting.ckpt. You can try Fill or Original for this, but usually Original works best. Sampling method=Euler a, steps=80, CFG=7, denoising=0.8. It's best practice to only outpaint in one direction at a time. As for the prompt, you don't need to include too much. You could just use "A naked woman standing," but sometimes something like "a naked woman squatting" or "a naked woman sitting" does the trick. It's not always necesary, but you may include some background elements. For this one I simply put "a naked woman squatting, legs spread, splits."
Once you've got an outpainted image that you are happy with, use sd-v1-5-inpainting.ckpt with the same settings as earlier to remove or fix up anything you don't like. Then switch over to f222.cpkt to clean up the body a bit and make it blend in wit the rest.
Repeat all steps until done!
I hope this information is helpful to some people. Of course, there are various approaches that could be utilized to address the issue. With the use of Photoshop, you can even make rough adjustments to the pose of individuals, re-import them, and repeat the same steps multiple times. There is also the option to obscure someone's face using a mask and then complete the rest of the image. So many options. Enjoy! Happy Diffuzing.
Legal and risk management.
Using this model for commercial purposes or any illegal activities is strictly prohibited.
The model has been designed using explicit material. To ensure compliance with local laws and regulations, it's important to use this model appropriately.
I firmly oppose the implementation of this model for producing any kind of inappropriate content. It is important to follow local laws and regulations when utilizing this model. Additionally, users must not infringe on the rights of others in regards to their reputation, privacy, or image.
According to my perspective, utilizing this model for making content that is meant for mature audiences is not suitable. The user of this model must ensure that they follow the laws and regulations that are applicable in their local area. Additionally, they should be careful not to violate the rights of others, including their rights to privacy, honor, or publicity.
Description
Simple Guide