Huslyo123’s ComfyUI Photorealistic Workflow
Are you new to ComfyUI and want to create stunning, photorealistic AI images without getting lost in all the nodes and settings? This guide is for you. I’ll walk you through my personal workflow, tested on a clean ComfyUI install.
Every step is explained with screenshots, examples and tips. Whether you’re just starting out or switching from A1111, this workflow will help you get consistent, high-quality photorealistic results fast.
Update: V3 is the most beginner friendly and stable workflow! Use that one
🔍 What is the Huslyo123 Photorealistic Workflow?
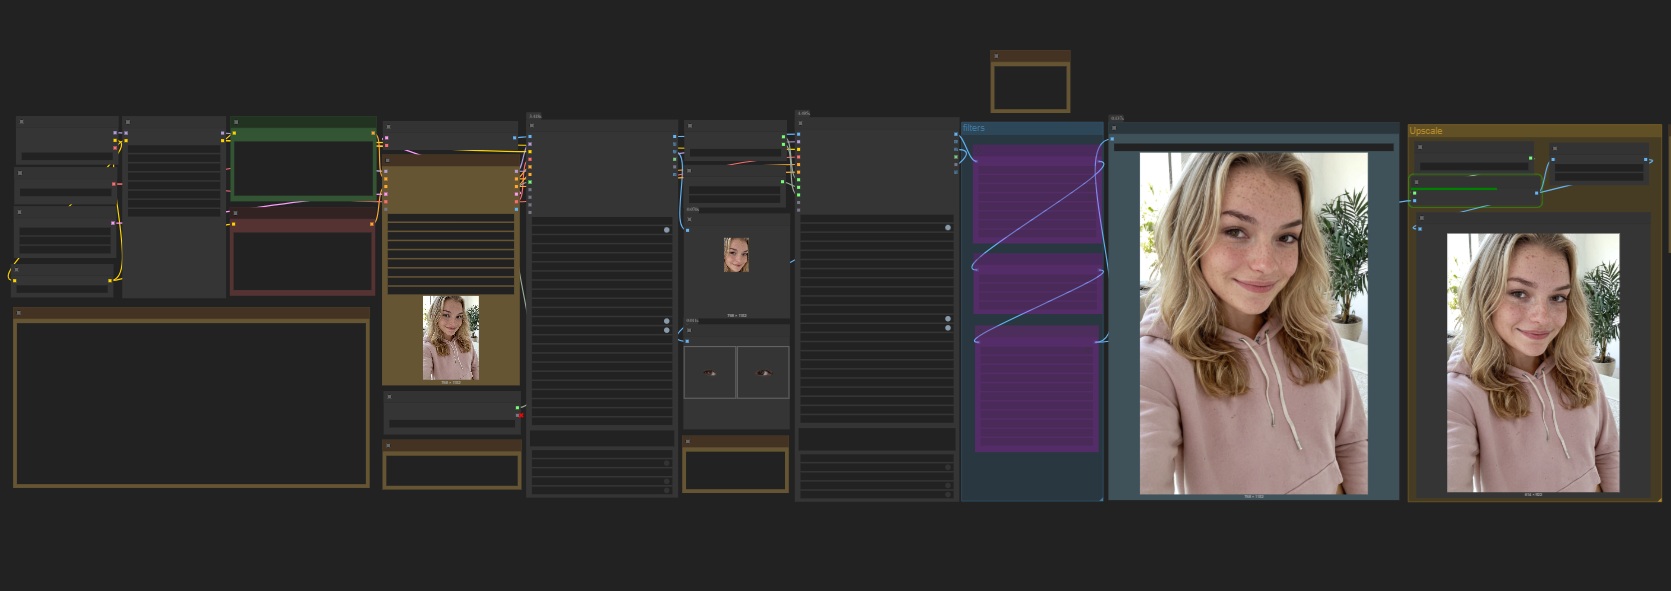
This is a clean and simple ComfyUI workflow, designed for use with most SDXL checkpoints. It’s beginner-friendly, but also a solid base if you want to expand into more advanced setups.
The workflow includes:
2 Face Detailers, one for the full head and one specifically for the eyes
Carefully tuned settings for sharp, realistic results
A flexible layout that’s easy to tweak and adapt
Easy to install, no weird or obscure nodes, everything is installed through the built-in Custom Nodes Manager
Grain filters: for added realism (only in V2. Replace them in V3 with my Touch of Grain LoRA)
Upscaler: for sharper and more realistic images
Perfect if you want to get great results fast, or use it as a starting point for your own photorealistic workflow.
✨ Want to create consistent character models, explore A1111 workflows, and get exclusive guides & tips? -> https://www.fanvue.com/huslyo123/fv-3
Curious what’s included? Full overview here → https://huslyo123.carrd.co/
Looking to train your own character LoRA – one that works for Instagram-style content, Fanvue, or OnlyFans?
Inside my private Discord, I share in-depth guides that walk you through the full process, step by step.
You’ll also get access to:
• My advanced Automatic1111 photorealistic workflow
• Hundreds of ready-to-use prompts for the best (NSFW) images
• Discord-only LoRAs
• Direct support from me and feedback on your AI work
• Ongoing updates, bonus content, and surprises
🧠 Whether you're a creator or just curious, this is where I share everything I know.
Step 1: Install Stable Diffusion with Stability Matrix (skip if already installed)
If you don’t have Stable Diffusion installed yet, go to https://lykos.ai and download Stability Matrix, a free and open-source desktop app. This is the same tool I personally use and I highly recommend it for beginners (not affiliated).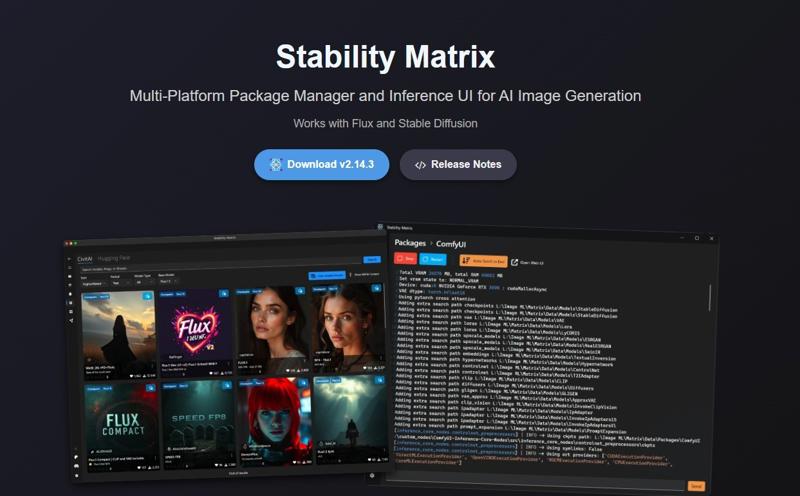
Why Stability Matrix?
• It installs everything you need to run Stable Diffusion: Python, Git, required libraries like numpy, and more, all with the correct versions.
• It keeps your environment stable and up-to-date.
• You can easily manage and share models, LoRAs, embeddings, and VAE files between ComfyUI, Automatic1111, Forge, and other tools.
Once installed, you’ll be ready to add ComfyUI in just one click.
Step 2: Install ComfyUI
Inside Stability Matrix, click the “+ Packages” button in the left menu and select ComfyUI from the list.
Click Install and wait for the process to finish.
That’s it. You now have a clean ComfyUI setup.
Step 3: Install ComfyUI Manager
Before installing the manager, make sure you have Git installed.
Download Git from: https://git-scm.com/downloads/win
Run the installer. The default settings are perfect, just click Next until it's done.
Now let’s install ComfyUI Manager:
Go to your ComfyUI custom_nodes folder. If you installed via Stability Matrix, the path will look something like:
C:\Users\your-name\Stability Matrix\Data\Packages\ComfyUI\custom_nodes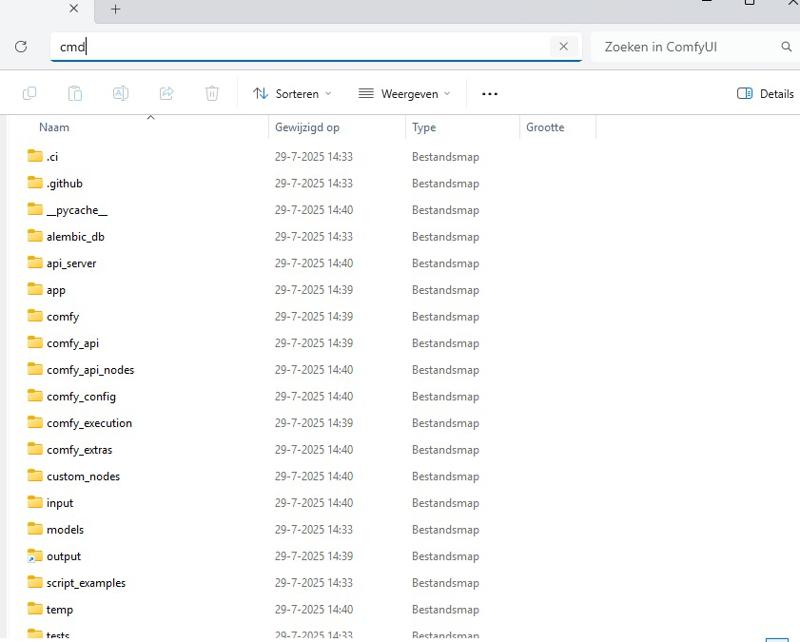
Click the address bar at the top of the folder window, type cmd, and press Enter to open a terminal in that location.
In the terminal, paste:
git clone https://github.com/ltdrdata/ComfyUI-Manager comfyui-manager
Restart ComfyUI.
You’ll now see a “Manager” tab inside ComfyUI. This makes it super easy to install and update nodes directly inside the interface.

Step 4: Download My Workflow File
Download the .json file on this page called:
Huslyo123 Photorealistic Workflow SDXL – ComfyUI [version number]
Then:
Start ComfyUI (this may take a while the first time, as it sets up everything in the background)
Once ComfyUI is open, drag and drop my .json file into the canvas
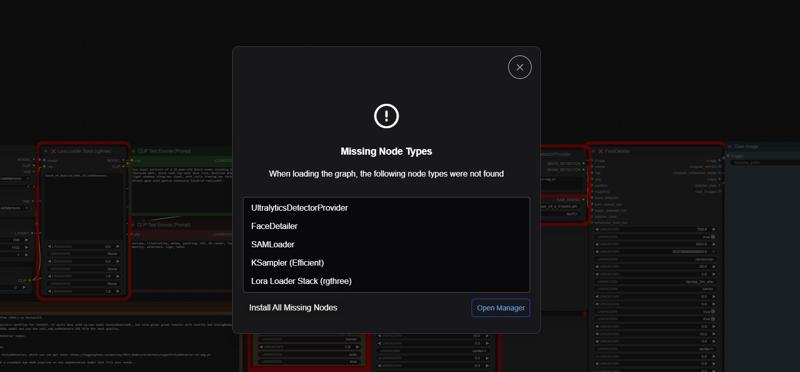
You’ll now see my full workflow. Some nodes will likely show up in red, that’s normal!
Thanks to ComfyUI Manager, you can now click the “Install missing custom nodes” button at the top.
Then click “Install All” and wait for the process to finish.
Once done, restart ComfyUI. Starting ComfyUI may take a bit longer after this step, and sometimes it won’t launch on the first try. Just click the green Launch button again if needed.
Step 5: Install Checkpoint, VAE, LoRA, and Eye Detailer
To run this workflow correctly, you’ll need to install a few key files: a checkpoint, a VAE, a LoRA, and an eye detailer model.
🔹 Checkpoint
For best results, use a photorealistic SDXL checkpoint. I personally recommend my own HuslyoRealismXL (experimental V1), but if you'd prefer something else, try AnalogMadness or Lustify, both are excellent.
Place the .safetensors file into:
C:\Users\your-name\Stability Matrix\Data\Models\StableDiffusion
🔹 VAE (sdxl_vae.safetensors)
Go to: https://huggingface.co/stabilityai/sdxl-vae/tree/main
Download the file named sdxl_vae.safetensors by clicking the download icon.
Place it in:
C:\Users\your-name\Stability Matrix\Data\Models\VAE
🔹 LoRA
I always use my Touch-of-Realism LoRA in this workflow. It adds that extra layer of realism, even with HuslyoRealismXL.
You can use this or any other LoRA you like. Place the file in:
C:\Users\your-name\Stability Matrix\Data\Models\Lora
🔹 Eye Detailer (PitEyeDetailer)
SDXL models need an eye detailer for sharp, realistic eyes. I recommend:
PitEyeDetailer-v2-seg.pt
⚠️ Windows might warn that this file is unsafe. I ignore this myself because multiple scans show it’s safe.
C:\Users\your-name\Stability Matrix\Data\Packages\ComfyUI\models\ultralytics\bbox.
🔹Upscaler (V2 only)
If you use the V2 version of the workflow. Download the upscale model
https://huggingface.co/FacehugmanIII/4x_foolhardy_Remacri
Place the file in C:\Users\your-name\Stability Matrix\Data\Models\ESRGAN, or if you use a standalone version of ComfyUI, in the \ESRGAN folder.
✅ You’re ready!
Start ComfyUI, load the workflow, and you’re now able to create photorealistic images in just a few clicks.
Want examples?
Check out my CivitAI profile, where I’ve posted over 2,700+ images – each with full prompts included so you can recreate them directly in this workflow:
👉 https://civarchive.com/user/Huslyo123
✨ Want to create consistent character models, explore A1111 workflows, and get exclusive guides & tips? -> https://www.fanvue.com/huslyo123/fv-3
Curious what’s included? Full overview here → https://huslyo123.carrd.co/
Description
If you like this workflow and guide, leave a thumbs up on this page. It really helps a lot!
V2 of my basic ComfyUI Photorealistic Workflow includes an optional grain filter for added realism, and a built-in easy upscaler using my favorite upscale model: https://huggingface.co/FacehugmanIII/4x_foolhardy_Remacri
Place the file in C:\Users\your-name\Stability Matrix\Data\Models\ESRGAN, or if you use a standalone version of ComfyUI, in the \ESRGAN folder.
FAQ
Comments (8)
Encountering an error when using the Low Quality filter and the upscaler. Other than that, this is a big upgrade over your first gen workflow! Really great stuff as always.
view size is not compatible with input tensor's size and stride (at least one dimension spans across two contiguous subspaces). Use .reshape(...) instead.
I get the same error with all the filters enabled
Hello, pls send me discord invite
Hi. All my links are on https://huslyo123.carrd.co/
heyaaa, im trying to generate with your checkpoint and woman877 loras with this workflow, trying to get her with with outfits, but everytime it generates her with naked breasts, how to fix it? or what settings to use in your workflow? please help!
You are probably using the NSFW version. I uploaded a new SFW version a while ago:
https://civitai.com/models/1750662?modelVersionId=2043110
From the LoRA text:
To avoid overly revealing or unintended results, set LoRA strenght to 0.6 and be as specific as possible when describing clothing. For example:
"wearing a long-sleeve high-collar floral print dress that falls mid-calf, cinched with a narrow leather belt, black tights and loafers"
You can also guide the output by using a strong negative prompt. Add to the negative prompt: naked, nude, cleavage, underboob, sideboob, sheer, see-through, lingerie, exposed breasts, nsfw, nipples, areola, erotic to steer clear of NSFW content.
I get this error (last line):
"100%|██████████████████████████████████████████████████████████████████████████████████| 20/20 [00:24<00:00, 1.25s/it] Requested to load AutoencoderKL 0 models unloaded. loaded completely 9.5367431640625e+25 319.11416244506836 True [Impact Pack] vae decoded in 1.3s 0: 640x448 2 eyes, 76.9ms Speed: 0.8ms preprocess, 76.9ms inference, 1.4ms postprocess per image at shape (1, 3, 640, 448) !!! Exception during processing !!! The size of tensor a (0) must match the size of tensor b (256) at non-singleton dimension 1 Traceback (most recent call last): File "C:\Users\dariu\ComfyUI\execution.py", line 496, in execute output_data, output_ui, has_subgraph, has_pending_tasks = await get_output_data(prompt_id, unique_id, obj, input_data_all, execution_block_cb=execution_block_cb, pre_execute_cb=pre_execute_cb, hidden_inputs=hidden_inputs) File "C:\Users\dariu\ComfyUI\execution.py", line 315, in get_output_data return_values = await asyncmap_node_over_list(prompt_id, unique_id, obj, input_data_all, obj.FUNCTION, allow_interrupt=True, execution_block_cb=execution_block_cb, pre_execute_cb=pre_execute_cb, hidden_inputs=hidden_inputs) File "C:\Users\dariu\ComfyUI\execution.py", line 289, in asyncmap_node_over_list await process_inputs(input_dict, i) File "C:\Users\dariu\ComfyUI\execution.py", line 277, in process_inputs result = f(**inputs) File "C:\Users\dariu\ComfyUI\custom_nodes\comfyui-impact-pack\modules\impact\impact_pack.py", line 876, in doit enhanced_img, cropped_enhanced, cropped_enhanced_alpha, mask, cnet_pil_list = FaceDetailer.enhance_face( File "C:\Users\dariu\ComfyUI\custom_nodes\comfyui-impact-pack\modules\impact\impact_pack.py", line 813, in enhance_face sam_mask = core.make_sam_mask(sam_model_opt, segs, image, sam_detection_hint, sam_dilation, File "C:\Users\dariu\ComfyUI\custom_nodes\comfyui-impact-pack\modules\impact\core.py", line 883, in make_sam_mask detected_masks = sam_obj.predict(image, points, plabs, dilated_bbox, threshold) File "C:\Users\dariu\ComfyUI\custom_nodes\comfyui-impact-pack\modules\impact\core.py", line 635, in predict return sam_predict(predictor, points, plabs, bbox, threshold) File "C:\Users\dariu\ComfyUI\custom_nodes\comfyui-impact-pack\modules\impact\core.py", line 592, in sam_predict cur_masks, scores, = predictor.predict(pointcoords=point_coords, point_labels=point_labels, box=box) File "C:\Users\dariu\ComfyUI\venv_directml\lib\site-packages\segment_anything\predictor.py", line 154, in predict masks, iou_predictions, low_res_masks = self.predict_torch( File "C:\Users\dariu\ComfyUI\venv_directml\lib\site-packages\torch\utils\_contextlib.py", line 116, in decorate_context return func(*args, **kwargs) File "C:\Users\dariu\ComfyUI\venv_directml\lib\site-packages\segment_anything\predictor.py", line 222, in predict_torch sparse_embeddings, dense_embeddings = self.model.prompt_encoder( File "C:\Users\dariu\ComfyUI\venv_directml\lib\site-packages\torch\nn\modules\module.py", line 1553, in wrappedcall_impl return self._call_impl(*args, **kwargs) File "C:\Users\dariu\ComfyUI\venv_directml\lib\site-packages\torch\nn\modules\module.py", line 1562, in callimpl return forward_call(*args, **kwargs) File "C:\Users\dariu\ComfyUI\venv_directml\lib\site-packages\segment_anything\modeling\prompt_encoder.py", line 155, in forward point_embeddings = self._embed_points(coords, labels, pad=(boxes is None)) File "C:\Users\dariu\ComfyUI\venv_directml\lib\site-packages\segment_anything\modeling\prompt_encoder.py", line 88, in embedpoints point_embedding[labels == -1] += self.not_a_point_embed.weight RuntimeError: The size of tensor a (0) must match the size of tensor b (256) at non-singleton dimension 1"
First: make sure your ComfyUI is 100% up to date
Second: You can use the V1 workflow. It's almost the same and you will encounter less errors.
If you want to use the V2 workflow, here are som quick fixes to try, in this order:
1) In FaceDetailer, turn Use SAM off, or set SAM mask mode to BBox only with a small dilation, then run again.
2) Ensure a SAM model is installed and selected, try sam_vit_h first, if it fails, try vit_b.
3) Raise face detection size and confidence, for example min face 64 to 96, threshold 0.5 to 0.7, and set max faces 1 to 2 to avoid bad detections.
4) Update Impact Pack and Segment Anything, then reinstall SAM
pip uninstall -y segment-anything pip install git+https://github.com/facebookresearch/segment-anything5) On Windows DirectML, run SAM on CPU inside the node or disable DirectML for SAM, DirectML can return empty tensors.
6) If it still errors, skip SAM and use BBox mask in FaceDetailer, or run a face crop step before FaceDetailer.
-Huslyo123