


 ⚡ Z-Image Turbo / Base Premium TXT-2-IMG Workflow ⚡
➡️ Grab your copy of the v6 Ultimate Edition now 🔥
WF Features:
✨ Compact Pro GUI Design || SDXL Pre-Definer (NSFW Fix) with Face Lock || 7x Detailer || SeedVR2 Upscaler || Seed Variance Enhancer || Lora Loader 4 all Models & Detailers || Color Grading || GGUF Support || ZIT & ZIB compatible || 5 different v6 versions 👀
Z-Image Turbo is a fast, powerful and highly efficient image generation model with 6B parameters. The strength of this model lies in its ability to generate photorealistic images. But even though the model follows prompts very well, the output still isn’t premium in terms of quality. We still need an upscaling process here to make the images presentable. This is where this workflow comes in! Including the ADetailer, SDXL Pre-Definer as NSFW Fix and SeedVR2 Upscaler for high quality outputs!
General Version differences:
v1 = Base Workflow with Ultimate SD Upscaler (outdated)
v2 = Lora Loader + Ultimate SD Upscaler (outdated)
v3 = LL + Color Grading + 2x Detailer + Ultimate SD Upscaler (outdated)
v4 = LL + Color Grading + 2x Detailer + SeedVR2 Upscaler
v5 = LL + Color Grading + SDXL PreDefiner + 6x Detailer + SeedVR2 Upscaler
v6 = LL + Color Grading + SDXL PreDefiner with FaceLock + 7x Detailer + SeedVR2 Upscaler + GGUF Support
v6 Versions Compare:

Recommendations based on your skill level:
ComfyUI Beginner 👉🏼 v6 Basic Version ⚡
Advanced User 👉🏼 v6 Pro Version ⚡⚡
AI Pro Creator 👉🏼 v6 Ultimate Edition ⚡⚡⚡
I have completely revised the manual so that even ComfyUI beginners can set up and use the Ultimate Edition! 🫶🏼
🚀 What do you need to get started right away?
This Workflow - just download it, unzip the file and load the *.json into ComfyUI
Z-Image Model: z_image_turbo_bf16.safetensors (place in \models\diffusion_models\)
Text encoder file: qwen_3_4b.safetensors (place in \models\text_encoders\)
The VAE file: ae.safetensors (place in \models\vae\)
SAM Model: sam_vit_b_01ec64.pth (place in \models\sams\)
Face Detector: face_yolov8m.pt (place in \models\ultralytics\bbox\)
Eyes Detector: Eyeful_v2-Paired.pt (place in \models\ultralytics\bbox\)
Hand Detector: hand_yolov8s.pt (place in \models\ultralytics\bbox\)
Various upscale models of your choice for v1, v2 & v3 (place in \models\upscale_models\)
Regarding the upscale model (only important for v1, v2 & v3) I recommend 4x_NMKD-Siax_200k.pth or 4x_UltraSharp.pth. These deliver the best results. But feel free to try out different upscale models. You can find a good selection here. You can ignore this if you use the SeedVR2 Version (v4+). I recommend using the SeedVR2 Version because it is faster and brings better image quality.
For SeedVR2 Upscaler you can find the model files here. Place one or more of them in \models\SEEDVR2\ folder. For more detailed info's about the models take a look at the v4 Changelog.
If you used FLUX before then you already have the ae.safetensors file and dont need to download it again. But if you prefer more details you can try out the UltraFlux-v1 VAE file.
You can also use the fp8 checkpoint if you run a gpu with 8gb of vram. Or use one of the available GGUF models in this case.
For v5 + v6 Versions you also need some good SDXL (or Pony / Illustrious) models. Place them in \models\checkpoints\
🚨 Make sure you use the latest stable ComfyUI version. Also don't forget to update the ComfyUI Frontend package manually and your Custom Nodes via ComfyUI Manager. Otherwise compatibility problems may occur and the workflow is not working properly.
The v3, v4 and v5 versions are made with the following packages:
ComfyUI Core v0.3.75
ComfyUI Frontend v1.34.2
ComfyUI Manager v3.37.2
Python Version 3.12.10
PyTorch Version 2.8.0+cu128
v6 versions:
ComfyUI v0.15.1
ComfyUI Frontend v1.39.19
ComfyUI Manager v3.39.2
Python Version v3.12.10
PyTorch Version v2.8.0+cu128
All latest versions of the custom nodes listed below
Please ensure that you use at least these versions. Otherwise, I cannot provide support if something is not working for you.
❓ FAQ ❓
1️⃣ Do I need some special nodes to run this workflow?
The nodes inside these workflows are common nodes. If ComfyUI still indicates a missing node just install it via ComfyUI Manager and restart briefly.
Custom nodes used in this workflow (v6):
I'm a big believer in "keep it simple and working". However, ComfyUI updates can sometimes break one node or another. I've been careful with my node choices though – nothing too exotic or obscure. So it's pretty unlikely to happen. If it ever does, I'll swap out the broken nodes and upload a new version right away. So i can guarantee that this workflow is always working just fine for you.
2️⃣ Can I use this WF for my AI Influencer projects?
Absolutely! You can use your ZIT Character LoRa's here. This workflow was engineered with high-frequency content creation in mind, specifically addressing the core pain points of AI influencer management: face consistency, pose preservation due to the great prompt follow of Z-Image and all the detailers to control every little detail of your SFW/NSFW creations.
By utilizing the integrated Face Lock mechanism for the SDXL Pre-Definer and GGUF-optimized weight balancing, the pipeline ensures that your character’s features remain identical across various lighting conditions, expressions and camera angles. Whether you are generating social media content, lifestyle shots, or marketing assets, this workflow minimizes the need for manual inpainting or iterative re-rolls. It is designed to act as a scalable foundation for consistent AI model branding, allowing you to focus on creative direction rather than technical troubleshooting. Try it out, you will be surprised!
Please note: The free Basic Version is primarily optimized for standard lifestyle and creative SFW content. For high-fidelity NSFW generations or advanced stylistic control, I recommend using the Pro Version or Ultimate Edition, which are specifically fine-tuned for these complex rendering demands. 🚀
3️⃣ What are the hardware requirements for this workflow?
This workflow is designed to be highly scalable, ensuring compatibility across a wide range of consumer-grade GPUs. While a minimum of 8GB VRAM is sufficient to run all versions of this workflow, your performance will vary based on the model precision and optimization settings.
Entry-Level (8GB VRAM): To maintain optimal generation speeds and avoid out-of-memory (OOM) errors, I highly recommend utilizing FP8 precision or quantized GGUF models. These optimizations significantly reduce the memory footprint without compromising the core aesthetic quality.
Performance Tier (12GB+ VRAM): For a fluid workflow experience, especially during high-resolution upscaling and batch processing, a GPU with 12GB or more of VRAM is recommended. This allows you to leverage the full BF16 precision of the Z-Image Turbo model, ensuring maximum fidelity and rapid inference times.
4️⃣ Is it possible to use this workflow on Runpod?
Yes, this workflow is fully compatible with cloud-based GPU platforms like Runpod or similar instances. Since the infrastructure is built on standard ComfyUI architecture, the deployment process is identical to a local installation. Just load your custom nodes, place your model files, drop the workflow and you are ready to render. A lot of Ultimate Edition user are using this workflow on Runpod and are happy with it.
The primary advantage of deploying this in a cloud environment is the significant throughput increase compared to consumer-grade local hardware. By leveraging high-VRAM instances (such as A6000 or H100 GPUs), you can drastically reduce inference times for complex LoRa-heavy prompts and high-resolution upscaling tasks. This makes it an ideal solution for users needing rapid, batch-based content generation without the overhead of maintaining local hardware.
5️⃣ What is the performance profile of this workflow?
The generation speed is not a fixed metric, it scales dynamically based on your specific setup and desired output parameters. Key factors influencing your render times include:
GPU Architecture & VRAM: Your primary hardware bottleneck.
Resolution Strategy: RAW base resolution vs. final upscale multiplier.
Pipeline Complexity: Number of active Detailer nodes and post-processing steps.
Model Precision: Choice of FP8, BF16, or GGUF quantization.
Benchmark Expectation: In the Ultimate Edition (utilizing all active Detailers at BF16 precision), you can expect render times between 70 to 150 seconds per image on a mid-range setup (e.g. RTX 5070TI).
Optimization Tips:
Precision Matters: Switching from BF16 to FP8 or quantized GGUF models will yield a noticeable performance gain.
Resolution Scaling: Reducing your base RAW resolution from 2.0MP to 1.4MP provides a significant boost in speed while maintaining high visual fidelity.
Cloud Scaling: If you deploy this on top-tier hardware like an RTX 5090 or H100 (via Runpod), latency is essentially removed from the equation. At that point, your generation speed is limited only by how fast you can edit your prompts. 😉
Out-of-the-box, the workflow is meticulously tuned to strike the perfect balance between high-fidelity output and production-ready efficiency.
💡 Usage Tips:
Simply set the desired resolution on the left, put in your prompt and start generating.
Why there is no negative prompt field? If the CFG value is set to 1.0 the negative prompt is ignored. This is one of the reasons why the model is so fast. This is intentional and not a mistake. Other workflows are ignoring this fact and offer a negative input node. But you don't need a negative prompt here. Simply enter your positive prompt and you're good to go!
For prompting, it's recommended to use natural language in complete sentences. Describe the person or people, the setting, the camera angle, and the lighting. The more detailed you are, the more accurate the result. 100-300 words works best.
If you only want to generate raw images for testing purposes, simply toggle off the upscaling and detailer groups using the first node on the top-left. This is also recommended for color grading. Don't forget to fix the seed for that.
Feel free to experiment with the denoise values in the detailer nodes to get the perfect result. Also try out different upscale models.
You don't need to go higher than 9 steps with this model. It is a 8 Steps Model. It will not generate better images if you go higher. Just leave it on 8 or max 9 steps.
I like to have the option to directly select the aspect ratio (e.g. 5:7 or 9:16) in the node. If you prefer to enter the resolution manually simply disconnect or delete the "Base Resolution Node". Afterwards you can enter your desired resolution in the "latent image" node.
📜 To keep this description as clean and compact as possible, I’ve moved the older legacy changelogs to this Article. If you're interested in how this workflow has evolved over time, feel free to dive into the full history there! 👍🏼
🆕 v6 Changelog:
You asked, I delivered! v6 isn't just a minor tweak; it’s a logic overhaul and "Listen & Deliver" Update. I took your feedback from v5 (especially regarding face consistency) and built in a solution that makes this workflow the most powerful tool for Z-Image generations these days. Better, faster and more "Lock-in" than before. 😉
What's New?
✨ Face Lock 4 Pre-Definer (The Game Changer!)
This was the #1 request after v5. In previous versions, the SDXL Pre-Definer sometimes went a bit rogue on the faces when using specific ZIT character LoRa's. Not anymore! I’ve built an intelligent logic gate that 100% preserves the face of your Z-Image Turbo character while still injecting all that sweet SDXL detail and fixing anatomy issues.
The Result: You keep your character's soul but get the body and skin textures of a high-end SDXL model.
How to use: It’s enabled by default in the Pro and Ultimate versions. If you want the Pre-Definer to go wild, you can simply toggle it off with the dedicated switch node.
✨ GGUF Model Support & 2-Way Switch
VRAM is precious, and I know it. v6 now fully supports GGUF models. I’ve added a super handy 2-Way Switch, so you can jump between your standard checkpoints and GGUF models with a single click. No more messy node reconnecting - just pure efficiency. Available in all 5 different versions.
✨ Z-Image Base (ZIB) Support & Negative Prompts
I’ve brought the Negative Prompt node back to the main stage! Why? Because Z-Image Base is using negative prompts and some of you wanna test ZIB models. While Turbo still doesn’t need negatives, ZIB thrives on them.
Pro Tip: If you switch to ZIB, remember to crank your KSampler steps up to 30-40 and set the CFG between 4.0 and 6.0. Turbo stays at its usual low values, of course.
✨ New Detailers: Feet & Penis "The Extra Inch"
Feet Detailer (Now in Pro): By popular demand, the Pro version now includes the Feet Detailer (previously Ultimate only). No more "AI-Potato-Toes" for the Pro users!
Penis Detailer (Ultimate Only): You asked for it, you got it. The Ultimate Edition now features a dedicated Penis Detailer for those... specific anatomy fixes. Precision is everything, right?
✨ Reworked GUI Design (The "Clean Desk" Update)
I didn't just prettify the comparison chart; I rebuilt the entire workflow UI!
Uniform Group Heights: All node groups now have the exact same height. This means you can drag and drop groups to rearrange the workflow however YOU like it without breaking the layout.
Bigger Final Preview: Less zooming, more admiring. The final output preview is now significantly larger so you can check your results instantly.
Under the Hood: Tons of "minor changes" (you know the drill - optimizing connections, cleaning up the spaghetti, making it run like a Porsche).
✨ Pro Version Not Free Anymore
I love sharing my work with the community, but I had to make a tough call. I’ve recently noticed that certain "creators" have been taking my free v5 Pro Workflows, slapping their name on it, and actually reselling them elsewhere.
Honestly? That sucks. I put a lot of time and perfectionism into these workflows so you can have a better experience, not so some leeches can fill their pockets with my work. Because of that i had to put the v6 Pro Versions behind a small Paywall on KoFi and PayHip.
Thanks for understanding. I’d rather keep this circle a bit smaller and high-quality than let people exploit the project. 🫶🏼
🚀 The v6 Lineup
1. Basic Version: ⚡
The free & clean entry point. Z-Image Turbo straight to Detailers (Face, Eyes, Hands) and SeedVR2 upscale. No Pre-Definer. Fast and solid.

2. Pro Versions: ⚡⚡
Now with Face Lock logic for the SDXL Pre-Definer and the new Feet Detailer. This is the sweet spot for most creators who want high-end SFW/NSFW results without going "Full Power".
Grab your copy now on KoFi or PayHip! 🛒💨

3. Ultimate Edition: ⚡⚡⚡🔥
The all-in-one powerhouse solution. Face Lock, all 7 detailers PLUS the brand-new Penis Detailer and individual LoRA/Prompt injection for every single body part. It’s the ultimate control desk for high-end content. Go wild with your AI Influencer Girl (or Boy?)! 😉

The Ultimate Edition is my "Masterpiece" and helps support the work I put into these updates. You can find the preview here, but the full power is waiting for you on KoFi or PayHip! 🛒💨
☕ Grab your full copy on KoFi ⬇️
It comes with 2 different versions of the workflow, a detailed guide and all seven custom Ultralytic files. Free bugfix Updates included!
Wanna buy anonymously? 🕵️♂️ If you prefer to pay via Crypto instead of PayPal or CC, no problem! Just hit me up directly on Discord (@mrsmithfpv) and we'll sort it out. Safe, fast, and no paper trail. 🚀₿
I still tried to keep every version as compact as possible with the same eye candy design you like. 👌
If you have ideas for optimization / new feature requests or just wanna say "thanks" feel free to leave a post in the comment section. If you have questions about this workflow, feel free to reach out to me on Discord anytime!
💕 Don't forget to spread some love - hit the like button and follow me (also on Ko-Fi) to not miss any new updates and more workflows like this one! 👍
If you like these workflows you can also buy me a coffee! ☕
Have fun and feel free to post your generated images in the gallery below! I would like to see what you do with these workflows!😊
Description
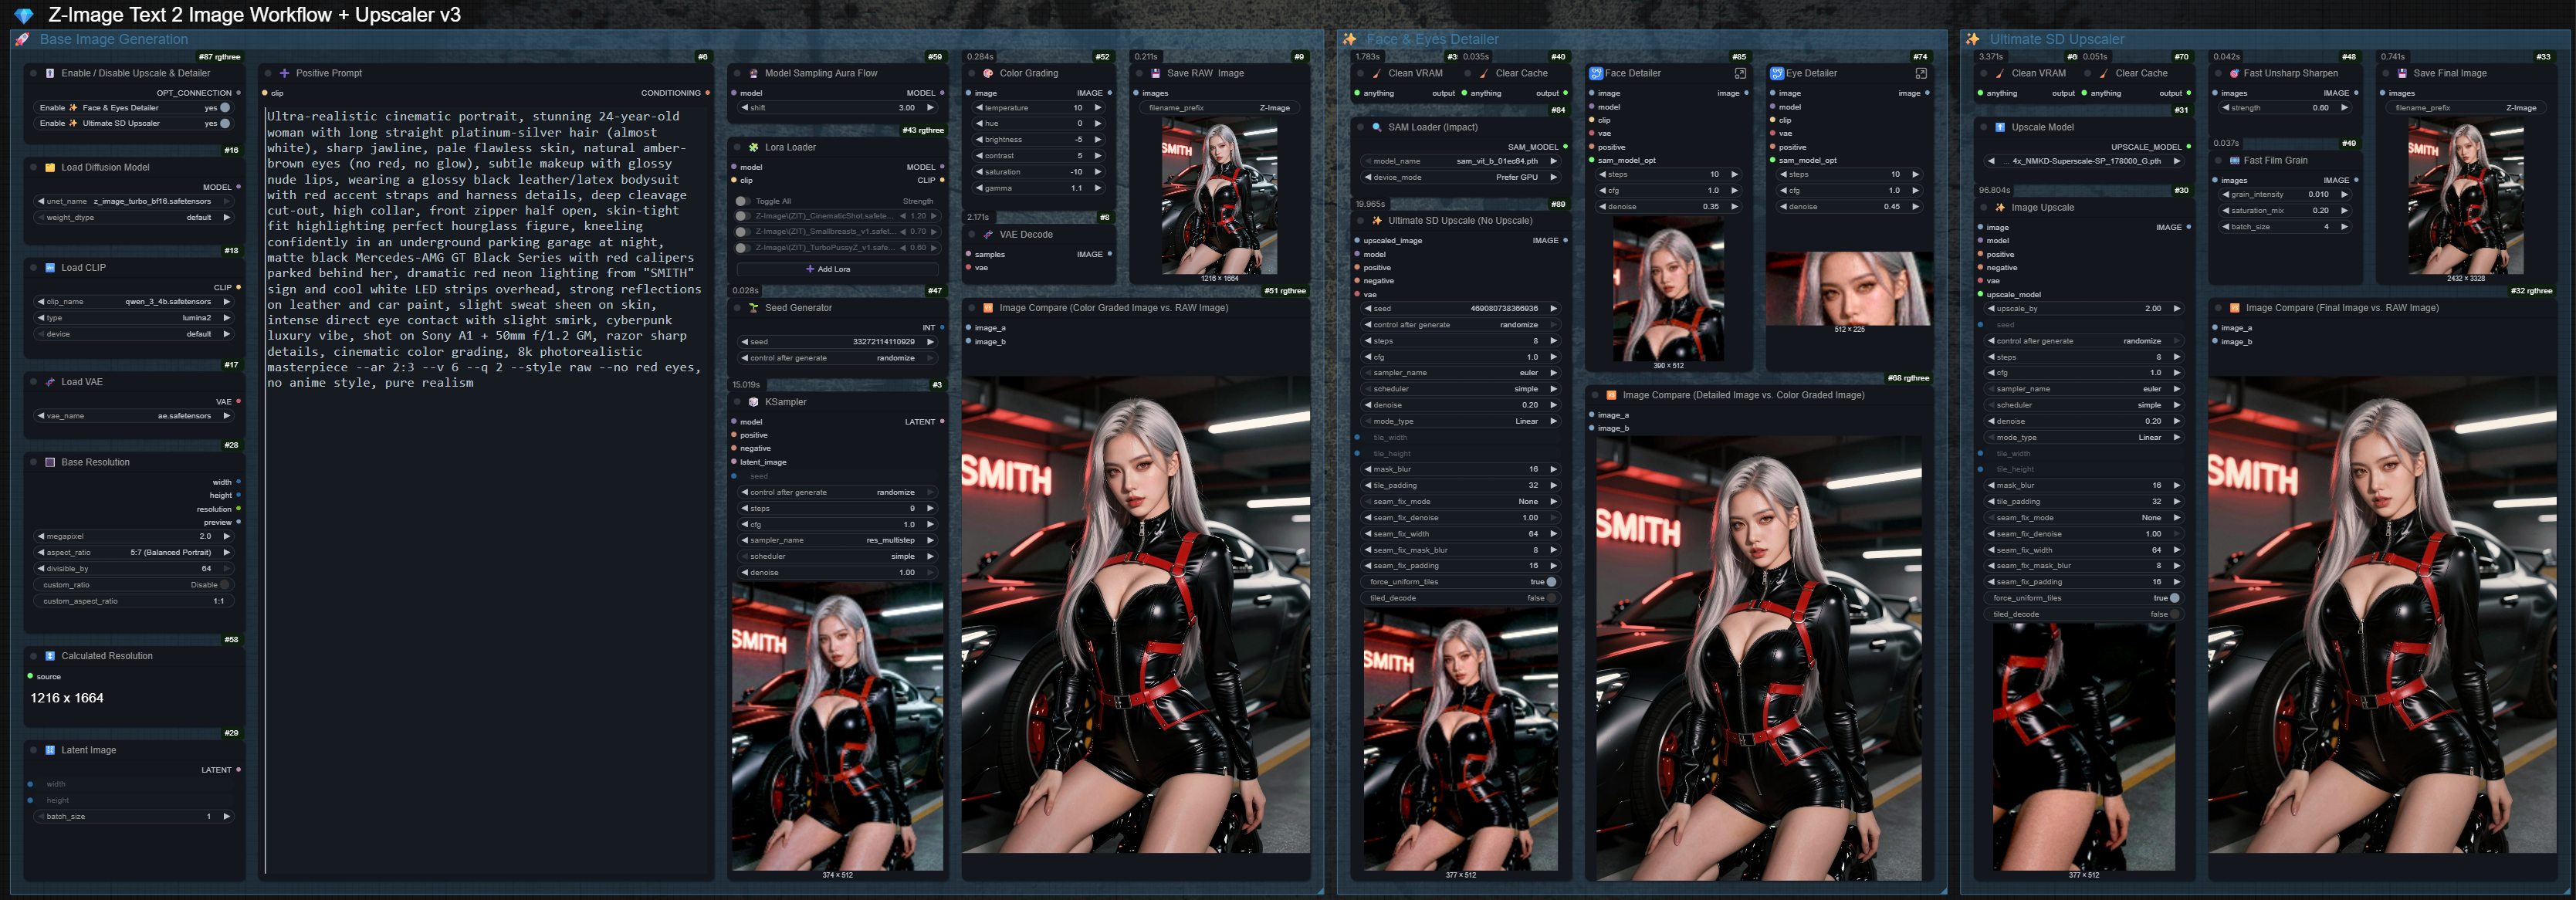
⚡ v3 ➜ Improved Image Quality with ADetailer!
Added Face and Eye Detailer
Added Color Grading
Added Calculated Resolution
Added Model Sampling Aura Flow
Adjusted Parameters
Two Different Versions in Download File
For a detailed changelog, please refer to the workflow description!
FAQ
Comments (21)
I don't understand why the Detailer and UPscale part is being completely skipped. Only the first base generation part work properly and the other is just bypassed. But Thanks for giving us wonderful w/f.
@okaeri9874 The v3 is tested on different systems and is working without any problems. Its not some of these complicated workflows. I keep it simple and compact. Already got a lot of positive feedback for the v3. Make sure to read the workflow description and update comfyui and the custom nodes listed there.
Maybe you got a problem with subgraphs. You can try to unpack the subgraph nodes. But the most important thing is still that you use latest versions of comfyui and the nodes listed in the description. It will work for sure.
Also make sure that you have downloaded the 2 needed files for the detailer:
- Face Detector: face_yolov8m.pt (place in \models\ultralytics\bbox)
- Eyes Detector: Eyeful_v2-Paired.pt (place in \models\ultralytics\bbox)
If its still not working for you take a look into the console terminal window. What are the most recent messages listed there? Copy and paste them here. 👌
@MrSmith2025 everything is working perfectly that I've followed your guide. Thank you so much! I really appreciate you providing such wonderful workflow.
@okaeri9874 I'm glad it's working now. What was the problem? Probably the two missing files, right?
@MrSmith2025 Yes it is . it was my bad :)
@okaeri9874 No problem! When there are a description and realease notes it is helpful to read them first... :)
Feel free to post your creations to the gallery below! :)
i don't know why detailer not work
@mahalo And I don't know either without you giving a precise description of what isn't working. 😉 The v3 is tested on different systems and is working without any problems. Its not some of these complicated workflows. I keep it simple and compact. Make sure to read the workflow description and update comfyui and the custom nodes listed there.
Also make sure that you have downloaded the 2 needed files for the detailer:
- Face Detector: face_yolov8m.pt (place in \models\ultralytics\bbox)
- Eyes Detector: Eyeful_v2-Paired.pt (place in \models\ultralytics\bbox)
If its still not working for you take a look into the terminal window. What are the most recent messages listed there? Copy and paste them here.
I released version 3 of this workflow today. This significantly improves the quality through the color grading node and the detailer part. Feel free to try it out and post your generations in the gallery below. 😊
Please read the Changelog at the end of the Workflow Description.
For anyone having issues:
The v3 workflow itself is fully working! It’s been tested on multiple systems and already used by many people without any problems.
In most cases, errors come from missing custom nodes, missing model files or outdated versions of ComfyUI support files. Please make sure you’ve updated everything and installed the required nodes (they’re all listed in the workflow description).
Also make sure you have downloaded the 2 needed files for the detailer:
- Face Detector: face_yolov8m.pt (place in \models\ultralytics\bbox)
- Eyes Detector: Eyeful_v2-Paired.pt (place in \models\ultralytics\bbox)
If you still get an error, feel free to copy the exact message here. I’ll gladly help. But the workflow itself is confirmed working.
Thanks to all the ppl who already wrote me via PN. Good to see the positive feedback. 👍
One of the best workflows for Z Image Turbo :-)
To anyone having a problem with Detailer not working, it's most likely because you're missing Eyeful_v2-Paired.pt
You can download it from huggingface and then drop it in \models\ultralytics\bbox
@Gh0sTt Thank you! I'm glad you like the workflow. 😊
And thank you for mentioning the bbox files again. I already updated the description and changelog. But some people just don't like reading descriptions or changelogs. 😁
Why not use something like seedVR2 instead? For simpler images I think ultimate scaler solutions work, but for more complex images it often craps out by adding random details/noise that messes the image. It is also much slower. I use the 4xUltraSharpV10 upscale model.
Hey, thanks for asking. Like you said it really depends on the image you need to upscale. But i think for most users and images generated with Qwen, Flux and Z-Image the Ultimate SD Upscaler is more than enough. The raw image output quality is good enough compared to SDXL, Pony, Illustrious etc. So it only needs some more pixels and sharpness and most users are happy. And for me Ultimate SD Upscaler works much faster than SeedVR2. And its a big difference for some users to have just some 67mb files instead of big GB model files. Not everyone got ultra high priced hardware... And there is not a big difference i would say. So overall Ultimate SD Upscaler is the better choice.
But if there is any interest to have this workflow with SeedVR2 i can upload a new version with it. :)
@yoloswagg45 Hey mate, ive tested a lot over the weekend. And now i can confirm that you are right. SeedVR2 is much faster and in most cases (not all) it offers the better quality. So i've swapped out the Ultimate SD Upscaler with SeedVR2 and released a v4 version. Have fun to try it out! 🚀
noob Q how do i use the node to disable the upscaler exactly?
@yvr66 Its the first node in the upper left corner. Just click on "yes" on the 2nd entry "Enable Ultimate SD Upscaler" and it will change to "no" and the Upscale Group is disabled (bypassed). :-)
@MrSmith2025 weird i can't seem to click on them (click and no change), do i have to link the node to anything?
@yvr66 No, you dont need to link anything. Its a complete ready to use workflow! Check if you got any missing nodes. Please read the workflow description above. :)
Why the positive prompt is also the negative prompt?
Nm just figured out the CFG is 1 so it's ignoring the negative prompt.
@cgvhjng Exactly this... It's all described in the workflow description. :)