


A workflow for Z-Image-Turbo focused on high-quality image styles and ease of use.
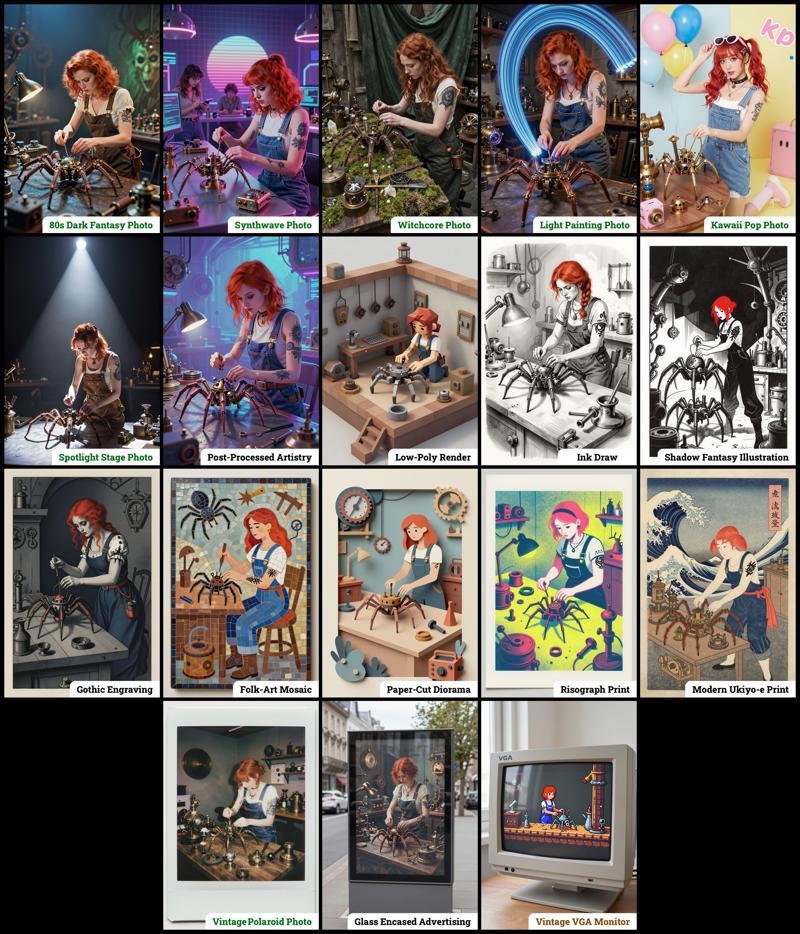
Style Selector: Choose from eighteen (x2) customizable image styles.
Refiner: Improves final quality by performing a second pass.
Upscaler: Increases the resolution of any generated image by 50%.
Speed Options:
7 Steps Switch: Uses fewer steps while maintaining the quality.
Smaller Image Switch: Generates images at a lower resolution.
Extra Options:
Sampler Switch: Easily test generation with an alternative sampler.
Landscape Switch: Change to horizontal image generation with a single click.
Spicy Impact Booster: Adds a subtle spicy condiment to the prompt.
Preconfigured workflows for each checkpoint format (GGUF / SAFETENSORS).
Includes the "Power Lora Loader" node for loading multiple LoRAs.

 The zip contains four workflow files:
amazing-z-image-a_GGUF: Recommended for GPUs with 12GB or less.
amazing-z-image-b_GGUF: similar workflow "a", but with more experimental styles.
amazing-z-image-a_SAFETENSORS: Based directly on the ComfyUI example.
amazing-z-image-b_SAFETENSORS: similar workflow "a", but with more experimental styles.
When using ComfyUI, you may encounter debates about the best checkpoint format. From my experience, GGUF quantized models provide a better balance between size and prompt response quality compared to SafeTensors versions. However, it's worth noting that ComfyUI includes optimizations that work more efficiently with SafeTensors files, which might make them preferable for some users despite their larger size. The optimal choice depends on factors like your ComfyUI version, PyTorch setup, CUDA configuration, GPU model, and available VRAM and RAM. To help you find the best fit for your system, I've included links to various checkpoint versions below.
Required Checkpoints Files
: for "amazing-z-image_GGUF"
z_image_turbo-Q5_K_S.gguf [5.19 GB]
local directory:ComfyUI/models/diffusion_models/Qwen3-4B.i1-Q5_K_S.gguf [2.82 GB]
local directory:ComfyUI/models/text_encoders/ae.safetensors [335 MB]
local directory:ComfyUI/models/vae/4x_foolhardy_Remacri.safetensors (for illustration refining) [66.9 MB]
local directory:ComfyUI/models/upscale_models/
: for "amazing_zimage-SAFETENSORS"
Based directly on the official ComfyUI example,
z_image_turbo_bf16.safetensors (12.3 GB)
local directory:ComfyUI/models/diffusion_models/qwen_3_4b.safetensors (8.04 GB)
local directory:ComfyUI/models/text_encoders/ae.safetensors (335 MB)
local directory:ComfyUI/models/vae/4x_foolhardy_Remacri.safetensors (for illustration refining) [66.9 MB]
local directory:ComfyUI/models/upscale_models/
: for Version 3.x
If, for some reason, you need to use the older version 3.x, you will also require the following additional file:
4x_Nickelback_70000G.safetensors [66.9 MB]
Local Directory:ComfyUI/models/upscale_models/
Required Custom Nodes
The workflows require the following custom nodes:
(which can be installed via ComfyUI-Manager or downloaded from their repositories)
rgthree-comfy: https://github.com/rgthree/rgthree-comfy
ComfyUI-GGUF: https://github.com/city96/ComfyUI-GGUF
License
This project is licensed under the Unlicense license.
More info:
Description
This update includes the following new features:
Increased Style Options: Configurable styles have been expanded, now offering 18 options per workflow.
Refiner: Add more details to images by applying a second processing pass.
Upscaler: Enhance image resolution by up to +50% in just a few seconds.
Mode Selector: This option allows for optimizing the refiner and upscaler specifically for either Photography or Illustration.
Speed Panel: A pair of options dedicated to accelerating image generation without significant quality degradation.
Power LoRA Loader: This node is now included and connected, facilitating the loading of multiple LoRAs.
FAQ
Comments (23)
Great workflow thank you.
Can you add clownshark sampler? RES4LYF samplers work perfectly with z-turbo.
Wonderful! Thank you so much!
is this WF available for QWEN image ?
This workflow really is Amazing, THANK YOU.
Btw, on the description, there are 30+ styles, but on the workflow, there are only 18 styles, am I missing something? I'm using V.4
how to edit images with this does anyone know? thank you for your hard work btw
The best thing I found here, it works very well and optimizes resources, thank you very much!
These are absolutely wonderful and my go to workflow for Zit. Do you plan on making similar workflows for Flux.2 Klein?
Maybe I'm missing something, but V3 gave me way better results than V4. V4 is much faster, but the image quality is noticeably worse with significantly more artifacts, even with the refiner toggle.
I wish the results were similar, because I really like some of the other improvements you've done to V4 such as the new lora loader.
The noise level when using the upscaler is too high. The image doesn't become clearer; instead, it becomes even more blurry.
style selectors are empty. otherwise works great
hey mate, could you release a version that perhaps incorporates the power nodes from your other post? cheers!
That would be really great!
Was having issues with rgthree nodes not installing, but I reversed it to a previous version to make it work.
Nice workflow, very detailed walkthrough and good results
Hello,
Incredible work, I'm trying to learn the sigma management you are doing, but still long way to go. any chance you could adapt to the z image base model now it's out ? seem globally <working for it except the steps that needs to be higher but somehow failing to do it
It applies to images when choosing styles, but Laura files added by users are not selectively applied. I'd like to know why.
That's definitely a very good workflow, but I prefer the results of your new custom sampler OOB. Do you think there will be a new version based on your new nodes? (Note: The nodes/example workflow also works great with Flux 2 Klein 9b!)
This workflow is PHENOMENAL! Is there anyway to add Reactor or some kind of face swap?
this is amazingly good. the quality of the images is great and the operation is very simple with simple nodes. I would like to give you an idea to implement an optional control net section
I love this workflow!!! One thing I would like to know, why have you removed the NODE called: Z-IMAGE ENHANCER?
这是一个很棒的工作流,正如你的工作流名字,非常令人惊讶,整体布局还算清晰,同时拥有安全张量和gguf版本,很方便。生成效果可以根据勾选框快速选择,生成结果非常有趣并且高效。总而言之,我非常喜欢它。
Amazing workflow!
forgive a stupid question ,were dose the negative prompts go?
Z image Turbo is a distilled model. It don't accept negative prompts.