


This is an advanced workflow for those who want to dail in an image at pro level grade. A simple version can be found HERE
Note: I spend a lot of time on these to make sure they are top notch. If you have ANY issues, I'm very responsive. hit me up and I'll resolve them for you.
A complete user and troubleshooting guide inclusing a list of common error messages can be found here https://civarchive.com/articles/24678/how-to-use-my-workflows-a-comprehensive-breakdown
LC123 Nodes: https://github.com/lonecatone23/ComfyUI_LC123_nodes
也有中文说明
Instagram: https://www.instagram.com/synth.studio.models/
Buy me a☕ https://ko-fi.com/lonecatone
This represents hundreds of hours of work that I give away for free. If you enjoy it, Please make sure to 👍like and post to my workflows. That is how you support me. Also, feel free to ⚡tip 😉
V19
Qwen broke all of my workflows, So I am going through and updating them as well as taking time to add new features (or better nodes)
fixed Qwen break
Removed unnecessry LLM instructions. it is now built into Qwen
Replaced the save nodes with a significantly better system
Minor clean up.
V17.1
You'll need to update the node pack
Change to Color match
Change to LC Sharpen Pro
Change to Lut
Lut folder now auto downloads
Other tweaks
Updated Notes
Introducing LC123 Nodes
Edie VRAM settings in the ComfyUI settings menu:
Smart Denoise (LCImageDenoise)
Removes noise while trying to keep detail
Color Match (LCColorMatch)
Matches colors to a reference image (usually Image 2)
Bloom (LCBloom)
Soft glow on bright areas (camera light bloom)
Vignette (LCVignette)
Darkens (or lightens) the edges
Image RGB (LCImageRGB)
Simple red / green / blue channel gain
Lift / Gamma / Gain (LCLiftGammaGain)
Classic three-way color corrector
Auto White Balance (LCAutoWhiteBalance)
Tries to neutralize overall color cast
Vibrance (LCVibrance)
Boosts muted colors without destroying already-saturated areas
Chromatic Aberration (LCChromaticAberration)
Shifts RGB channels for a 3-D / vintage lens look
Sharpen Pro (LCSharpenPro)
Adaptive mid-tone contrast / micro-contrast
Image Adjust (LCImageAdjust)
Brightness, Contrast, Saturation, Sharpness, Blur
Lens FX (LCLensFX)
General lens distortion and optical effects
Lens Profile (LCLensProfile)
Applies real lens characteristics (e.g. Canon 50mm f/1.8)
Film Stock B&W (LCFilmStockBW)
Converts to black & white using real film responses
Film Stock Color (LCFilmStockColor)
Applies classic color film response (Ektachrome, Portra, etc.)
Film Grain (LCFilmGrain)
Realistic film grain with lots of control
Desaturate (LCImageDesaturate)
Partial or full desaturation.
Apply LUT (LCApplyLUT)
Applies a 3D LUT (.cube file)
Image Crop (LCImageCrop)
Inline crop tool
Text Overlay (LCTextOverlay)
Adds text on the final image
LC Watermark 💧(LCWatermark)
dynamically adds any image as a watermark
Plus plenty of other options. Check them out here: https://github.com/lonecatone23/ComfyUI_LC123_nodes
V16
Complete redo of the 🎨 Post Processing Suite
It was long overdue. The nodes I used did not really align with Krea2 (or Zit for that matter)
What I changed
removed the Optical Realism section. The quality dropped and I get better results from individual nodes
Added white balance
Updated the color match node to V2
Added a skin preserving vibrance node
Added lens profile
Added radial blur
Added pro film grain
Added a better B&W desaturation node
MASSIVE update of the notes.
V15
I have been messing around with Anima regional Prompt and got so frustrated, I made my own nodes set https://github.com/lonecatone23/ComfyUI_LC123_nodes
use an image 🖼️as the background or plain white ⬜
dynamic canvas means you do not need to open up mask editor
Plug in a global prompt or enter it here
works with Controlnet now (Kinda. Still beta )


Vastly Improved Image control
added my own set of nodes including 📐 Aspect Ratio Simplifier which saves a boatload of time trying to get the right image size
Other minor OCD tweaks
V14
Vastly improved Controlnet
also addresses the break that I was unaware of because hey.. stuff updates 🤔
⚠️ Controlnet file location has changed. See notes.

Added I2I 🖼️ and a denoise slider to support it
Updated the 🧠brains a bit, mainly to work with the slider
I'll probably do a gut redo soon. I want dual samplers, but to properly build them and still have denoise, they are custom (see Krea2 workflow)
Minor OCD stuff.
V10 & 11
Swapped out the detailers to SEGS detailers for significantly better control and quality
Updated the notes
Added a GGUF Qwen VL Prompt Enhancer for fast prompts.
it's also abliterated, so does NSFW incredibly well 🤔
Added the ability to color match to the original image without having to reload it.
Updated Hi-res fix
V9.0
Note: Both Controlnet & Regional Prompt nodes are in Beta testing. You will not find these to be as rigid as SDXL or Flux based ones, but they are fun to mess with.
Added back draft mode by request
added shhh.. nodes (You'll thank me)
Made it so you can use the original image ratio.
Super good for regional prompts and Controlnet
Added Regional Prompt (BETA)
I'm still testing this out. Not sure how I feel about it.
what it does do well: ART
what is sucks at: people
Replaced math nodes to be compatible with Linux users
Tweaks here and there.
Ver 8.0
added controlnet
added Klein enhancement
reworked Post Production Suite
Minor tweaks.
Ver 6.0
Upgraded Prompt assist.
Added an inline crop tool for easier image editing.
inmproved the save option to include the option to add a date to the metadata file. name for beter organization.
Minor note tweaks.
Ver 5.2
Updated for Comfyui changes
Added sentence remover to prevent CivitAi flags
Made some optimazation changes for Anima 3 preview
reworked the user settings area.
Ver 4.0:
On a neverending quest for opions, I decided to tweak my Anima workflow to get relism and semi-realism out of it for the Anima2 model
Added a detailer suite based on SDXL or Illustrious for realistic options
Note: It's not gonna beat ZIT, but with the prompt adherence, It's cool for semi-realistic
Included my full detailer suite
Included my full Post production suite
Fine tuned Optical Realism to work with this model (in other words, don't mess with the settings)
Ver 3.0 included in download for straight Anime
I had to make modifications as to how the Savenodes worked. ComfyUi broke them (again 🙄)
What this workflow contains:
Sage Attention: Speeds up production
Ultimate Upscaler for prescaling and hi res fix
Detailing Suite for face, hands, eyes
Seed VR2 Upscaler to get 4k on low VRAM
Essential Post Production Suite
JPEG Scrubber
Full tutorial available.
也有中文说明

Description
FAQ
Comments (11)
Is there any way that you might be able to do this for illustriois? Anima is quite new, and while this will be a good thing to use once it get's better, It would be nice if one for illustrious was avalibe since there is so avaliable for it.
I have a massive collection of Illustrious workflows. Go to my page
I am curious about the logic behind the upscale parameters for Anima. Why do you use specifically CFG 1 and 4 steps? My old Illustrious workflow does nothing but ruin images during upscaling with CFG 4, 10 steps, and 0.5 denoise. I am not a big fan of ultimate sd upscale and usually just use a model upscale combined with a KSampler. Maybe that is the problem 🤔
What are you using as an upscale model? Each model has it's perks. A cfg of 1 specifcally makes it do very little modification to the original prompt. 4 steps because I'm not trying to rebake it, just clean it up, and that's about the bare minimum it needs. The higher the denoise, the more npoise it injects into the image. at .5 you are overwriting half the noise. Of course it'll destroy your images. I use 0.15 denoise because 0.1 is too low and 0.2 starts making changes.
SD ultimate upscale is the bomb. It is a hi res fix, detailer, and sampler all in one. You just had it tweaked wrong.
Try my settings and tell me what you think.
@lonecatone23 I usually use Remacri as an upscale model. Yes, I understand that 0.5 denoise introduces a lot of new noise, but based on experience with ILXL models, it does not create such drastic changes there while often doing a good job finishing the base image.
I understand your approach of trying to make minimal changes, but I do not really like the images Anima produces at 1mp. They feel somewhat raw to me, so I usually try to increase the noise values to get something more finished.
On Illustrious, Ultimate gave good results, but I did not use it only because it took more time (lol), whereas the upscale plus separate ksampler combo gave the same thing. But here the situation is completely different. My standard method gives just terrible results and even adds some strange patterns to the images https://files.catbox.moe/72poyd.png. However, Ultimate even at 0.5 noise, 10 steps, and 4 cfg basically gives the result I expected initially https://files.catbox.moe/sxevcy.png, so the problem was not the parameters but the upscale method itself :d
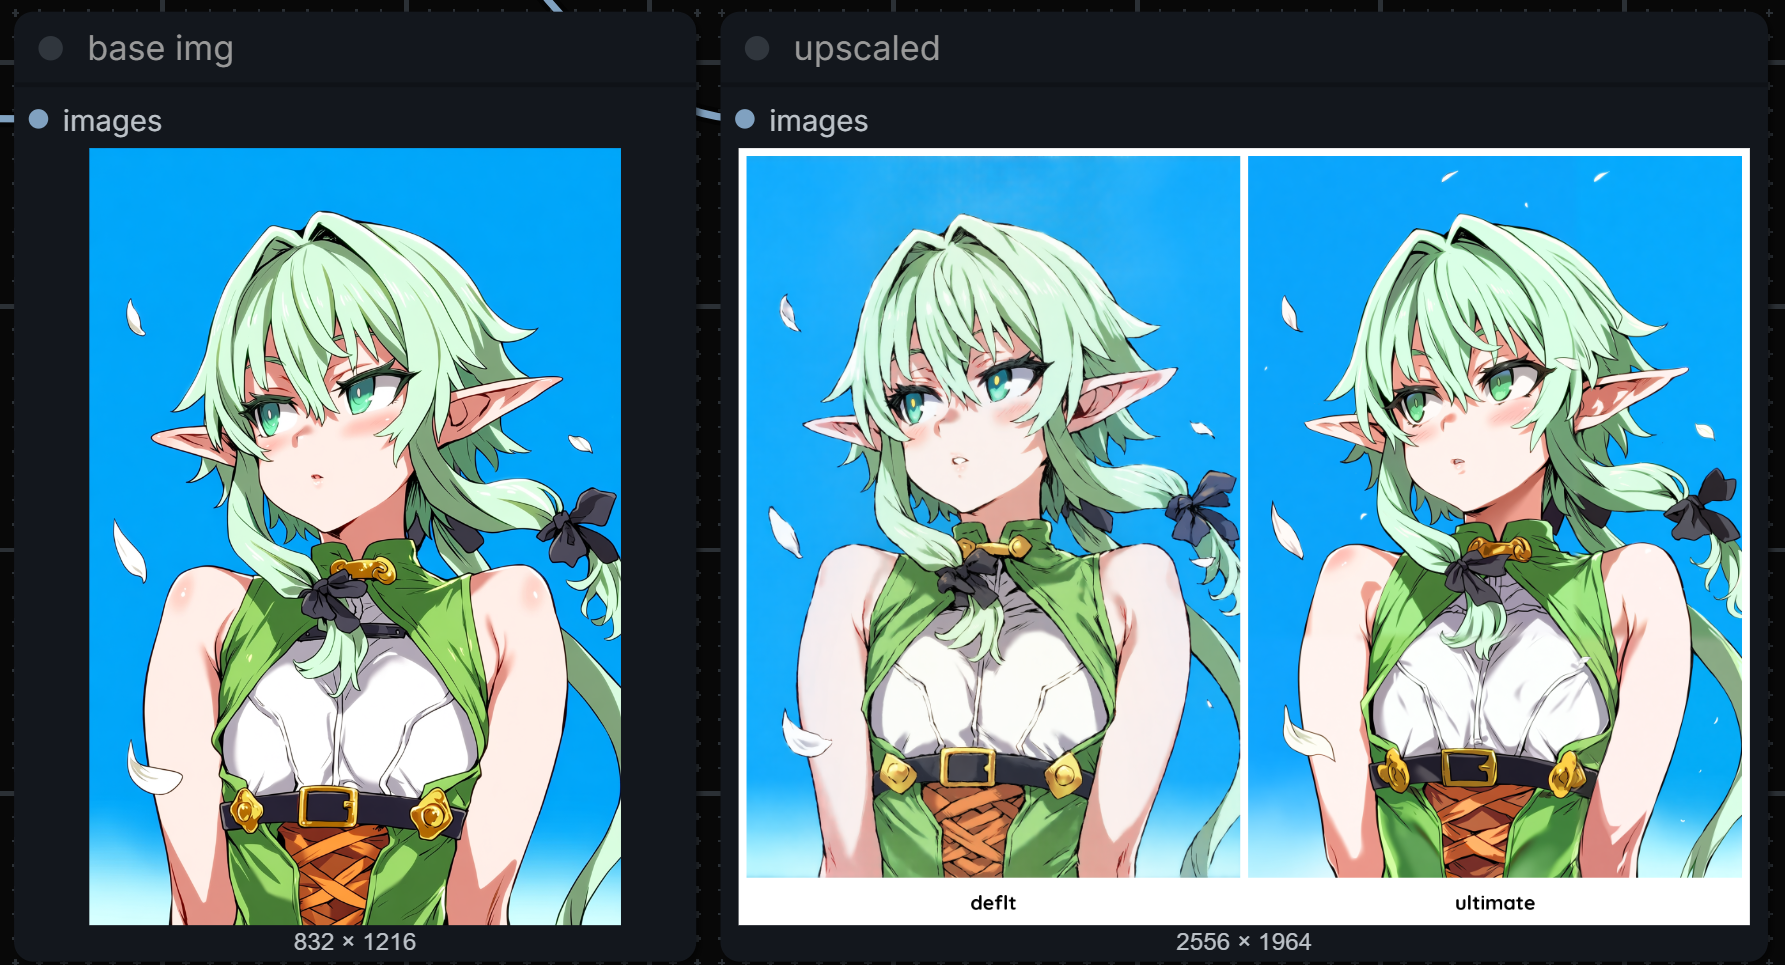
Moreover, I have a guess why this happens. Most likely, since the current Anima preview was trained only on 512, when it tries to process anything above 1mp, it results in such a mess (although I am not entirely sure about this, it handled up to 1024x1536 just fine🤔). But it handles individual tiles from ultimate without any issues. So thank you, I have realized that I should give it a try after looking at your workflow.
Basically, I have resolved this issue, but perhaps my approach with such relatively high step and denoise values is incorrect, so I would be glad to hear if you have any thoughts
@degurshaft the only reason why I like Anima at all is that it is stupid good at prompt adherence. When the full version comes out, I'm sure I'll change my mind.
Typically when you have a model and exceed the base size, it starts to tile its output (two people, artifacts, etc.) I never have really noticed that other than what I'd normally expect from any Model.
As far as Ultimate goes, You're using it as a second pass. I use it as a detailer.
@lonecatone23 I also cannot wait for the Anima release. After all, qwen, even at 0.6B, looks much better as a TE than clip, and the smaller nuances will be resolved once the community starts actively making fine tunes, just like what happened with sdxl
@lonecatone23 Exactly.
I might add that tiled SEGS upscaler works better if you want more than just clean up (ie. fix details), especially per-tile-prompted. But this is a great upscale method for the model specifically.
@yorgash You'd have to show me a good example of that. That sounds liek detailers, not upscalers
@lonecatone23 Same as SD upscale. Send it to an upsampler model then rework it per tile.
@yorgash so when you tile an image, it's typiclally to save VRmm. you then have to stich it back together. If you are using it a SEGS detailer t do it, you're feathering it back together.
I'm running a bounty right now. Show me your work and get ⚡⚡⚡
https://civitai.com/bounties/11666/flow-masters