


Flux.2 (Dev/Klein) AIO workflow
Flux.2's use cases are almost endless, and this workflow aims to be able to do them all - in one!
- T2I (with or without any number of reference images)
- I2I Edit (with or without any number of reference images)
- Edit by segment: manual, SAM3 or both; a light version with no SAM3 is also included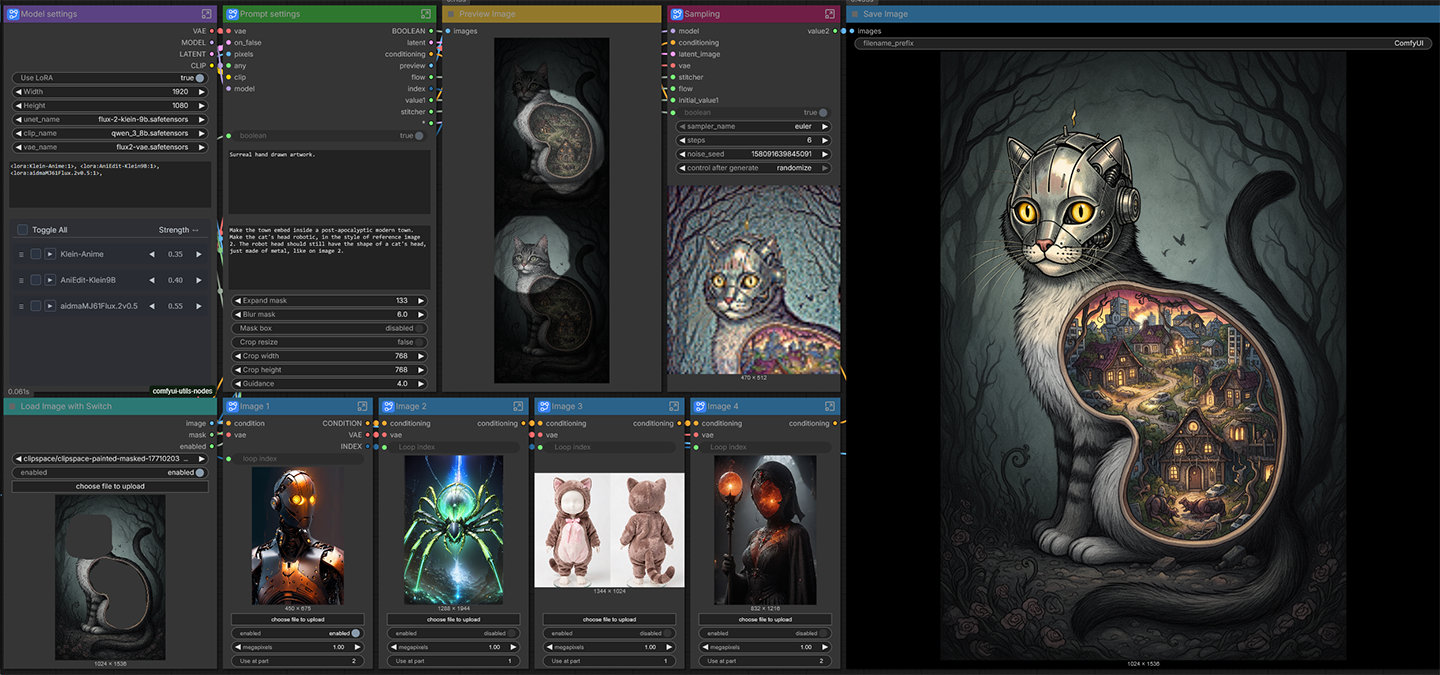
How to use
Load image and enable
This is the main image to use as a reference. The main things to adjust for the workflow:
- Enable/disable: if you disable this, the workflow will work as text to image.
- Draw mask on it with the built-in mask editor: no mask means the whole image will be edited (as normal). If you draw a single mask it will work as a simple crop and paint workflow. If you draw multiple (separated) masks, the workflow will make them into separate segments. If you use SAM3, it will also feed separated masks versus merged, and if you use both manual masks and SAM3, they will be batched!
Model settings
You can load your models here - along with LoRAs -, and set the size for the image if you use text to image instead of edit (disable the main reference image).
Prompt and crop settings
Prompt and masking setting. Prompt is divided into two main regions:
- Top prompt is included for the whole generation, when using multiple segments, it will still preface the per-segment-prompts.
- Bottom prompt is per-segment, meaning it will be the prompt only for the segment for the masked inpaint-edit generation. Enter / line break separates the prompts: first line goes only for the first mask, second for the second and so on.
- Expand / blur mask: adjust mask size and edge blur.
- Mask box: a feature that makes a rectangle box out of your manual and SAM3 masks: it is extremely useful when you want to manually mask overlapping areas.
- Crop resize (along with width and height): you can override the masked area's size to work on - I find it most useful when I want to inpaint on very small objects, fix hands / eyes / mouth.
- Guidance: Flux guidance (cfg). The SAM3 model has separate cfg settings in the sampler node.
Preview segments
I recommend you run this first before generation when making multiple masks, since it's hard to tell which segment goes first, which goes second and so on. If using SAM3, you will see the segments manually made as well as SAM3 segments.
Reference images 1-4
The heart of the workflow - along with the per-segment part.
You can enable/disable them. You can set their sizes (in total megapixels).
When enabled, it is extremely important to set "Use at part". If you are working on only one segment / unmasked edit / t2i, you should set them to 1. You can use them at multiple segments separated by comma.
When you are making more segments though, you have to specify which segment to use them.
An example:
You have a guy and a girl you want to replace and an outfit for both of them to wear, you set Image 1 with the replacement character A to "Use at part 1", image 2 with replacement character B set to "Use at part 2", and the outfit on image 3 (assuming they both want to wear it) set to "Use at part 1, 2", so that both image will get that outfit!
Sampling
Not much to say, this is the sampling node.
Auto segment
- Use SAM3 enables/disables the node.
- Prompt for what to segment: if you separate by comma, you can segment multiple things (for example "character, animal" will segment both separately). Use character:4 for example if you want to segment up to 4 characters.
- Threshold: segment confidence 0.0 - 1.0: the higher the value, the more strict it will be to either get what you want or nothing.
Custom nodes needed:
rgthree-comfy
ComfyUI Impact Pack
ComfyUI-KJnodes
ComfyUI-Easy-Use
ComfyUI-Inpaint-CropAndStitch
ComfyUI-Lora-Manager
Description
Reduced the number of custom nodes to 5, with all of them being the absolute most famous, well-maintained node packs. The rest using Core nodes now.
FAQ
Comments (3)
This is inasanely stellar work. Your logic layout is inspiring. 👍
How can I fix this error? "lora loader (lora manager) Missing connection Required input slots have no connection feeding them."
To fix this, you must ensure all required circle inputs on the left side of the Lora Loader nodes are connected to matching outputs from other nodes.