

Thanks for your attention.
contact me if you want, discord with "ttplanet", Civitai with "ttplanet"
you can also join the group discussion with QQ group number: 294060503
update for rank256 version, please notice it will save the VRAM, but it will decrease the Quality!!!
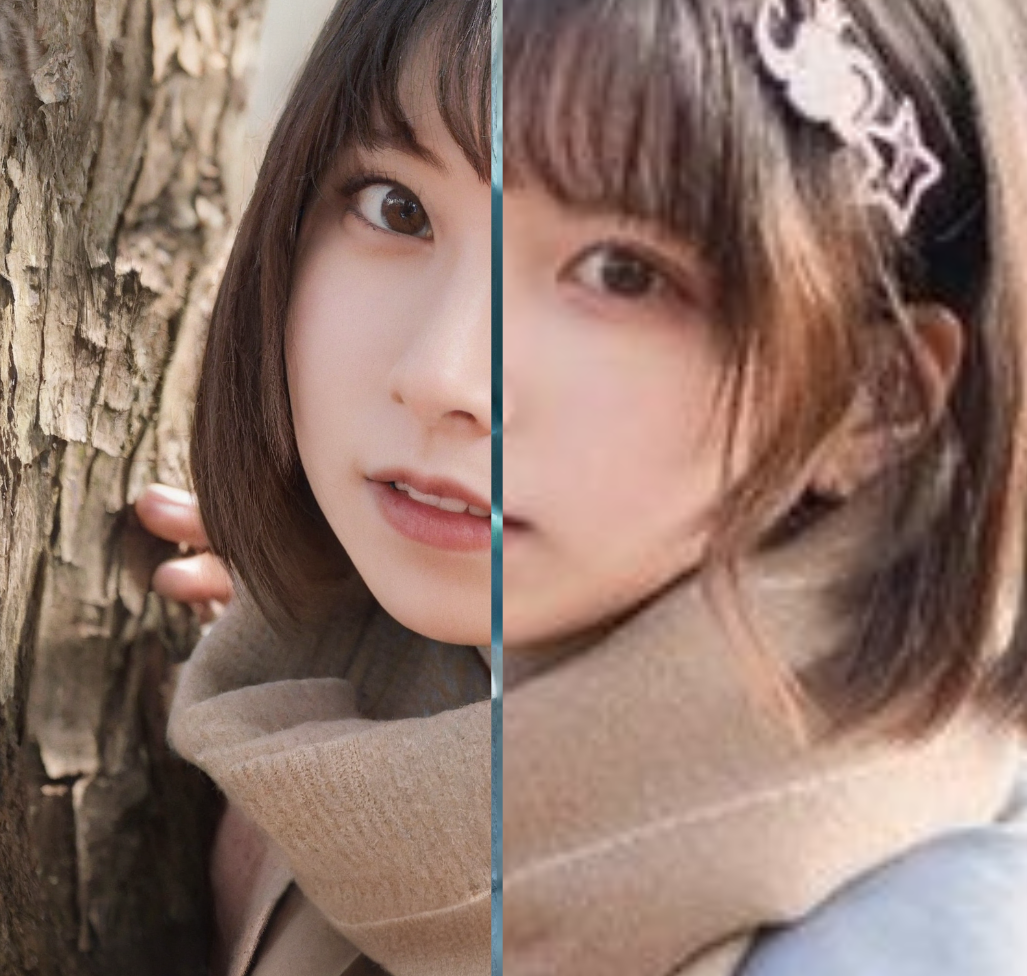
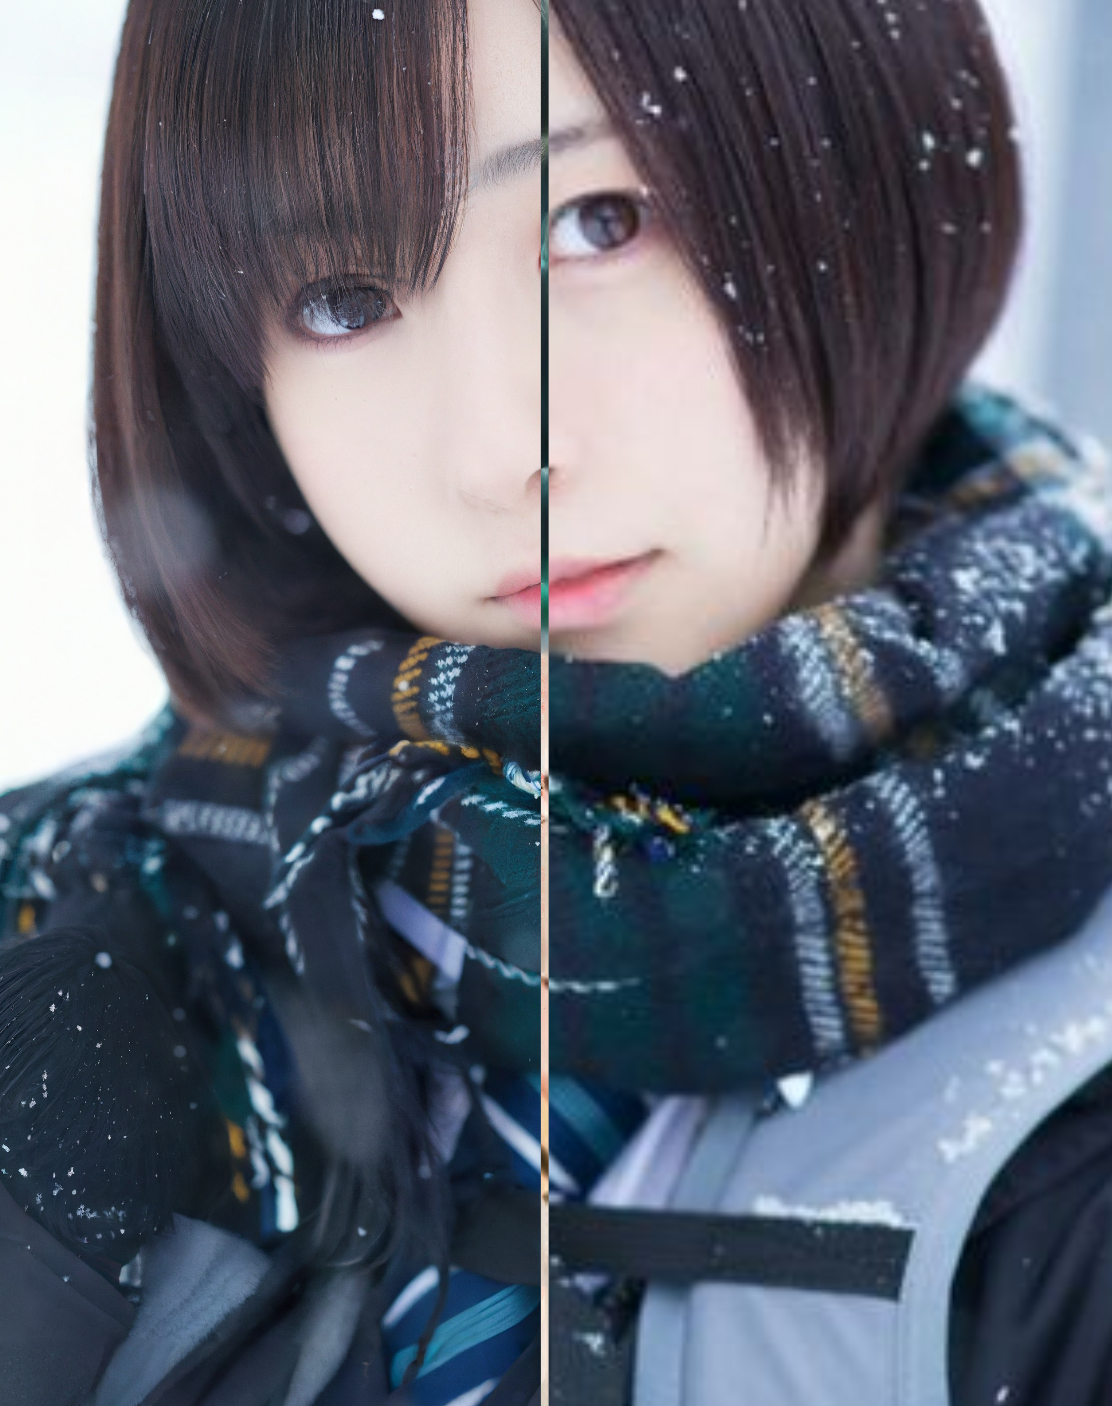
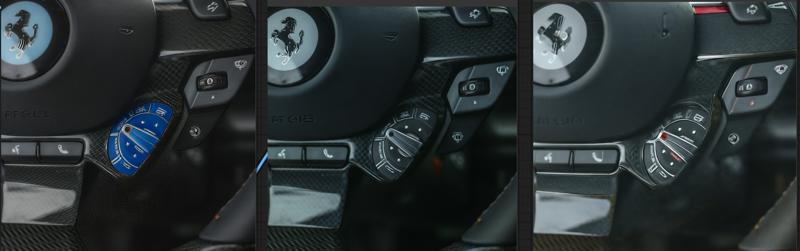
please refer to the following pic to decide which version you will use:
the logo of Farai, V2>V1>rank256
the material of carbon fiber. V2=V1>rank256
update Preprocessor for comfyui
you can find it here:https://civarchive.com/models/426501/60sec-process-for-4k-resolution-t2i-with-rtx4090-and-tile-model
in the workflow package
Latest Update 2024/4/13:
Here's a refined version of the update notes for the Tile V2:
-Introducing the new Tile V2, enhanced with a vastly improved training dataset and more extensive training steps.
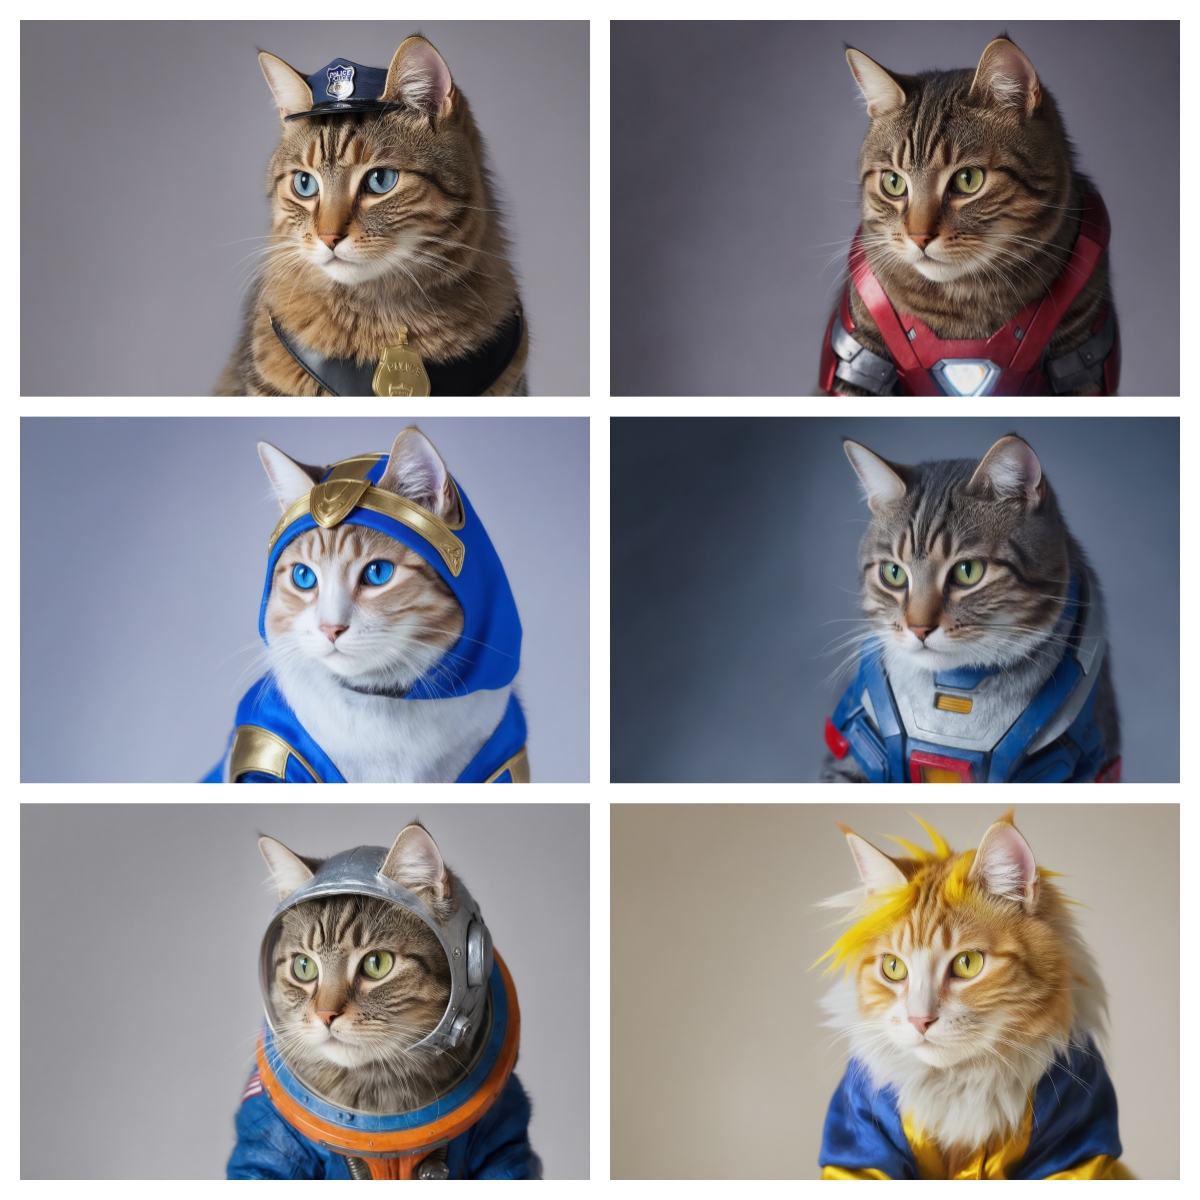
-The Tile V2 now automatically recognizes a wider range of objects without needing explicit prompts.
-Strong text reorganization, can keep the most clear text with style transfer process.
-I've made significant improvements to the color offset issue. if you are still seeing the significant offset, it's normal, just adding the prompt or use a color fix node.
-The control strength is more robust, allowing it to replace canny+openpose in some conditions.
If you encounter the edge halo issue with t2i or i2i, particularly with i2i, ensure that the preprocessing provides the controlnet image with sufficient blurring. If the output is too sharp, it may result in a 'halo'—a pronounced shape around the edges with high contrast. In such cases, apply some blur before sending it to the controlnet. If the output is too blurry, this could be due to excessive blurring during preprocessing, or the original picture may be too small.
Enjoy the enhanced capabilities of Tile V2!
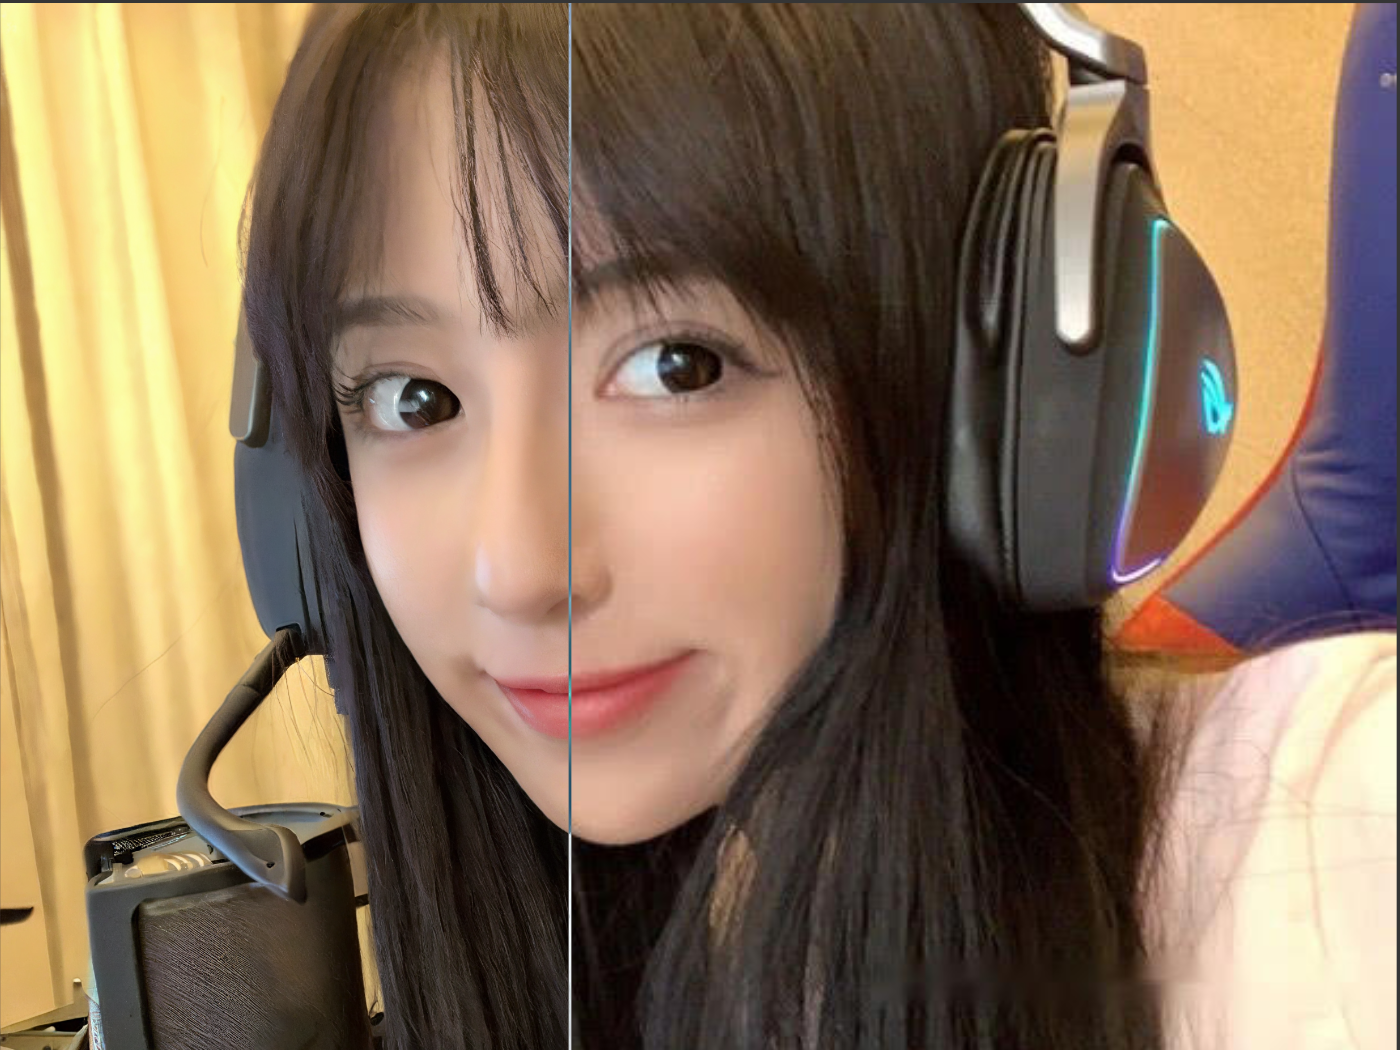
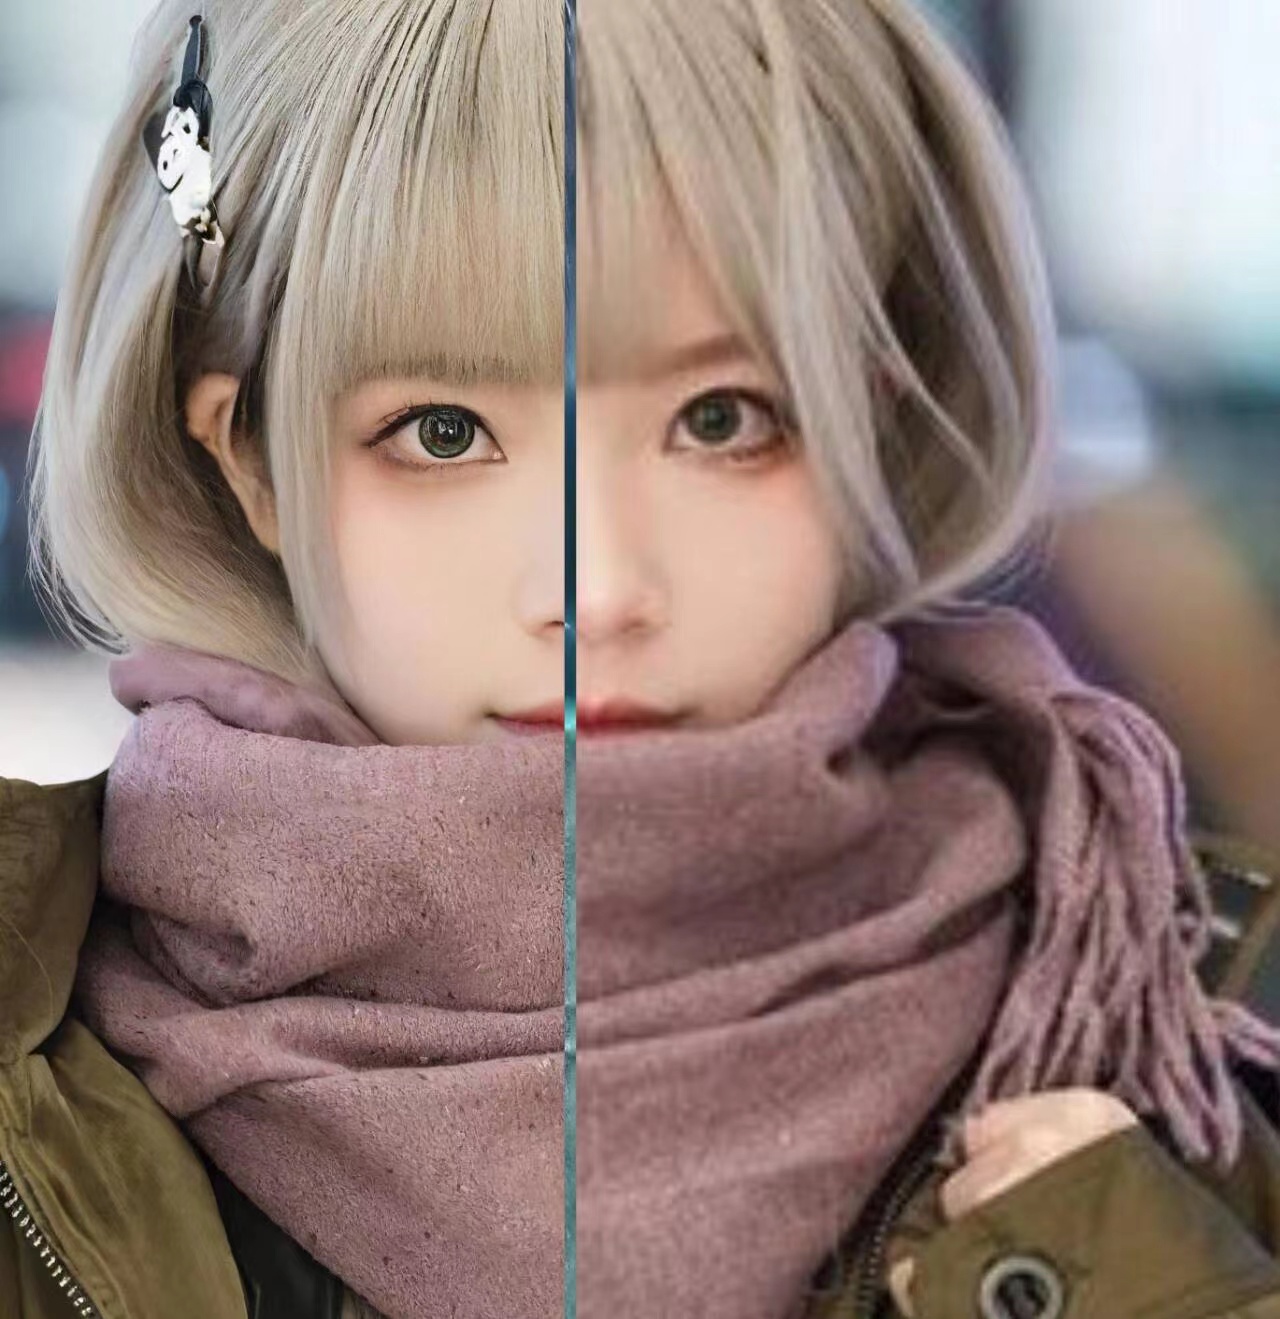
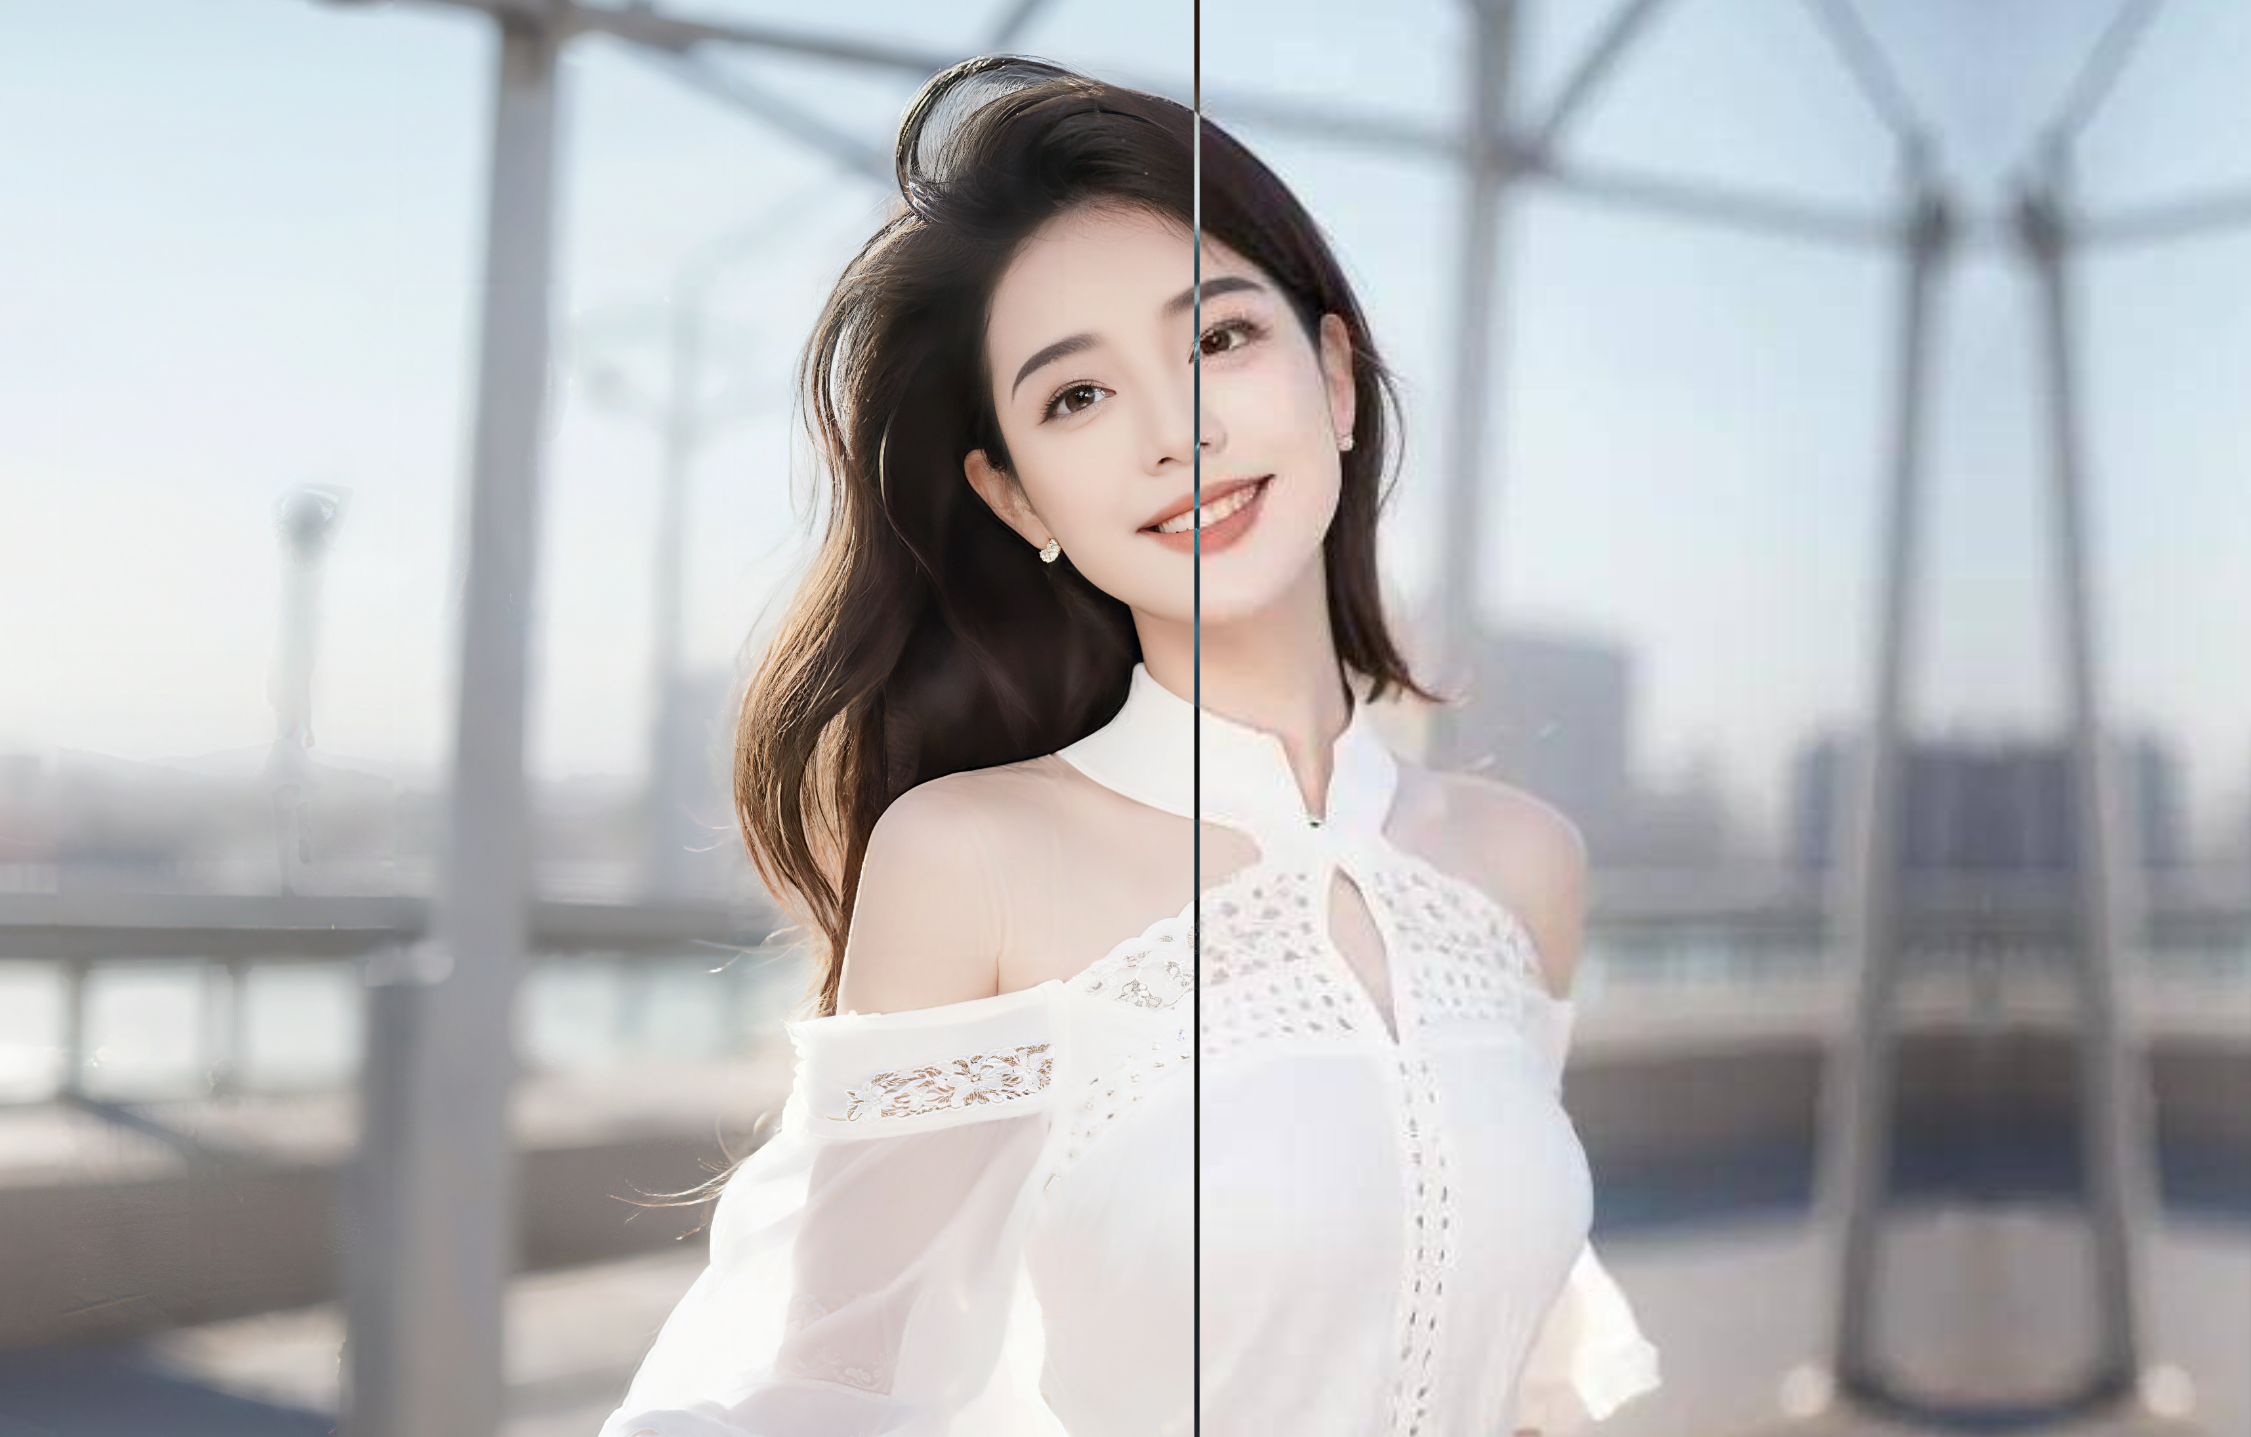
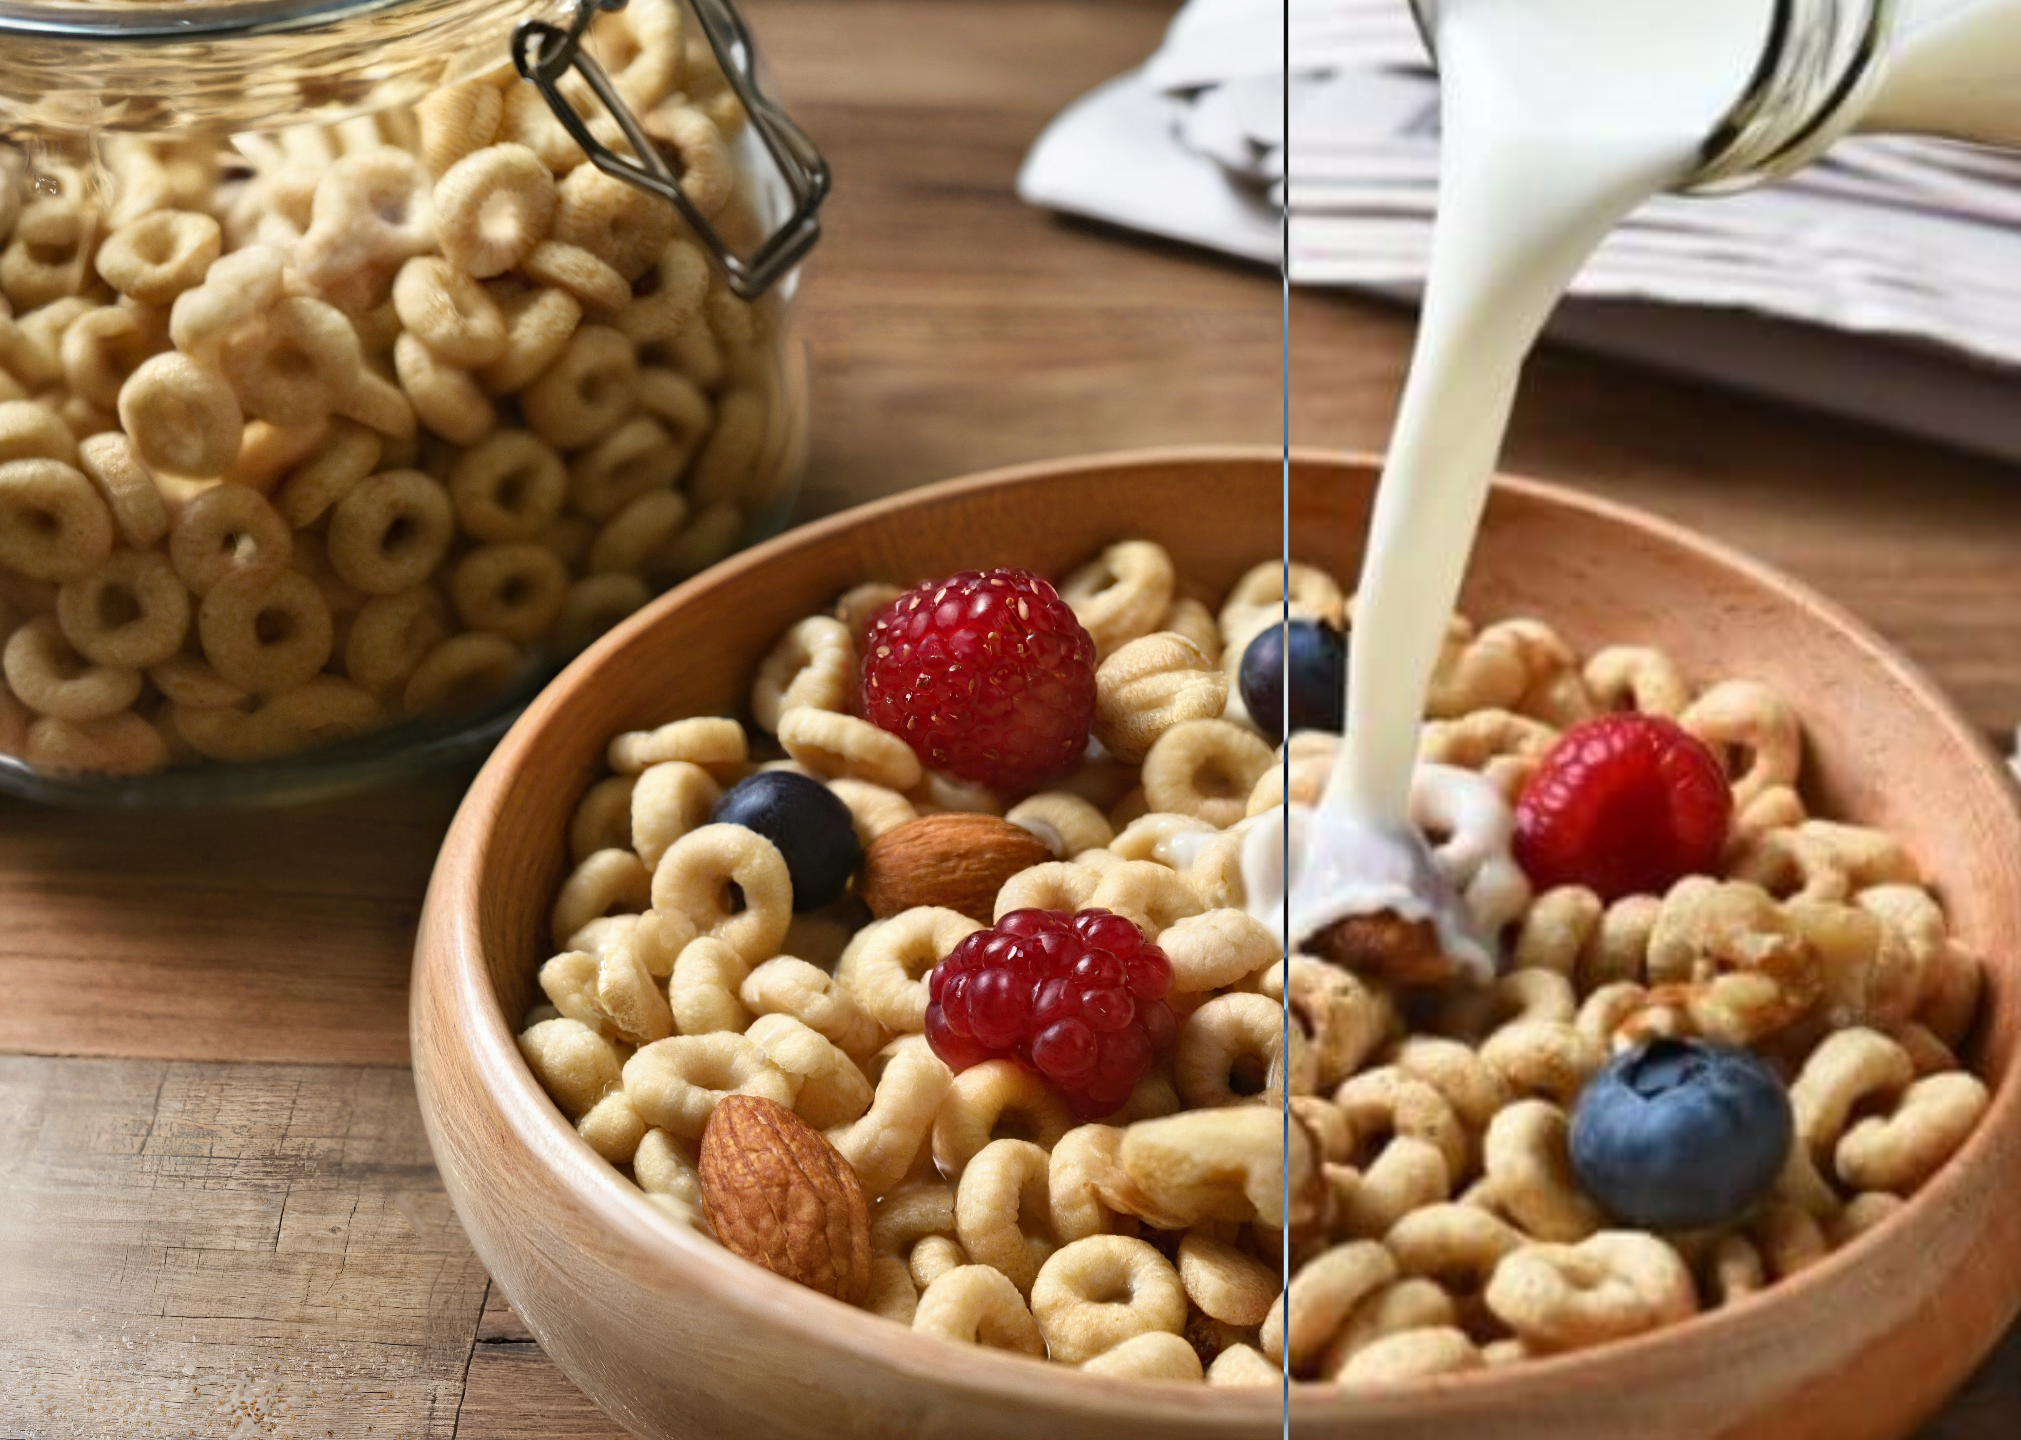
This is a SDXL based controlnet Tile model, trained with huggingface diffusers sets, fit for Stable diffusion SDXL controlnet.
It is original trained for my own realistic model used for Ultimate upscale process to boost the picture details. with a proper workflow, it can provide a good result for high detailed, high resolution image fix.
As there is no SDXL Tile available from the most open source, I decide to share this one out.
update for style change application instruction and upscale simple work flow:
update the style change workflow for comfyui:
https://openart.ai/workflows/gJQkI6ttORrWCPAiTaVO
Part1 for style and background change application:
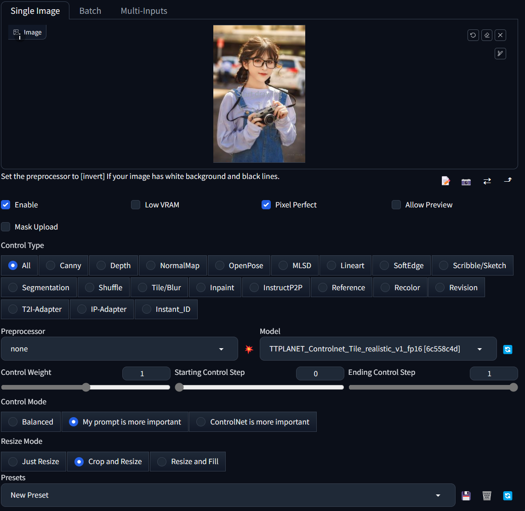
Open a A1111 webui.
select a image you want to use for controlnet tile
remember the setting is like this, make 100% preprocessor is none. and control mode is My prompt is more important.
 :
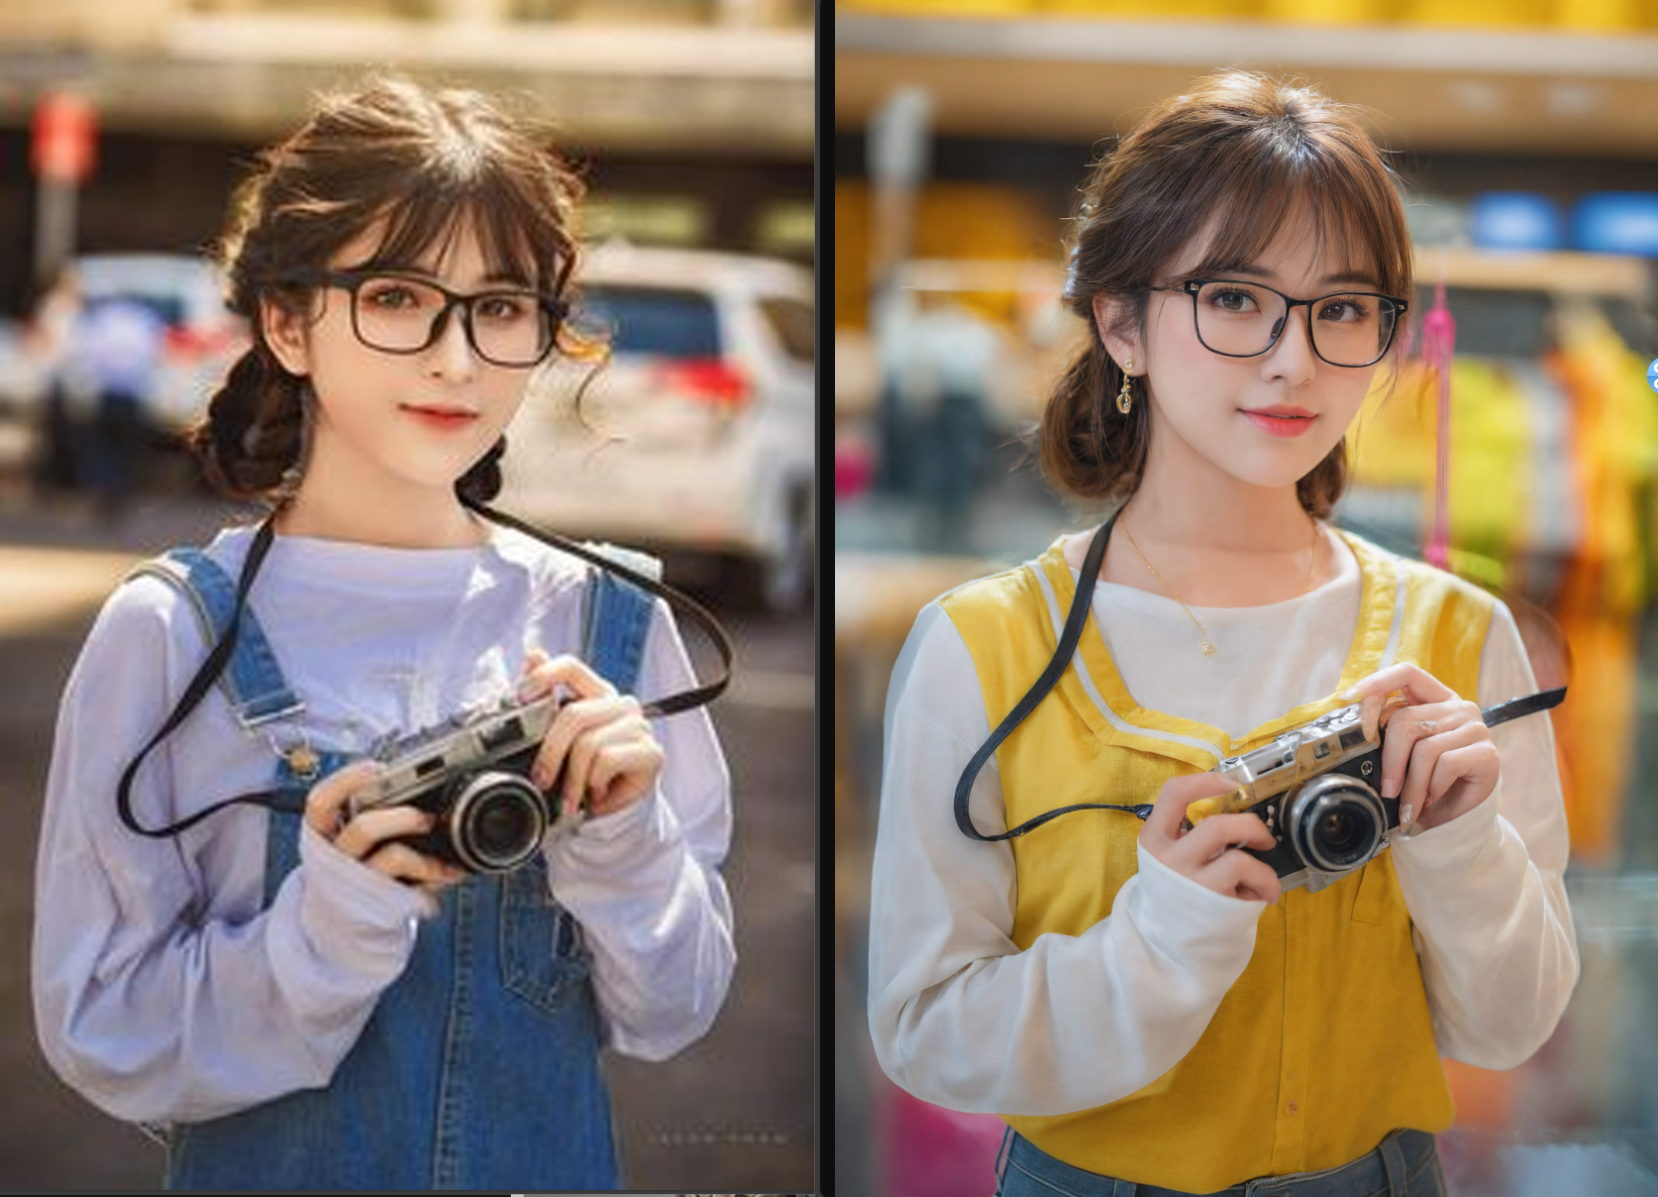
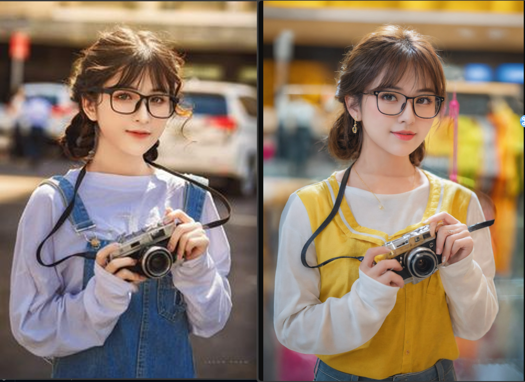
:type in the prompts in positive and negative text box, gen the image as you wish. if you want to change the cloth, type like a woman dressed in yellow T-shirt, and change the background like in a shopping mall,
Hires fix is supported!!!
You will get the result as below:
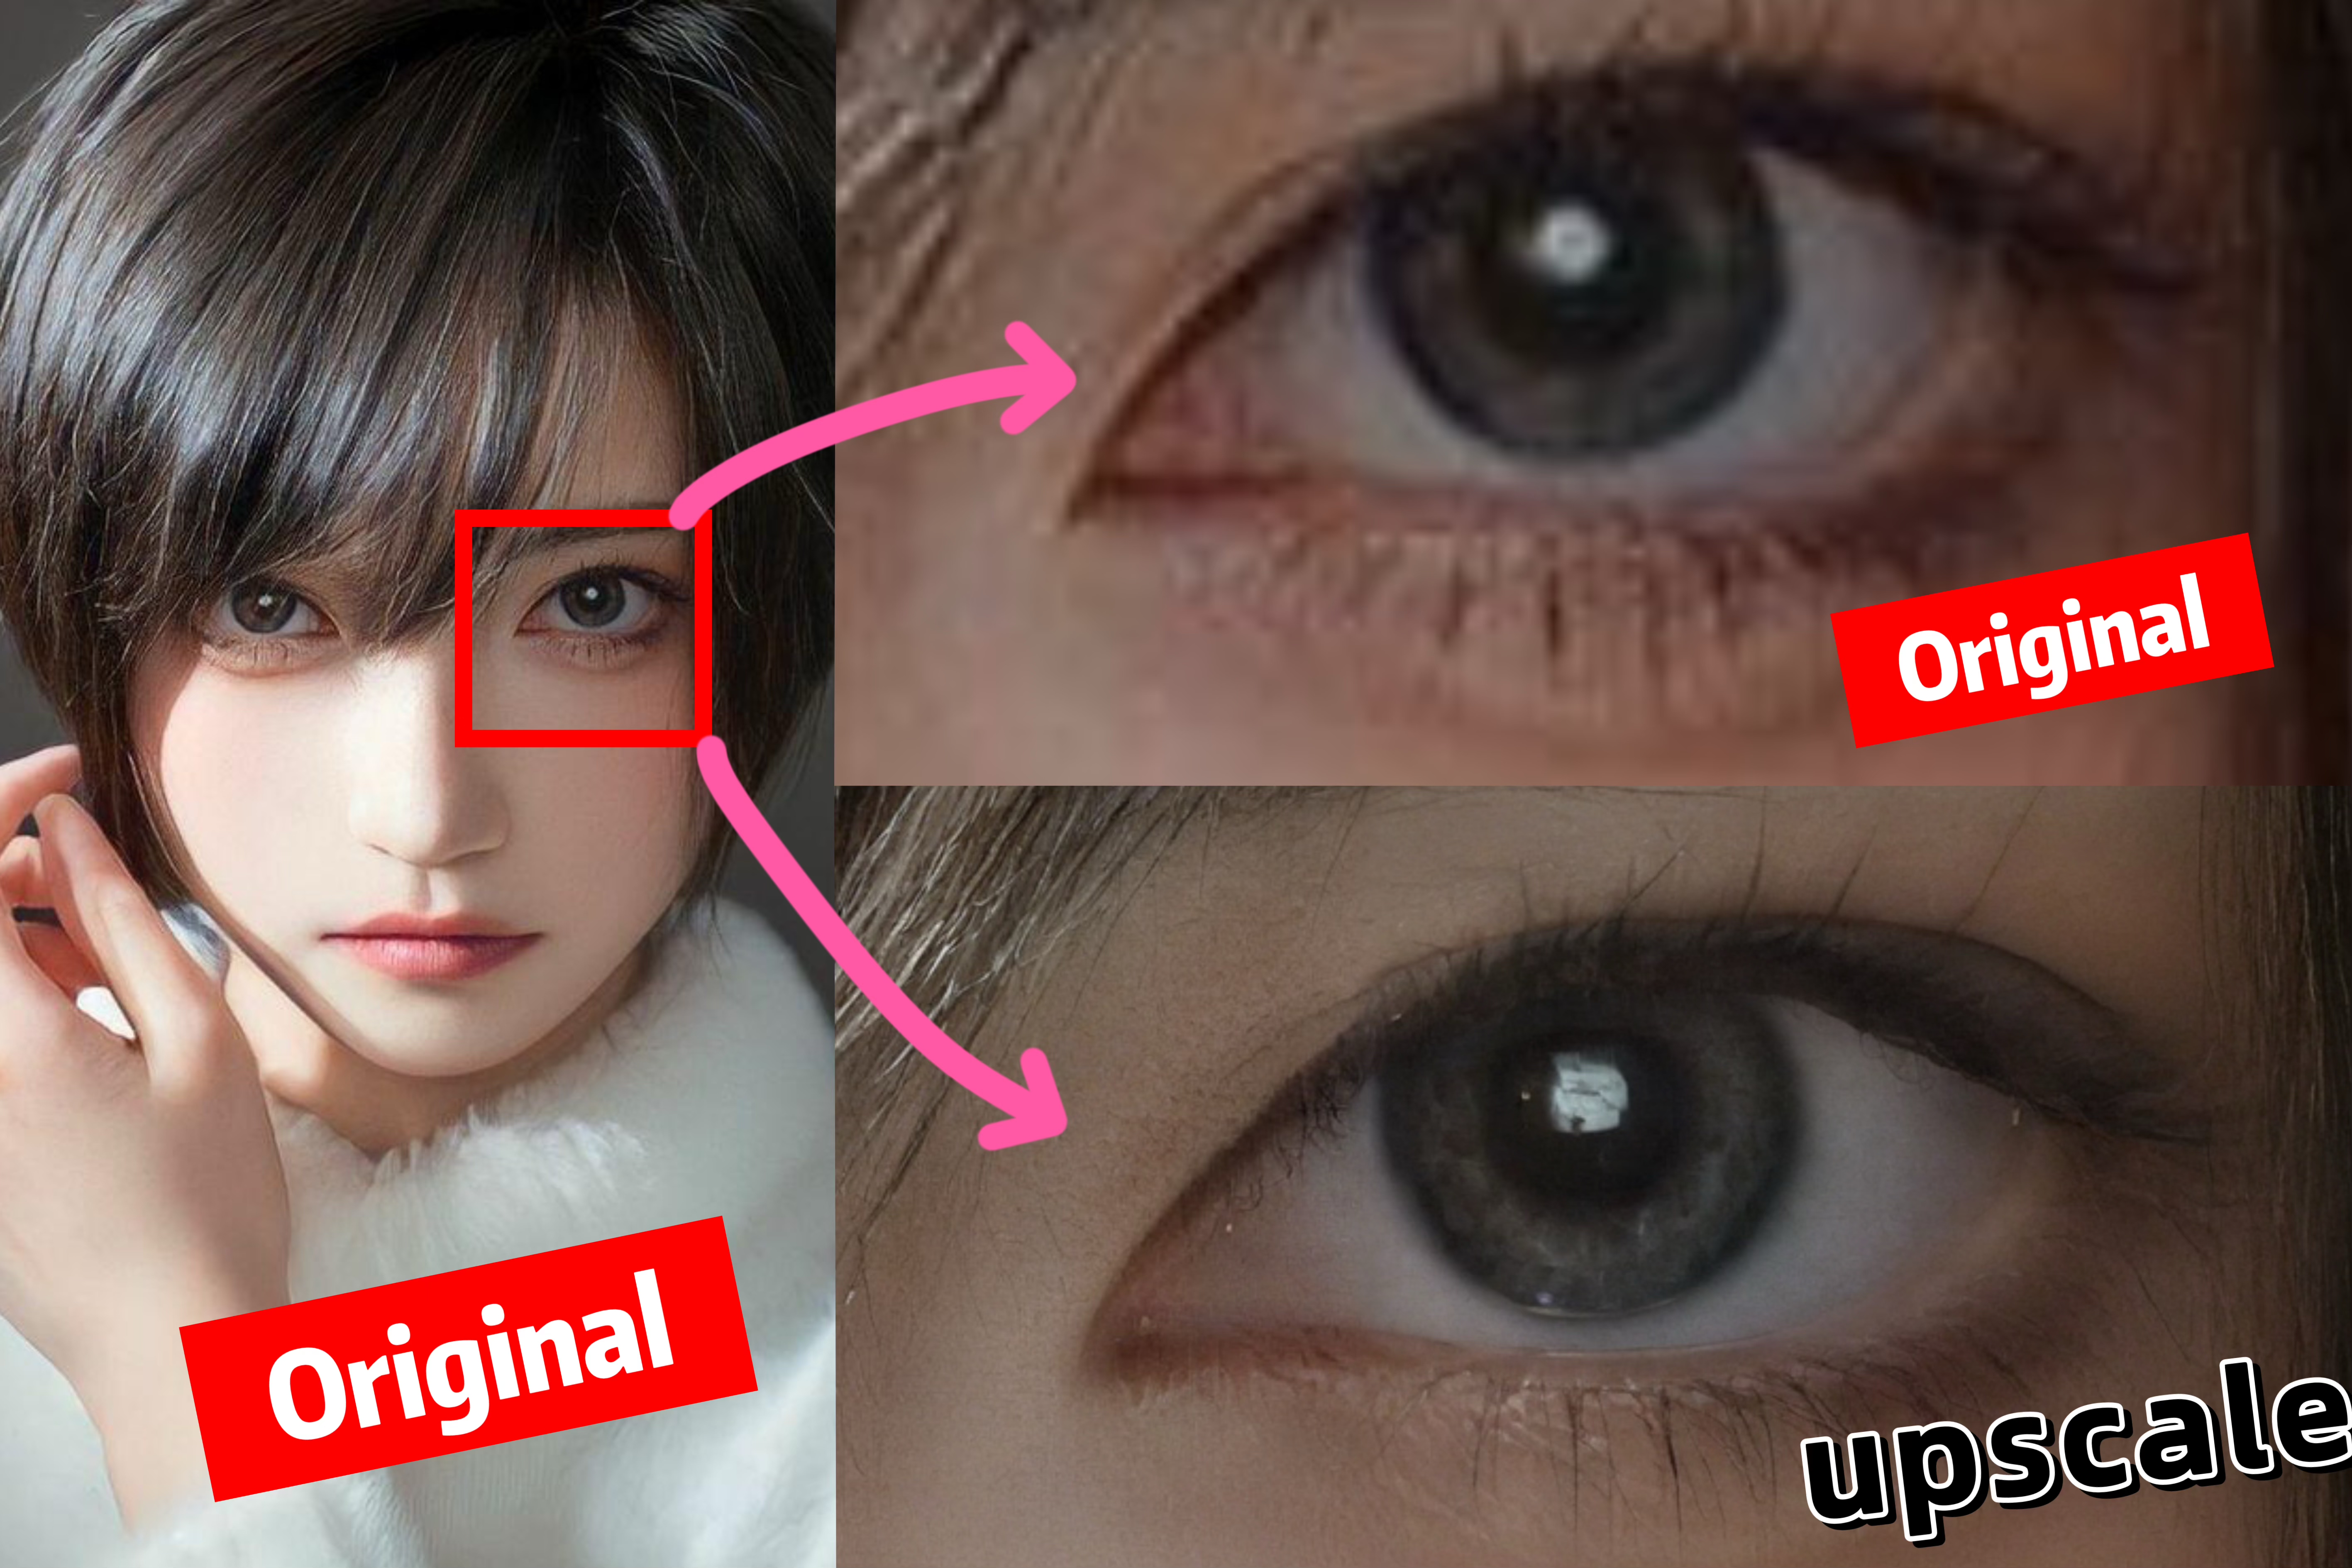
Part2 for ultimate sd upscale application
Here is the simplified workflow just for ultimate upscale, you can modify and add pre process for your image based on the real condition. In my case, I usually make a image to image with 0.1 denoise rate for the real low quality image such as 600*400 to 1200*800 before I through it into this ultimate upscale process.
Please add IPA process if you need the face likes identical, please also add IPA in the raw pre process for low quality image i2i. Remember, over resolution than downscale is always the best way to boost the quality from low resolution image.
https://civarchive.com/models/333060/simplified-workflow-for-ultimate-sd-upscale
This is a SDXL based controlnet Tile model, trained with huggingface diffusers sets, fit for Stable diffusion SDXL controlnet.
It is original trained for my own realistic model used for Ultimate upscale process to boost the picture details. with a proper workflow, it can provide a good result for high detailed, high resolution image fix.
As there is no SDXL Tile available from the most open source, I decide to share this one out.


Developed by: TTPlanet
Model type: Controlnet Tile
Language(s) (NLP): No language limitation
Uses
Important: Tile model is not a upscale model!!! it enhance or change the detail of the original size image, remember this before you use it!
This model will not significant change the base model style. it only adding the features to the upscaled pixel blocks....
--Just use a regular controlnet model in Webui by select as tile model and use tile_resample for Ultimate Upscale script.
--Just use load controlnet model in comfyui and apply to control net condition.
--if you try to use it in webui t2i, need proper prompt setup, otherwise it will significant modify the original image color. I don't know the reason, as I don't really use this function.
--it do perform much better with the image from the datasets. However, everything works fine for the i2i model and what is the place usually the ultimate upscale is applied!!
--Please also notice this is a realistic training set, so no comic, animation application are promised.
--For tile upscale, set the denoise around 0.3-0.4 to get good result.
--For controlnet strength, set to 0.9 will be better choice
--For human image fix, IPA and early stop on controlnet will provide better reslut
--Pickup a good realistic base model is important!
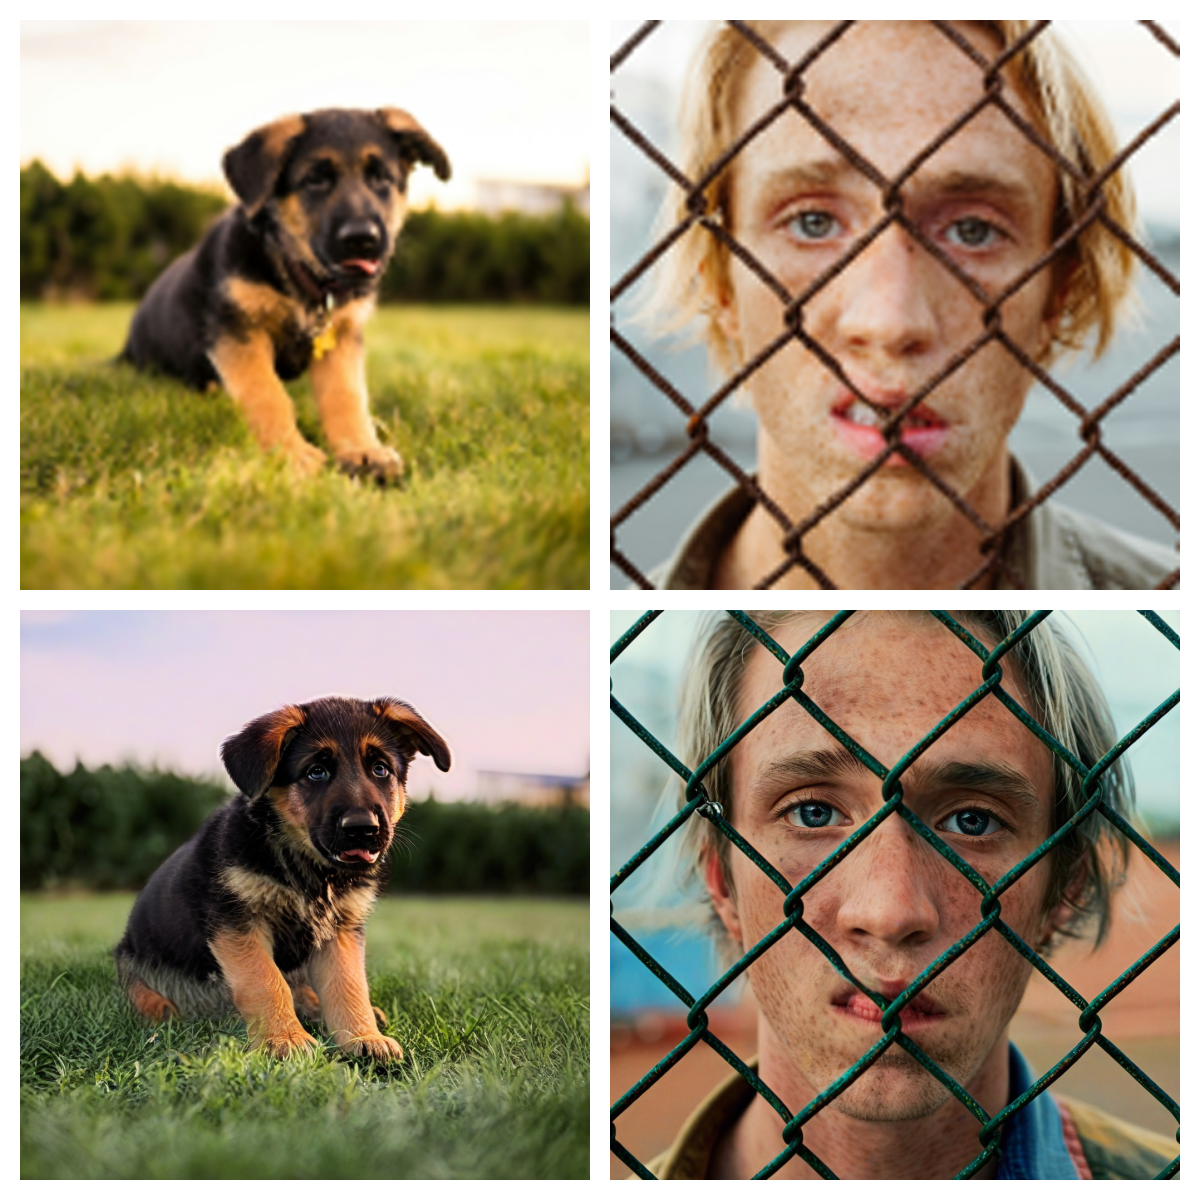
blurry recovery:


cloth change but keep the pose and person:
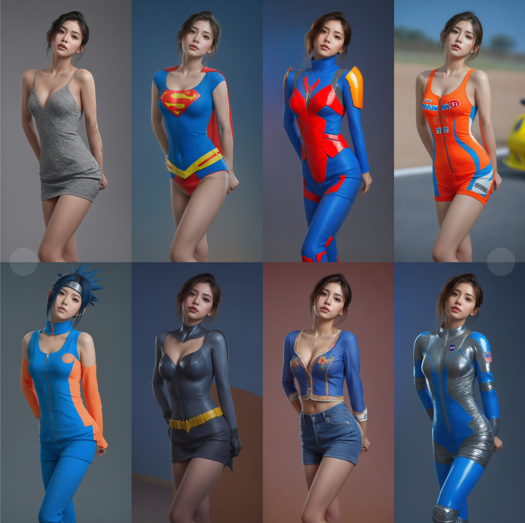
Besides the basic function, Tile can also change the picture style based on you model, please select the preprocessor as None(not resample!!!!) you can build different style from one single picture with great control!

Bias, Risks, and Limitations
No commercial USE!!!! Do not use it for adult content
Recommendations
Use comfyui to build your own Upscale process, it works fine!!!
Special thanks to the Controlnet builder lllyasviel Lvmin Zhang (Lyumin Zhang) who bring so much fun to us, and thanks huggingface make the training set to make the training so smooth.
Model Card Contact
contact me if you want, discord with "ttplanet", Civitai with "ttplanet"
Description
FAQ
Comments (53)
Thanks for training this controlnet!
Could you please share the workflow that you have used for "blurry recovery"?
Yes please. And how to do this in the automatic1111 interface
I am working on a simplified version for comfyui as it consumes great resource now!!! 5 mins/per pic based on 4090!!!
@ttplanet i am using comfyui's load controlnet and apply controlnet with none preprocessor. getting this error "Input and output must have the same number of spatial dimensions, but got input with spatial dimensions of [6, 6, 768] and output size of (768, 768). Please provide input tensor in (N, C, d1, d2, ...,dK) format and output size in (o1, o2, ...,oK" other controlnet models seem to work, this is not for some reason. any ideas with comfy?
@omrio for style change function, I don’t how to do my prompt is more important model in comfyui, I will check. I DON’t use comfyui as much as A1111 webui. For upscale function, I do use comfyui for upscale by using apply controlnet and model loader. I also use no preprocessor in comfyui. But when you do upscale in webui I used Tile resample processor. Both webui and comfyui request the ultimate sd upscale extension. Let me know if you have more questions
I have updated for ultimate workflow, but this is not a blur fix, for blur fix, please process based on the actual condition, may combine with style change + upscale, or i2i modification as normal +upscale. it all depends on the condition of image. remember, Tile model is not a upscale model, it can't be directly used for upscale.
Sorry, I don't understand your instructions how to use it.
Can you please give a set of instructions / a workflow for A1111 about what to do to get an unblured version of an image?
will do tomorrow as I thought it is same as sd1.5 age
instruction for style change has been updated, follow my instruction, you should get what I can do
@ttplanet Is it possible for you to make a video for automatic1111? ☺️
@marjan2k use my comfyui workflow please
Can I use it in comfyui now
For image upscale, yes! For style change, not the same as webui
finally a good tile cn model for sdxl! nice job
Great, the model I've always wanted
It feels like a more controlled img2img process (well maybe that's the idea), but not "enhace", as it usually changes the image a lot, or I'm doing something wrong. But it gives good results.
eDIT: also I don't see any tile process
Read the instruction completely for part 2, upscale workflow it there.
When you do t2i, with my prompt is more important, you will see things changed a lot, img to img, the idea is to keep the img no structure change but a enhance on detail.
I've tried with each version of the seamfix tile options of ultimate upscale script, and you can clearly see the tile edges, which ruins the image. Unless anyone can recommend a way around this, unfortunately this is unusable.
I am sorry to hear that you are experiencing a tile edge issue, which I assume it looks like square block in the image? I did not see any through my process as I did not use seamfix at all. I am using a comfyui process, I have posted in the instruction, maybe you can try?
Ultimate requires you to use max. 0.35 denoise strength. To get rid of seams you can also use Multidiffusion (TiledDiffusion) extension.
This controlnet model has been covered in the video below, and he sets the tile padding in Ultimate SD Upscale to 64 (and seamfix is off). Also covers some useful nodes for this type of worklflow: Image Comparer (rgthree) and Color Match from ComfyUI-Image-Filters
https://www.youtube.com/watch?v=Abkm4VYh9VI&ab_channel=Arch_AI_3D
I've always struggled getting seems too. Setting the denoising strength between 1-1.5 helps but I swear I still see the seams if I zoom in.
@notjackdorsey 0.2... not 1-1.5
FORGE 版!! 不起作用嗎??
没有测试过forge,理论上没区别
我也在用forge,不起作用(其实有点用,但是很奇怪的图像),确实。
I'm also using Forge, it doesn't work (it's actually a bit useful, but it's a strange image), indeed.
@CyberSwordworks my prompt is more important will bring you the correct effect
虽然有放大,但我无法生成你范例图的样子,无法准确放大。
@CyberSwordworks 我的范例都是用800分辨率以下的网络图片测试生成的。做了两次放大
经我反复测试,forge,Lightning和turbo都可以用,很惊喜的模型,不过放大质量我还在测试,还不算满意。
@CyberSwordworks forge作者发明的模型代码和训练方式,当然可以用啦,感谢大神lvming zhang,他是个天才
Can it be also used in Fooocus? Especially for upscaling?
I'm seeking assistance with upscaling an image using the WebUI, and being new to this, I've explored every option and combination available. Unfortunately, despite my efforts, I consistently encounter visible tiles (squares) in the final result. Let me provide as much information as possible about the process I followed.
Initially, I created a 1344 by 768 image. Subsequently, I utilized Hires.fix to upscale it by 2x, employing 4x-UltraSharp with a denoising setting of 0.45 – all of which produced satisfactory results.
Following this, I transferred the image to i2i, maintaining identical parameters from the t2i process, but refined the prompt to only include "masterpiece, best quality." Additionally, I adjusted the denoise strength to 0.35, while keeping the rest unchanged (Eular a, CFG: 7, Steps: 28). I activated ControlNet with this model, enabled Pixel Perfect, employed the tile_resample preprocessor, set a control strength and ending control step of 0.9, and kept the mode in Balanced. Finally, I incorporated the Ultimated SD upscaler script with the following settings: Upscaler: 4x-UltraSharp, Type: Linear, Tile width: 1536, Mask blur: 8, Padding 128.
Despite experimenting with various values, including blur, type, width, and padding, I'm unable to eliminate the visibility of squares in the output. Any assistance or guidance on this matter would be greatly appreciated. Thank you!
I will recommend the upscale should be done in i2i model rather than a t2i model.
gen a image you like, through it to i2i, use ultimate sd upscale script, use 8X upscale or 4X upscale model, set target upscale rate at 4X will be fine. apply the cn tile model to the upscale tile piece, it will control the tile image and adding details, when the script is done, it will combine all the tile pieces together and become a full img again.
please set denoising very low when you have a close up img for a person, like 0.2-0.25
if you are upscaling a sight view, higher to 0.4 is fine,
I will recommend use 1024 tile, because I trained it based on 1024 resolution. I don't recommend seam fix, it will damage the details, although it can fix the block line issue. 128 padding seems high, I usually use less than 64,
@ttplanet, appreciate your response. Despite my efforts, I'm consistently facing visibility issues with the lines. I haven't incorporated ComfyUI, but I carefully examined the workflow JSON. I'm confident I've transferred all relevant settings to WebUI. The generated image includes the following metadata:
parameters
masterpiece, best quality
Negative prompt: nsfw, lowres, bad anatomy, bad hands, text, error, missing fingers, extra digit, fewer digits, cropped, worst quality, low quality, normal quality, jpeg artifacts, signature, watermark, username, blurry, artist name
Steps: 28, Sampler: Euler a, CFG scale: 7, Seed: 808933342, Size: 2688x1536, Model hash: 1449e5b0b9, Model: animagine-xl-3.0, Denoising strength: 0.35, Ultimate SD upscale upscaler: 4x-UltraSharp, Ultimate SD upscale tile_width: 1024, Ultimate SD upscale tile_height: 1024, Ultimate SD upscale mask_blur: 8, Ultimate SD upscale padding: 32, ControlNet 0: "Module: tile_resample, Model: ttplanetSDXLControlnet_v10Fp16 [6c558c4d], Weight: 0.9, Resize Mode: Crop and Resize, Processor Res: 1088, Threshold A: 0.5, Threshold B: 0.5, Guidance Start: 0, Guidance End: 0.9, Pixel Perfect: True, Control Mode: Balanced, Hr Option: Both", Mask blur: 8, Inpaint area: Only masked, Masked area padding: 32, Version: f0.0.17v1.8.0rc-latest-276-g29be1da7
Would you mind examining this information and letting me know if anything appears unusual? If needed, can I share the image with you on Discord for further analysis? Thank you!
@MrCylion upscale usually don‘t need the prompt, I Will suggest as simple as you can, just focus on the main objects you need to work!
@ttplanet I finally understand what's going on thanks to your workflow. Actually, the squares are much worse in your workflow then what the WebUI was generating. However, the ColorFix node seems to fix about 90% of the issue. If I take your images into Photoshop and play around with the curves, they are still clearly there, just not as visible thanks to the color correction.
@MrCylion that‘s the reason I play it with comfyui and add the color fix. nice to know u can play it now
While exceptional in Krita AI diffusion for Photo restoration, there was no way to turn it off for AI art where upscale from a low image with bad details you want changes to happen to fix the image.
But photo Restoration this is amazing as keeps everything the same, but thats where issues lay where upscale of bad Ai renders they stay the same bad.
is there a way where this could be made a lora or something where it can be used when needed. though I'm aware its Ai diffusion krita that the issue as overwrites all upscalling to use this.
but this is amazing for use of photo Restoration.
So I don't know how most people are using this model, but loading this up using the HighRes-Fix Script node seems to keep amazing consistency using Latent upscaling, no matter how many interations you choose. Pretty incredible.
I tried img2img with 2 Ultimate SD Upscale nodes one after another and Advanced ControlNet between them. On the first one I used 4xUltraSharp and the second 4xFaceUpSharpDAT using RealVisXL Lightening. It did great job with the second upscale besides it cook the colors a bit.
I tried with HighRes-Fix Script it makes really crisp clean image but adds contrast and saturation. how do you fix that?
@toshiro_mifune I will need to re-train the model, I have noticed the issue
@ttplanet Great work on this model and thanks so much for releasing it! I am also noticing quite severe color shift towards yellow, especially on portraits. Is this something that would be improved with a re-training of the model, and do you know if/when you will release an updated model?
@ttplanet Your model works fine with the UltimateSDUpscale node with an image width scaling of 1344 by 1.5 times and a tile size of 1024. But in the “Apply” node the input should not be given an initial generation prompt, but almost empty text, only with some clarification of some high-end details ( for example, eyes). The only significant drawback of the model is that the resulting image appears to have a noticeable outlining of contrasting areas and small dots (such as stardust) - this is very similar to crude sharpening. Lowering the Apply Advanced Controlnet level to 0.56 helps, but not completely. The oversharpening effect remains noticeable. Further lowering this parameter leads to the fact that the displacement of part of the image at the border of the tiles again becomes noticeable.
@windlike_gust if you see it, because the weight is not soft enough.... and blur or soft weight can help!
@ttplanet Thanks for your response! When a Ultimate SD Upscale node works with the applied TTPlanet v1 model in ComfyUI, not the entire image will be oversharpened, but only very contrasting transitions such as contrasting lines and dots. The thickness of the oversharp contour exceeds the thickness of the line itself and the diameter of such points. That is, it is as if sharpening was performed on a very reduced image, and then the result was again scaled to the output. I'm talking about a situation where, when using your model, a minimized prompt of several tokens without amplifiers is received at the input. There is nothing to soften. If we apply a bypass to the Apply Advanced ControlNet node, the oversharp effect in the resulting image disappears, but the displacement of part of the image at the border of the tiles again becomes noticeable, which we wanted to get rid of.
Maybe the work of the USDU node in ComfyUI leads to this effect? I need to try other upscaling methods with your model.
@alexcopy @toshiro_mifune The color shift towards yellow is caused by the use of the 4x-UltraSharp model. You can test this by simply replacing the rescaling model with 4x-UniScaleV2_Soft for example.
In any case, I definitely see a shift towards yellowness from 4x-UltraSharp when using the Ultimate SD Upscale node in ComfyUI even without using the TTPlanet model.
@windlike_gust @windlike_gust @windlike_gust use prompt is more important will help, but still comfyui is easier to remove this side effect. I have no clue now how to balance it between control capability....I have just released v2, I guess you will like it!!!
@windlike_gust I tried different upscalers I believe -ESRGAN and something FaceDAT the image still get 'burned'/orange. And I upscale with empty prompts 512x768 images from sd1.5 and they look good, with low denoise of 0.2
@ttplanet The model is awesome! Thank you very much for the clarifications, including for the second version. I didn't use it quite correctly.
did someone tried different Sampler settings of Ultimate SD Upscale? What would be the best options for best quality?
Details
Files
ttplanetSDXLControlnet_v10Fp16.safetensors
Mirrors
ttplanetSDXLControlnet_v10Fp16.safetensors
TTPLANET_Controlnet_Tile_realistic_v1_fp16.safetensors
ttp_xl_tile_full.safetensors
diffusion_pytorch_model.fp16.safetensors
diffusion_pytorch_model.fp16.safetensors
TTPLANET_Controlnet_Tile_realistic_v1_fp16.safetensors
ttplanetSDXLControlnet_v10Fp16.safetensors
ttplanetSDXLControlnet_v10Fp16.safetensors
ttplanetSDXLControlnet_v20Fp16.safetensors
TTPLANET_Controlnet_Tile_realistic_v1_fp16.safetensors
Available On (1 platform)
Same model published on other platforms. May have additional downloads or version variants.