civitai-sync is a tool to download and explore your Civitai creations.
Download generations from the Civitai generator
Download posts from your public profile
Browse your creations offline, with the mini-website Explorer
Data and media is saved in date-ordered folders.
Auto-updates for new versions
Like it? Give a thumbs-up or review. ❤️
See comments below, and the discussion page for ideas and issues: https://civarchive.com/articles/5676
The program comes in 2 parts:
Command Line Interface (CLI). It runs in your computer terminal or command prompt
Explorer, a mini-website to browse your creations.
Civitai saves your generations for 30 days, so use the tool regularly.
Read on for installation instructions.
Download the tool
Download the tool from this page. It's a zip file.
On your computer, Unzip (or “Extract”) the file. It will create a new folder; rename it “civitai-sync”. Move the folder wherever you want to keep it.
Install Node.js, download it from: https://nodejs.org — if you already have Node, it needs version 18 or above.
If you have a nice new shiny clickable Node.js icon on your desktop or menu, don’t click it. You don’t need to. That’s for something else. Do this:
Install the tool
If updating from an earlier version, see "Manual software update" below.
On Windows, double-click the "install_win" file to install. This will open a command prompt, install the software dependencies and then close. Or, install manually with the steps below.
On Linux, Mac, open your Terminal app.
On Windows, your “Command Prompt”.Inside the terminal, change directory (“
cd”) to the unzipped “civitai-sync” folder. Ensure this matches the name and location on your system. For example:
cd Downloads/civitai-sync
On Windows, use backslashes, not forward-slashes, e.g:
cd C:\Downloads\civitai-syncInstall the software dependencies by typing:
npm run setup
Run the tool
Now you can run the program.
On Windows:
Double-click the "Civitai-Sync" file.
To add it as a Desktop shortcut icon, right-click on it > "Send to" > "Desktop (create shortcut)".
On Linux, Mac, or Windows:
In the terminal app, change directory ("
cd”)Run it by typing:
npm run cli
Manual software update (optional)
Since v4, software updates are automatically detected. When a new version is released, you will see an option to install the update.
If you want to manually upgrade:
Download the zip file, unzip it.
Copy the unzipped files into your existing “civitai-sync” program folder, overwriting the older files.
In the terminal app, change directory ("
cd”)Type: “
npm run setup”.On Windows, double-click on “install_win”.
Create an API key
For access to your account, you need a Civitai API key.
In Account Settings, see “API Keys” near the bottom of the page: https://civarchive.com/user/account
Click “Add API key”. Name it, e.g. “civitai-sync”. Click “Save”.
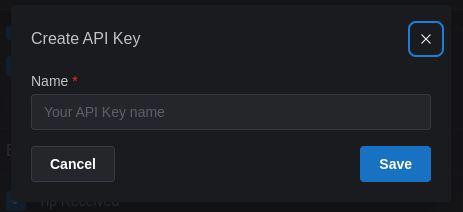
You will be shown the key only once > Copy it.
In civitai-sync, choose "Set API key", and paste the key.
(To paste, right-click > "Paste", or press "Ctrl+V" or "Ctrl+Shift+V")
Password protection
You can set a password to encrypt your API key, e.g. if you are on a shared computer. You'll enter the password each time you run the program. Or press "Enter" for no password.
Change Domain: civitai.red users
Go to Settings > Change Domain > civitai.red
This setting is visible for .red users who have "Enable Mature Settings" (18+) enabled at https://civarchive.com/user/account
Start Downloading
If your API key is saved, you can choose "Download generations" and "Download posts".
See “Options” to change what is download and where it is saved.
Download Location: inside the program folder in "data" and "media"; you can change to another location.
Choose: to make folders for your ❤️ favorited and 👍 liked gens, or to download only data.
Latest: download your most recent creations.
Or download just “Favorite / Liked” gens.
Open the Explorer
☞ Click "Start Explorer"
Data
Data is saved directly from Civitai's API, as text files (in “JSON” format). Prompts and metadata are already embedded in the media metadata (e.g. "EXIF" format).
You can explore the generation parameters and details for images and videos, in the civitai-sync Explorer.
Multiple accounts
The program is normally run as:npm run cli
To download from an alternative account, specify a unique name for it:
npm run cli bob
Change the download directory to be different for each account, unless you want the data and media for the accounts to be merged.
Problems? Thoughts? Get in touch
Make a comment, start a chat.
@monkeypuzzle
Description
This version works with the latest additions to onsite generations.
FAQ
Comments (24)
even if they have the option for download, still prefer this unofficial tool, it is just better and now more easy to use!
Thank you!
Jep... more structured and more importantly: either the official button doesn't download any metadata (or I have missed some settings somewhere lol) ;)
@AvonN I think they updated that, because yeah, it doesn't download any metadata in the begining, but now it does, still, I prefer %100 this tool.
yeah, the site's download feature does now include all the attached metadata, but this tool is still significantly better.
Aside from the generally more structured downloading, IMO the major thing is that all the pics are downloaded in order.
(I just can't understand how all those users who don't use this tool are satisfied with the official site downloads, isn't the pics being in completely random order a major inconveneience !?! There should be tens of thousands of downloads of this tool, not a few hundred!)
Thanks a lot this is awesome
Hello. Great tool.
There seems to be an issue where the tool downloads all generated images, including those that have been deleted in the onsite generator, is this fixable? Assuming this is not a case of Civitai not tagging images as deleted, which might be the case if I interpret the json files correctly (the handful I looked at all had 8 images with "succeeded" as their status, which is odd as I only VERY rarely keep all 8 images from a batch of 8 (for context: I generate in batches of 8)). In that case it would of course be very difficult for you to know which ones to download and not!
If you could investigate this, and make CivitAI aware if it is a problem on their end, that would be nice.
Fake edit: quickly looking at old json files from version 1, those only contained a few links instead of 8. This makes it very likely that it is a CivitAI fuckup.
Thanks for the report. The tool downloads whatever it sees in the data feed from the site API. It may be that the feed now mistakenly includes deleted items.
If could be possible for the tool to skip deleted items if they have some kind of indicator in the feed that they are deleted, but really this ought to be fixed in the original data feed.
I will raise this with the team.
@monkeypuzzle Thank you for the reply. I kind of assumed you couldn't do anything without CivitAI either tagging deleted items or just not including them in the response, yeah.
@fatcowenthusiast This is now fixed in the latest version, v4. Media deleted onsite won't be downloaded. To delete media already downloaded but deleted onsite, see the new option "Remove deleted media" in "Download generations" > "Options".
I often use the Hi-Res fixes, but this seems to ignore the hi-res versions(?).No issues otherwise. I have a lot of generations but I'm like 90% sure I'm not getting the hi-res versions. If anyone noticed otherwise or has advice please share.
I was having this issue too. My workaround was writing a Python script that parses the JSON data for the URLs, then downloads those into a separate directory.
@3al2rom3t4y Ah I see, thank you for your reply. I know enough Python to eventually do this, just have to bring myself to do it. To be clear, did you work from the source code itself or did you draft something completely separate?
@Goonofdoom Drafted something separate.
I haven't been able to replicate this. @3al2rom3t4y if you could give me a snippet of the data feed that includes the images not downloaded, I can investigate what has happened.
Same here. It grabs the low res version created in the hi-res fix then ignores the actual hi-res file. So it basically downloaded 1311 of 1667 total files.
I see the bug now for Text-to-image Hi-res fix. It is an artefact of the file naming algorithm. Both the normal size and hi-res image are given the same filename, so only one is saved. I'll have a think how best to resolve it. Thanks for the report.
This is fixed in version 3.0.3, which updates the downloaded media filenames to accommodate upscaled images.
Use "Download options" > "Update media filenames" to rename previously downloaded images to the latest format.
Use "Download options" > "Download missing" to download any missing images.
Hey, this really is a awesome tool. And better than the site's download button in a bunch of ways. Thanks for all the hard work (still ongoing with the communication and updating, I see!).
Can you help with something: I want to use it for downloading the gens from a second account; I see in the instructions you say to add a config file.
Am I understanding correctly that after I do that I can just run the program as usual, or I'll need to do something specific each time ( e.g. specific path for the run command) ?
Also, will all pics will be automatically downloaded to their dates in the original image folder, or a separate folder is created for each account?
I'm asking mainly because I'm scared to mess with the settings, I may somehow erase my first account's painstakingly downloaded gens, or mess the settings up somehow.
Thanks for the feedback. You are welcome. All you have to do is give a name to the other account and a place to store its config file.
When you do "npm run cli", it saves a file in the "config" folder called "default". It has the same effect as "npm run cli config/default".
If you do "npm run cli config/alt", it will create a file called "alt" in the config folder. Call it whatever you want, and it doesn't need to be in the config folder. E.g. "npm run cli C:\Documents\bob".
Then you can set a unique directory for both the data and media downloads, in "Download Options".
@monkeypuzzle I appreciate the quick reply!
So, sounds good. I'll have to try it out when I get back home tonight. But just to make sure I'm understanding you correctly:
1: even after I set up this alt folder and this download location for a second account, the first account remains with the same default path, so it doesn't create a need to add anything specific to the "npm run cli" command for the first account, correct? because any "npm run cli" without a specific path will always default to the location of the first account.
Also, 2: what will happen if I command "npm run cli config/alt", but don't bother to set up a separate download location in "Download Options"?
(sorry if these are stupid questions, I'm new to command line interface. you've made a "coder" out of a noob! :-)
@abrmzan388 very good questions.
1. You can still run the default account with "npm run cli" and nothing will change with it.
You can also rename the config/default file to a different name, or move it to a different location, if you prefer.
2. If you don't change the download locations, it will use the default settings. If you didn't change these previously, and you don't change them for the alt account, then both accounts will be downloaded into the same folders.
@monkeypuzzle Thanks for the details, sounds good.
@monkeypuzzle just updating you, that I ran the program for my alt account, following your directions, and it worked beautifully. Thanks so much for the help!
New in version 3.0.3: the downloaded media filenames are updated to accommodate workflows like upscaled images.
If you previously generated "Text-to-image Hi-res fix" images, one of each pair of images may be missing:
Use "Download options" > "Update media filenames" to rename previously downloaded images to the latest format.
Use "Download options" > "Download missing" to download any missing images.
Details
Files
Available On (1 platform)
Same model published on other platforms. May have additional downloads or version variants.