
How to Generate Multiple Different Characters, Mix Characters, and/or Minimize Color Contamination | Regional Prompt, Adetailer, and Inpaint | My Workflow
Edit: 27.01.25
Hey, it's been a while—more than six months, to be exact. The AI/SD space changes so quickly that it’s hard to keep up with all the possible errors. Everyone uses different WebUIs and versions, so some might work while others don’t.
Sections 1 and 3 of this tutorial focus on the Regional Prompt Extension, which no longer works with the new Forge (i.e., since the import of Flux). Old Forge and Reforge might still support it. If you’re using the new Forge, you may want to install Forge Couple instead.
I’ve now added a fourth section covering SD Forge Couple. Most of the basic concepts are already explained in Sections 1 and 3, so this new section will focus on the usage of Forge Couple. The underlying logic is similar to the Regional Prompt Extension, but there are some differences.
(All images shown in Section 4 were generated on IllustriousXL/PaSanctuary.)
Edit: 30.06.24
I added a brief installation guide on how to install this extension. I will continue this tutorial section (Part 4) shortly after my exams. Things have been pretty busy lately, so I apologize for the inconvenience.
0. Intro
Hello everyone,
here is a little guide that will be updated from time to time. I will add different versions on top of the model page to show you some different images with their metadata, so you can copy and paste into auto1111/forge. I post this in a model page instead of article, because I can showcase images better this way, while also having a better view of comments I get. No need to download the file I attached here.
In this guide, I will go over Regional Prompt, Adetailer, and inpainting. This is also different on XL and 1.5, so the settings are not the same on both versions, but similar.
What do we need?
SD Forge Couple (Section 4)
Checkpoints and LoRA's
Any Character LoRA's, but works with baked-in characters as well.
Models, where I used/needed Regional Prompt:
Here is a small list of models that I published, where you might need or want a regional prompt for optimal results:
For Pony:
For 1.5:
For Illustrious:
Note for 1.5: 1.5 LoRAs require Latent Mode, which is currently not usable in Forge. This tutorial doesn't cover that for now but will do so later. It's a bit more complicated.
0.5 INSTALLATION:
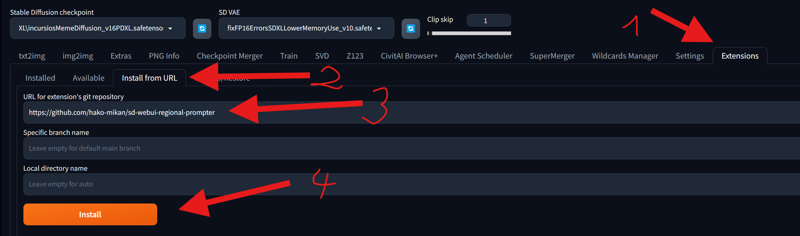
First, we start our WebUI (in this case, Auto1111 or Forge). It's best to use the latest version of either one. After opening the WebUI, go to the Extensions Tab -> Install from URL. Paste the following link under URL for extension's git repository: https://github.com/hako-mikan/sd-webui-regional-prompter. Then, press Install.
 After doing that, restart your WebUI. I recommend closing the WebUI terminal and rerunning it.
Note: If you are using Colab or sharing your WebUI with the command-line argument --listen, you might need to add an additional command-line argument: --enable-insecure-extension-access. WARNING: Only use this command if you are the only one using your WebUI. If other people use your WebUI, you need to trust them, or you could lose your data or get hacked.
The file with the command-line arguments can be found in your WebUI folder. It's called webui-user.bat. Right-click and open it with a text editor or Notepad to edit it.
 You don't need to do this step if you don't share your WebUI. It's only necessary when you use
 --listen or when using Google Colab or something similar.
1. REGIONAL PROMPT Basic (Matrix) (Pony XL):
Overall Settings:
After installing all necesarry Extensions, you will see in your txt2img and img2img the tab "Regional Prompt".
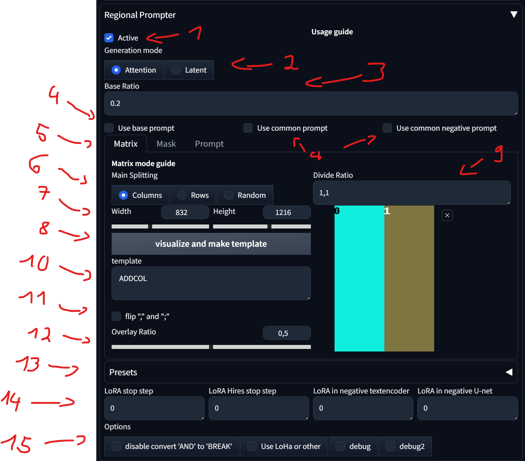
Activate/disable
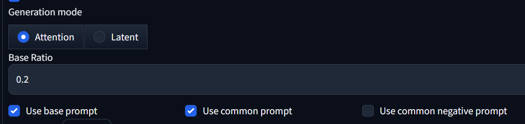
There are two generation modes. For XL, only the 'Attention' mode is important, with or without LoRAs. The 'Latent' mode doesn't work properly IN FORGE, due to the XL encoder. A separate Tutorial section will be done for 'Latent' mode.
With the base ratio, we can change how strong the base prompt is. If the base value is 0.2, then the weight of the base prompt in the generation is 0.2, and the divided areas are 0.8.
Base, Common, and Negative Prompt:
'Use base prompt' affects the entire image, mostly used for backgrounds and/or characters, impacting all divided areas. I personally don't use it much.
'Use common prompt' copies and pastes all prompts in that section to all regions.
'Use common negative prompt' does the same for the negatives. This is only useful if you want to have a specific negative in a specific divided area. Otherwise, leave it unchecked, as the negatives will affect the entire image anyway.
Section for Matrix, Mask, and Prompt: We will see the differences between them later. For now, we will focus on Matrix.
Main Splitting: This allows you to change how you divide the template. Changing this and pressing 'visualize and make template' will update it to the template.
Changing Width and Height does not affect the image; it's there only for visualizing the template. You can leave it at its default setting.
Pressing 'visualize and make template' will update the template on the right side.
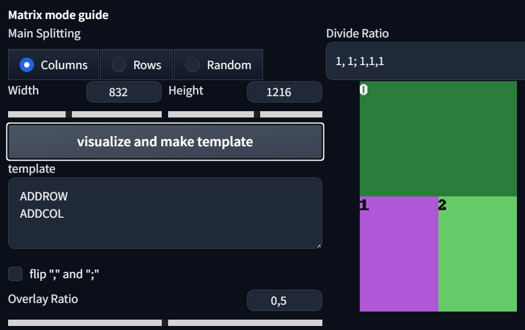
Dividing Ratio:
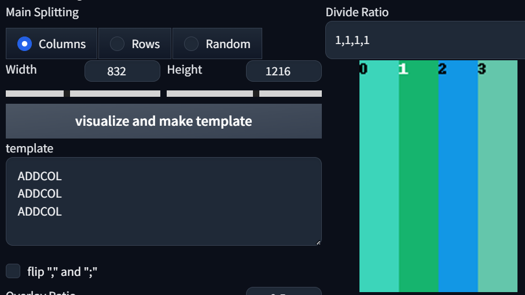
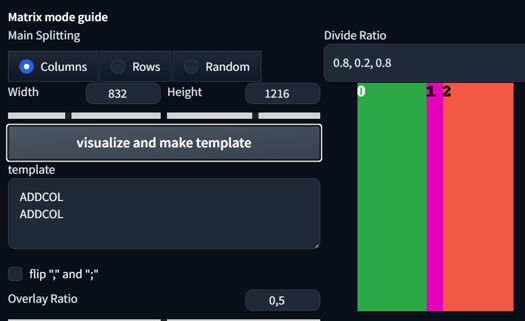
This divides your image into regions. Setting it to 1,1 will give you 2 regions. Setting it to 1,1,1 will give you 3 regions. You can even set different sizes for regions. Here are some examples:
1,1 Columns

1,1,1,1
0.8, 0.2, 0.8
1, 1; 1,1,1
1,1; 2, 3, 3

1, 1, 1; 1, 1, 1

Shows the current template format and the order of regions.
Flips ',' and ';'. Fairly useless.
The overlay ratio might be an important factor in determining how much impact one region with its prompt and overlay has on other regions. If you require precise prompting and don't want much interaction between the regions, lower the ratio. If not, keep it at 0.5.
Your presets
Options for Latent, fairly useless for us in XL.
Options for other things that might be needed for debugging.
Prompting Multiple Characters:
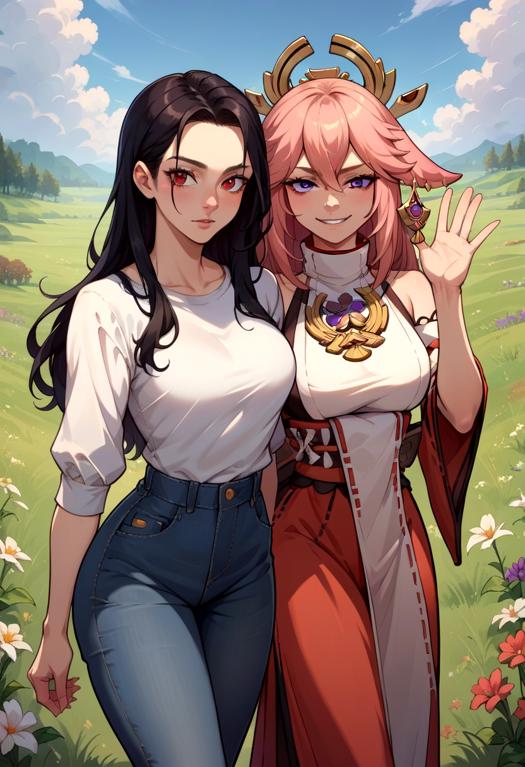
So, how do we use it? Let's start with something basic. First, activate the regional prompt, select the common prompt, divide the ratio to 1,1, create the template, and then set your prompts:
score_9, score_8_up,score_7_up, source_anime, indoors, standing, cowboy shot, 2girls, seductive smile, from above, hoodie, jeans, looking at viewer,

BREAK yae miko,
BREAK raiden shogun,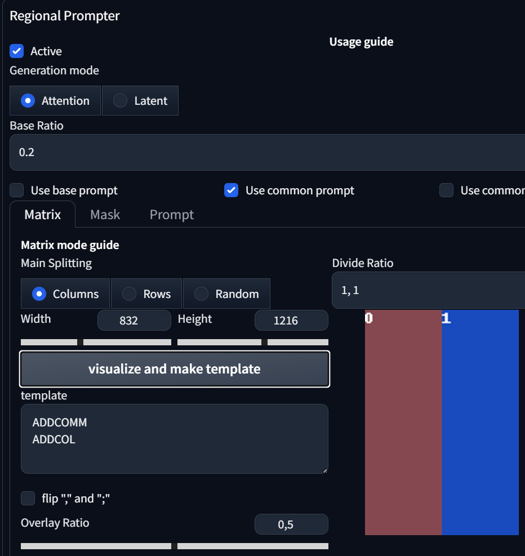


Okay, what do the prompts do here? We selected the Common prompt, which means the first line of the prompt will be applied to all regions. After the use of our first BREAK prompt, we arrive at our first region, Region 0. Here, I typed a baked-in character that is already quite stable without any additional use of LoRA. In this case, Yae Miko. After that, I added another BREAK to move to my second region and typed in another baked character, also known as Raiden Shogun.
See, that was pretty simple, right?
We can also make the prompt a bit longer or more complicated. Let's try the same settings, but with more prompts:
score_9, score_8_up,score_7_up, source_anime, indoors, standing, cowboy shot, 2girls, seductive smile, from above, hoodie, jeans, looking at viewer,

BREAK yae miko, black hoodie, waving,
BREAK raiden shogun, white hoodie, hand on hip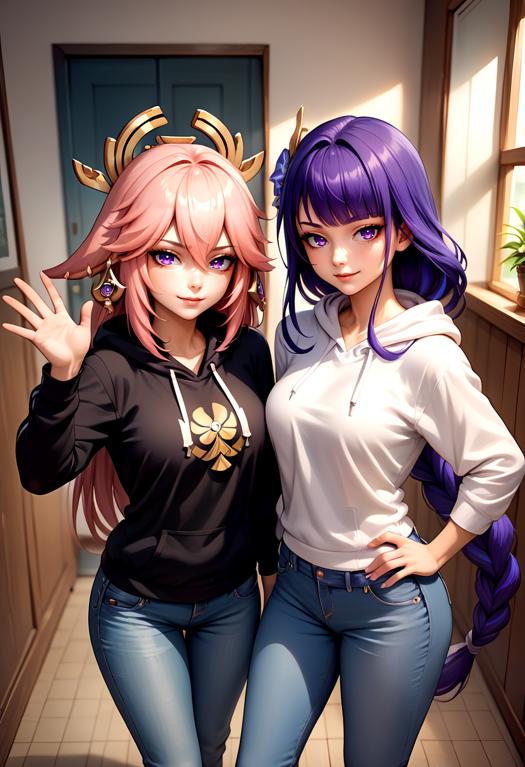
Okay, how about adding another character? Sounds crazy, right? Now, let's incorporate the use of LoRA for "Fubuki from @holostrawberry". Here are the prompts and settings:
score_9, score_8_up,score_7_up, source_anime, indoors, standing, cowboy shot, 3girls, seductive smile, from above, looking at viewer,

BREAK yae miko, black hoodie, hoodie, jeans,
BREAK raiden shogun, white hoodie, hoodie, jeans,
BREAK reaching towards viewer, <lora:fubukiXL:1>, fubukibase, white blouse, detached sleeves, black shorts, blue neckerchief, thigh strap, single thighhigh, white hair, single side braid, ahoge, piercing, fox tail, pentagram,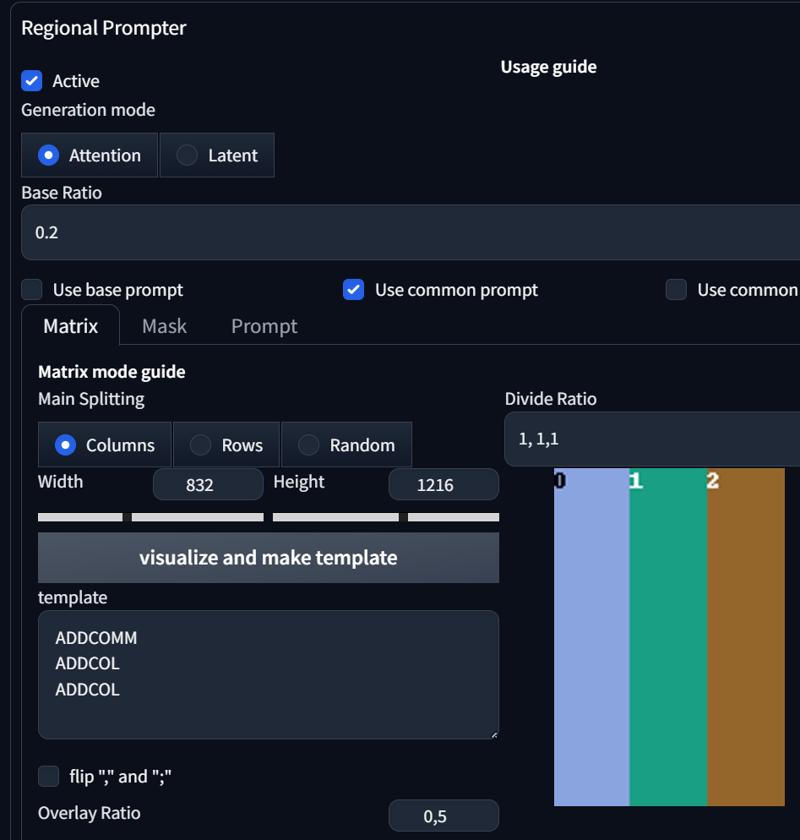
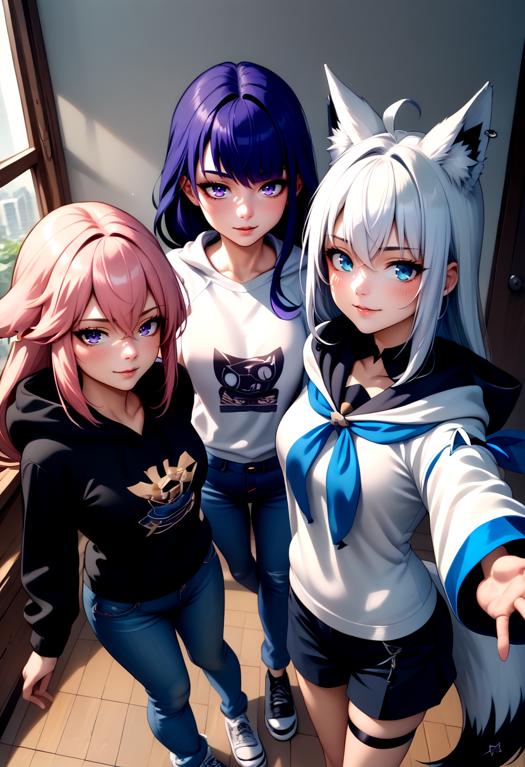
So, what changed? First of all, I tweaked the prompt slightly. I changed "2girls" to "3girls", swapped the positions of hoodie, jeans in the prompt, and added another BREAK to introduce another character. In the Regional Prompt Settings, I simply added another Divide Ratio; in this case, it's 1,1,1.
As you can observe, the results are becoming somewhat unstable. Incorporating elements like Cowboy shot, from above and generating images of 3 people can complicate maintaining the same scenario. However, by removing from above, we achieve this image:
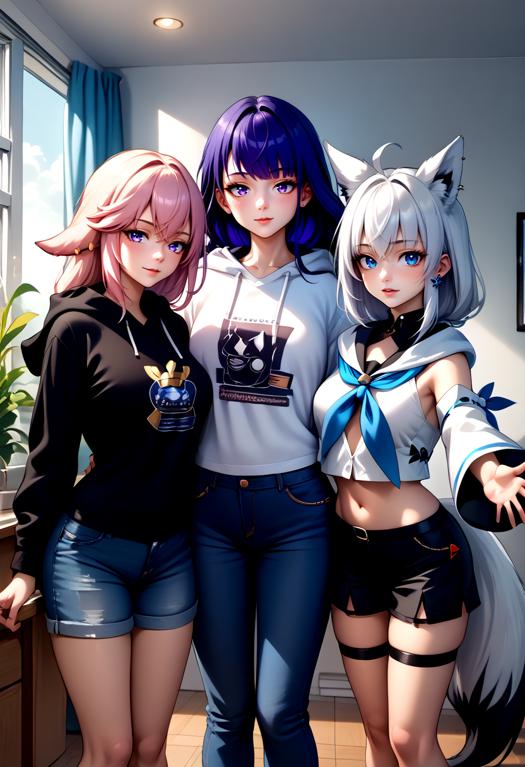
As you can see, our image becomes a bit more stable and follows the prompts more closely. What you prompt is very important; every single prompt can and will induce drastic changes. If something is not going according to plan in Regional Prompt, try to be more precise in your prompts.
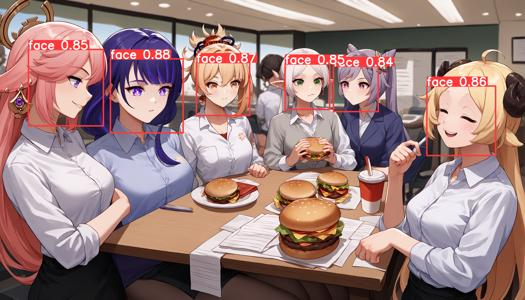
Let's prompt some more girls, shall we? Changing to a 1344x768 landscape format and increasing the number of sample steps from 24 to 30. Adding another two LoRAs Frieren and Watame from @ChameleonAI):
score_9, score_8_up, score_7_up, source_anime, 6girls, office, office lady, around table, table, food, beverage, burger, starbucks, shirt,

BREAK yae miko, smirk,
BREAK raiden shogun (genshin impact),
BREAK yoimiya \(genshin impact\),
BREAK FrierenBase, green eyes, white hair, long hair, twintails, earrings, <lora:ChamFrierenPonyXL:1>, eating burger,
BREAK keqing \(genshin impact\),
BREAK <lora:CHAR-TsunomakiWatamePonyXL:1>, TsunomakiWatame, sheep girl, long hair, ahoge, happy, sheep horns, blonde hair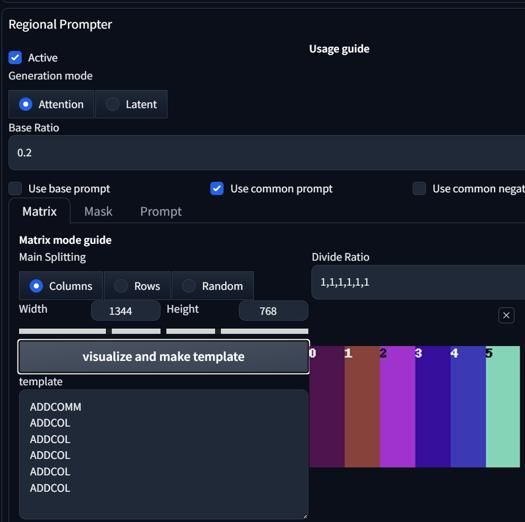
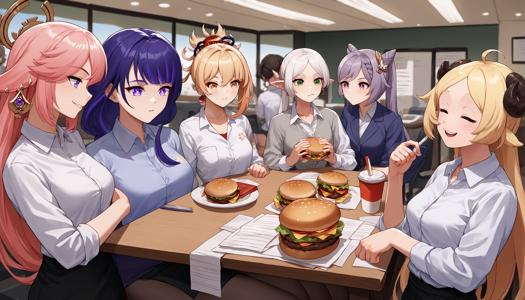
Cool, right? Using two different Character LoRAs while also prompting four baked-in characters in one image. With that many people, there's a high chance that you'll encounter image errors.
Now, let's combine some actions or concepts with multiple characters. As always, let's start with something basic and add "hug":
score_9, score_8_up,score_7_up, source_anime, indoors, standing, cowboy shot, 2girls, seductive smile, looking at viewer, hoodie, jeans, hug,

BREAK yae miko, black hoodie,
BREAK raiden shogun, white hoodie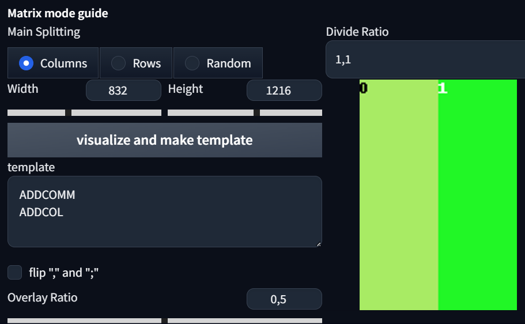

Hugging each other without much problem? Well, that's because our overall overlap ratio is high enough.
Now let's do it with a Concept LoRA called Handshake from @justTNP. Same settings, but with a different aspect ratio (1:1) and a different prompt:
score_9, score_8_up,score_7_up, source_anime, indoors, standing, cowboy shot, 2girls, seductive smile, looking at another, hoodie, jeans, handshake, <lora:concept_handshake_ponyXL:0.5>,

BREAK yae miko, black hoodie,
BREAK raiden shogun, white hoodie,
As you can see, I used that LoRA in the common prompt, but with half of the original weight (1 -> 0.5). Divide by the amount of regions you use, so if you have 2 regions, do half of the original LoRA weight. The reason for this adjustment is that each region takes the value, and the overall image shouldn't exceed a reasonable amount of LoRA weight.
Edit: Keep the batch size low. Max batch size should only be 4.
Also, using multiple characters requires you to adjust your Adetailer, because your Adetailer doesn't get affected by the regional split. It will mix faces and can dominate one eye color.
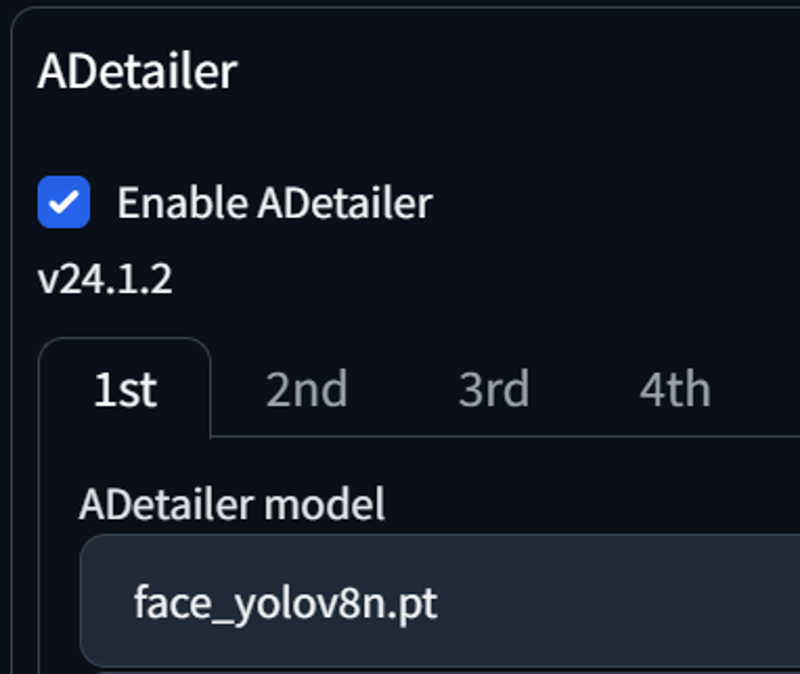
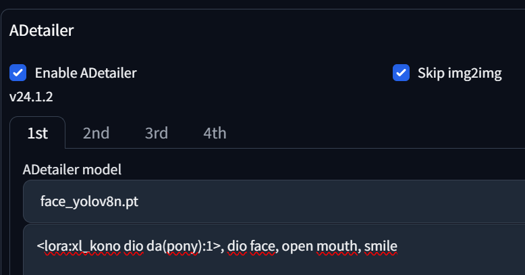
2. Adetailer
Adetailer is a very useful tool for detecting stuff and automatically inpainting. There are different YOLO models like face, hand, eye, full body, feet, clothing, etc., but we will focus here on the face model. There are two main ways to use Adetailer: one via Txt2Img and the other with Img2Img.
If you generate an image with one person and have your Adetailer on, it works normally. If you generate two people, with or without Regional Prompt, the attributes will most of the time be mixed. Dominant color or attributes from the other character will take over. Here is how to fix that.
Settings:
First, we need to adjust one setting when we install Adetailer. Go to Settings -> Adetailer -> Sort bounding boxes by -> Set it to "Position (left to right)"

That's it for now. Let's move on to image generation.
Adetailer (Txt2Img):
First, let us generate an image without adetailer on:
score_9, score_8_up, source_anime, 2girls, upper body,

BREAK white shirt, red eyes, black hair, long hair, tongue out, mole under eye,

BREAK black shirt, blue eyes, blonde hair, ponytail, smirk,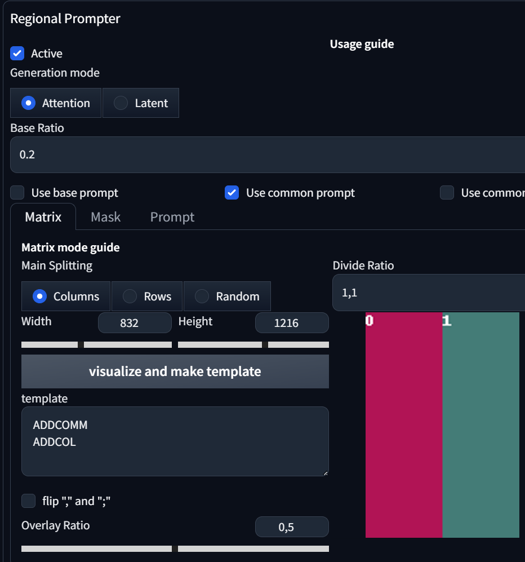

As you can see, the results are quite sharp even without the use of Adetailer. This is because we are using an upper body shot. Most faces will be sharp, but we can also see much more detail when we use Adetailer. Now, let's enable Adetailer.

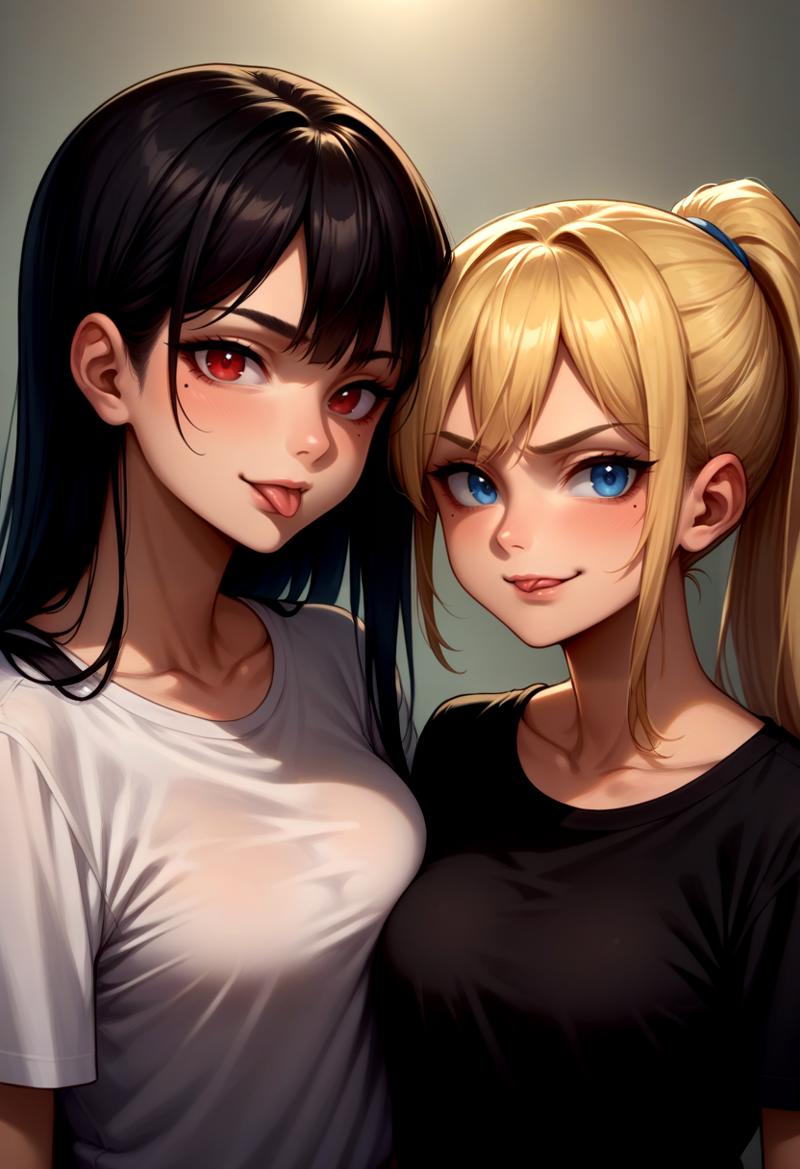
Both faces were detected by the Adetailer. As you can also observe, features like a mole under the eye, tongue out and smirk are getting mixed here. This is expected. How do we fix that? Easy solution: We use the [SEP] token in our Adetailer positive prompt. Generating this image again yields this result:


This was quite an easy example. Let's try this with a LoRA. Here are Ranni from Elden Ring and Vergil from DMC:
score_9, score_8_up, source_anime, cowboy shot, standing,

BREAK 1girl, <lora:Ranni_XLPD_CAME:1>, IncrsXLRanni, wavy hair, cracked skin, blue skin, colored skin, extra arms, extra faces, doll joints, white dress, witch hat, brown cloak, waving, crying,

BREAK 1boy, <lora:dmc5_vergil_ponyXL:1>, dmc5vergil, black coat, fingerless gloves, pants, smirk,
without adetailer

Adetailer detecting Faces:
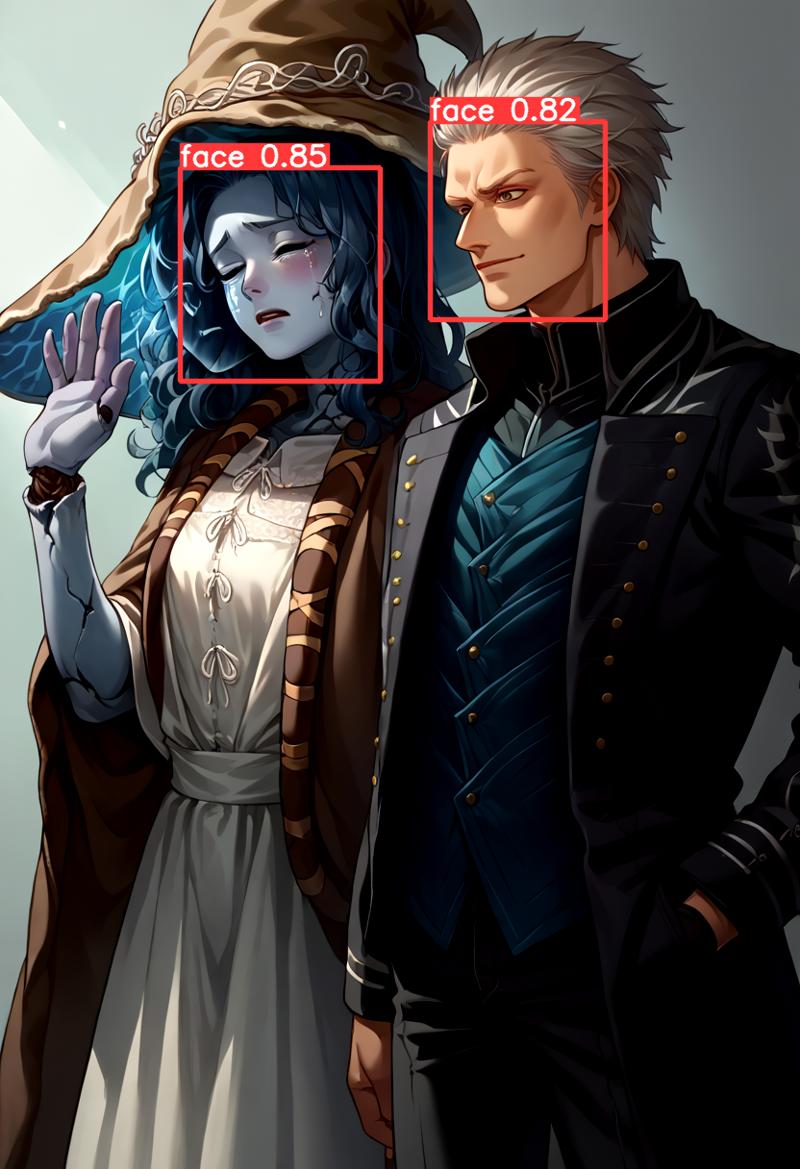
Adetailer without Prompt:
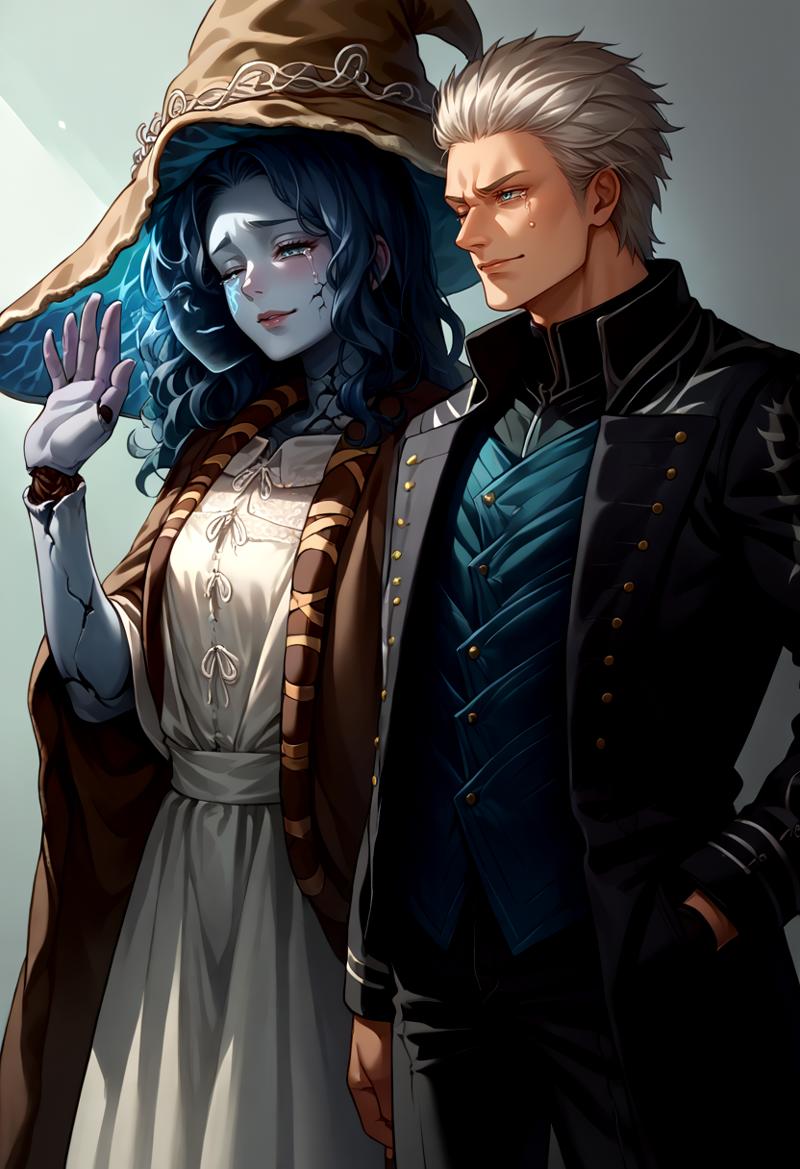
As you can see here, Vergil got some attributes from Ranni, like one eye closed and her crying. Let's fix that with this Adetailer prompt:
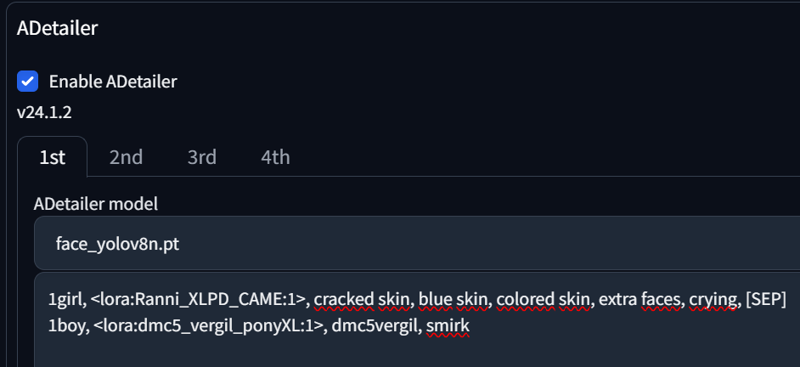
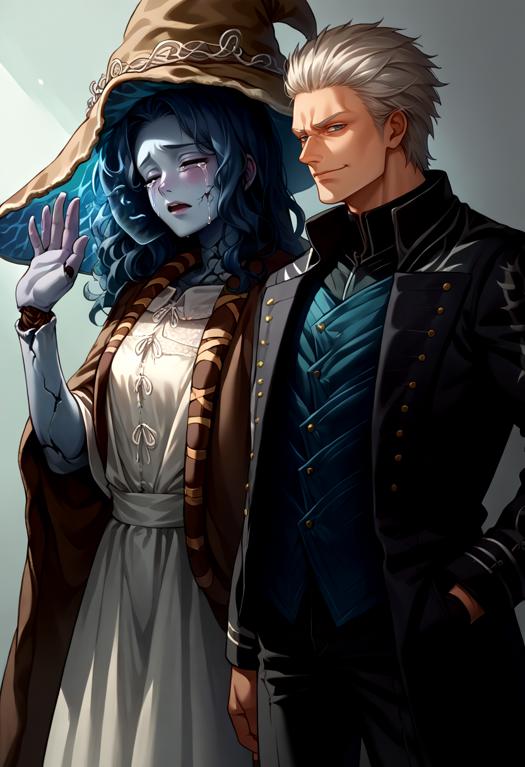
And it's done. Nothing more is needed here.
One final aspect you need to be aware of is that some VAEs leave marks around the faces. I'm currently using flatpieceVAEXL, and it can get quite messy, especially with other color VAEs. Here is one example:
score_9, score_8_up, source_anime, 1girl, solo, looking at viewer, cowboy shot, medieval, grass, flower field, cloudy sky, red eyes, long hair, black hair, shirt, jeans
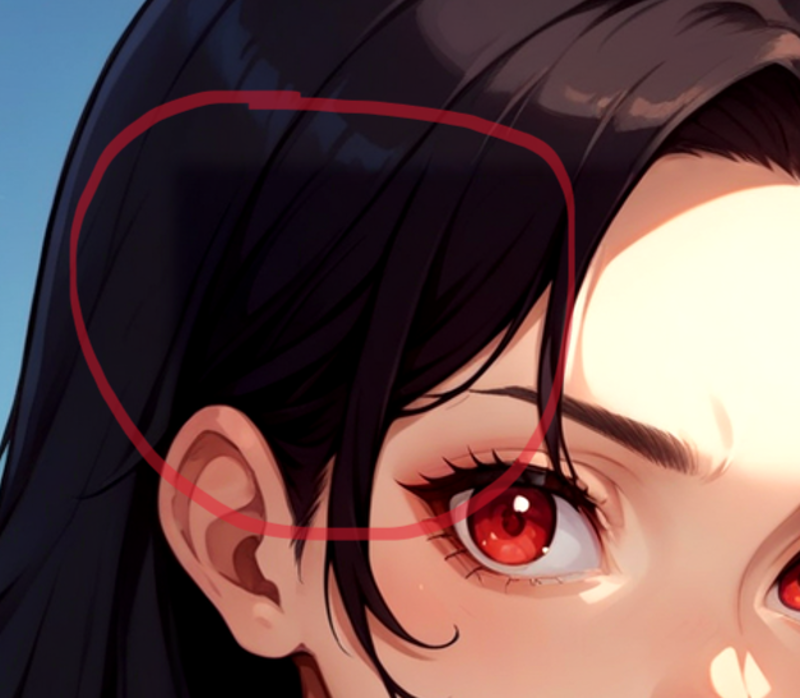
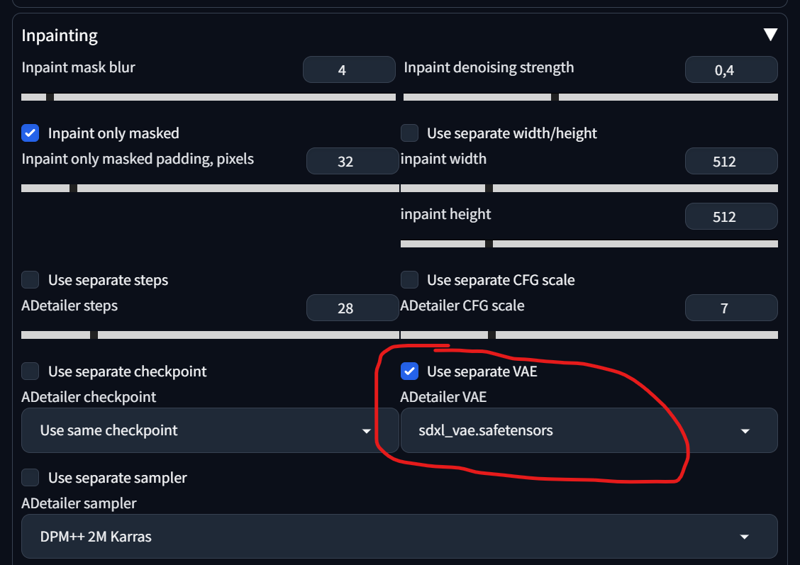
As you can see, it leaves a square, that looks very off. There are 2 ways to fix it.
1) Adetailer -> Inpainting -> Inpaint denois strength from 0.4 to under 0.2
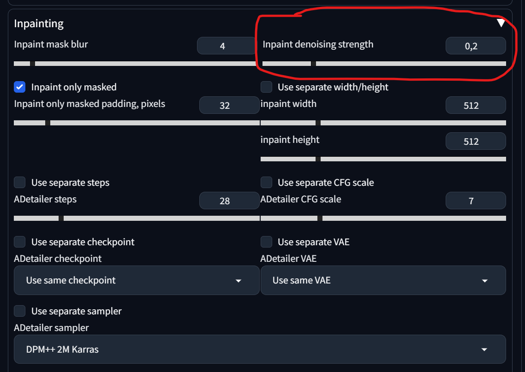
2) Adetailer -> Inpainting -> Use separate VAE -> sdxl_Vae (default) or something more neutral
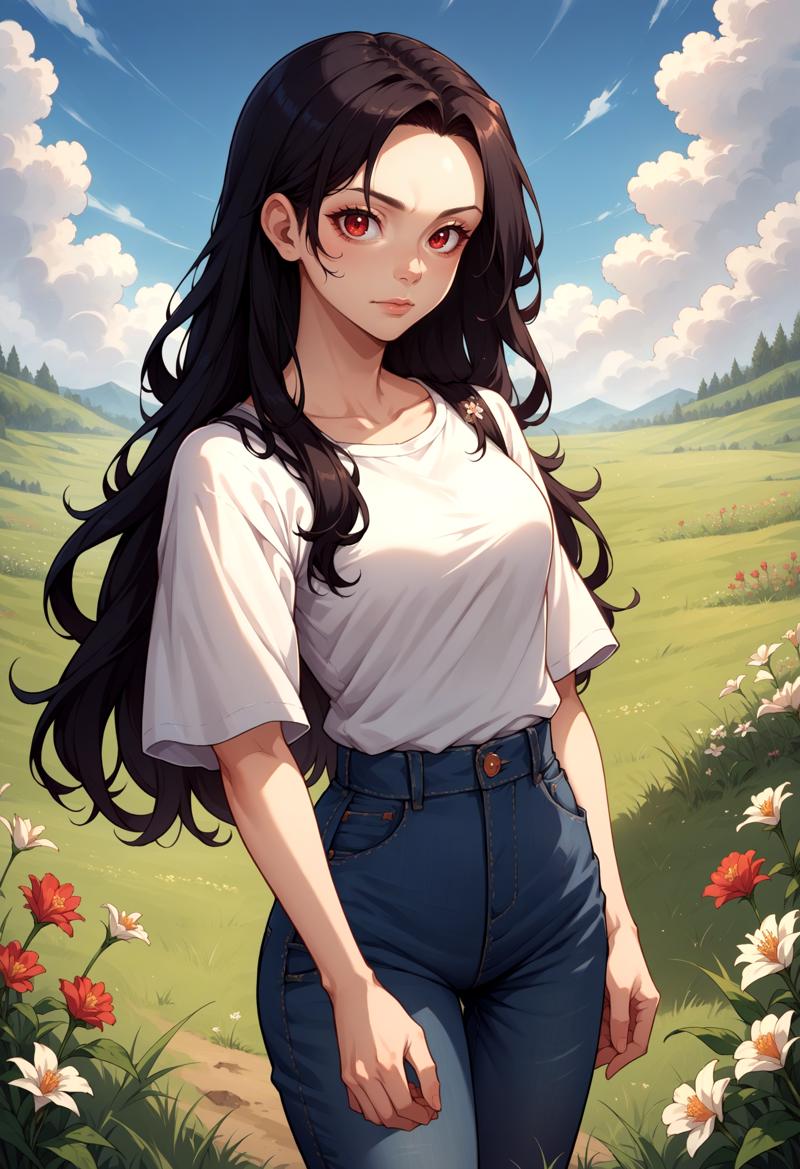
Both are viable. Here is the Result:

Let's move to the next section.
Adetailer (Img2Img):
If you have an image and you don't want to use Adetailer in txt2img (to save VRAM), then you can move that image to the img2img tab. This way, you have more control over the prompts you want to experiment with, without having to regenerate that image over and over again. Our starting image is this:
As you can see, the faces are somewhat off. We'll move that image to img2img now and adjust our settings and prompt:


Important here:
set width and height to 1024x1024 (for XL) or 512x512 (for 1.5)
set denois strength to 0.9 (in img2img)
set your prompt in your adetailer
enable "Skip img2img"
The Result:


Okay, this seems to work quite well with 2 faces. But how about multiple faces? That's also quite straightforward. Let's take the initial image from the Regional Prompt:

Setting prompts:

Adetailer detecing:
Result:

As you can see, Adetailer detected 6 faces. We separated each face with a [SEP] token and adjusted every face accordingly, from left to right. You might wonder what would happen if I just input 2 prompts with one [SEP] token for 6 faces. Well, the first face receives the first prompt, and the other 5 faces receive the second prompt.
If you use only one prompt, you can also create something funny. Here is the DIO's Face LoRA:

Well, that's everything for this section. The next update will focus more on the Regional Prompt Mask instead of the Matrix.
3. Regional Prompt (Mask)
The mask mode is a very useful tool for directly painting over the region where you want your prompt to apply. It also allows for better control over the regional overlap. @PotatCat is a big fan of the Mask mode, and it's understandable why. Check out his image gallery if you want to try and see what's possible.
Overall Settings and inpainting the Area:
First, let me introduce you to the overall settings for it. It might seem a little complicated at first, but bear with me. Instead of choosing "Matrix" in our Regional Prompt, we are going to choose "Mask" now.
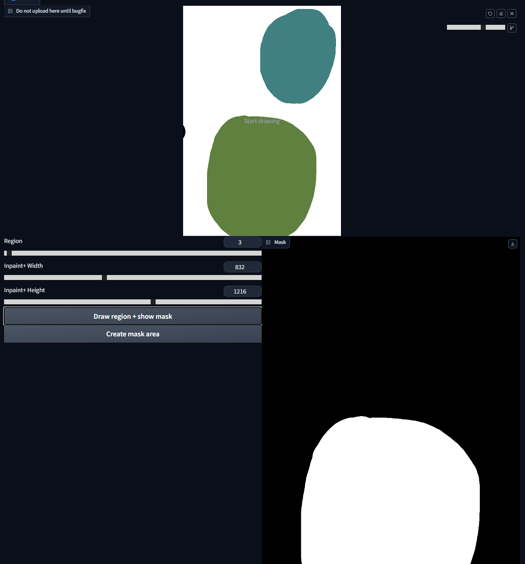
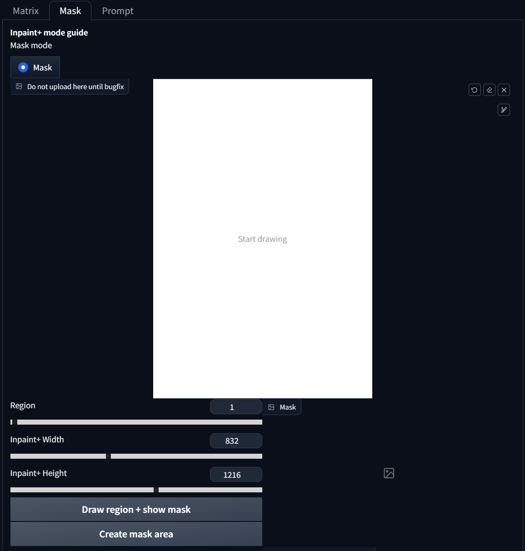 We first want to adjust the width and height to our initial size that we aim to generate. In my case, it's 832x1216. After that, you press "Create mask Area." That's our first step. Now we can start drawing. After drawing our region, we press "Draw region + show mask.
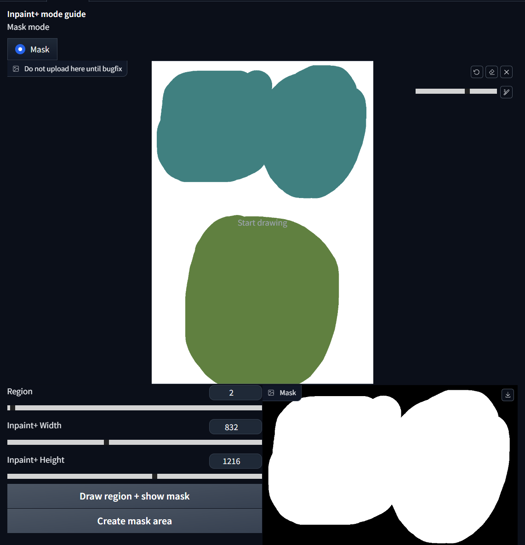
 As you can see, the Region Slider changed from '1' to '2', while also displaying a mask beside it. If you now draw another region and press 'Draw region + show mask' again, it will automatically advance to the next region and update the output mask.
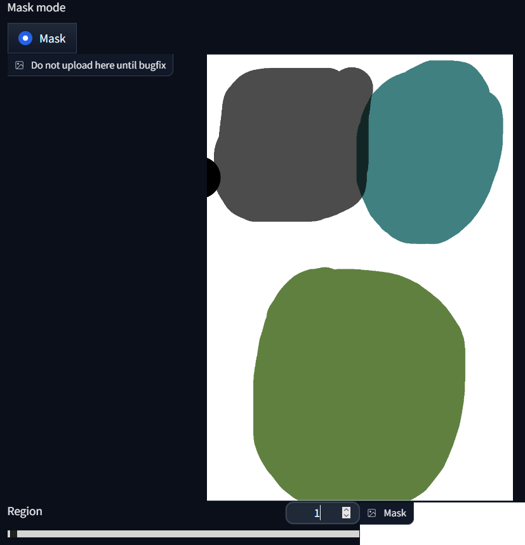
 It's possible to add to existing regions by reselecting the same number and drawing as usual. In this case, we choose Region 1, paint it, and press 'Draw region + show mask' again.
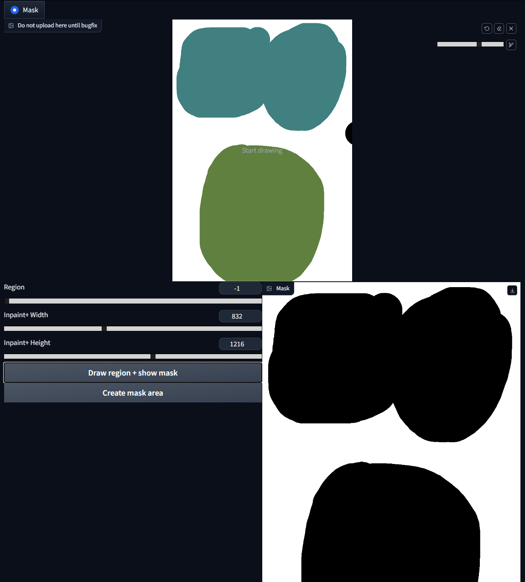
 We can also display all the regions in the mask area by selecting -1 on the Region Slider and pressing 'Draw region + show mask'.
Special Case for Base Prompt:
Now, let's discuss the Base prompt. Using both Base prompt and Common Prompt in mask mode is advantageous because the Base prompt will fill all the non-masked areas.
 When the base is off, any non-colored regions are added to the first mask (and thus should be filled with the first prompt). When the base is on, any non-colored regions will receive the base prompt in full, while colored regions will receive the usual base weight.
The Base Ratio in this case can be set to 0 if you want to avoid any bleeding between the background and masked area. Alternatively, you can set the weight higher, like a 0.2 ratio. The inpainted area has an impact of a 0.8 ratio in this scenario. I would suggest staying at 0 or 0.2 and not going higher.
Prompting in Mask:
Now that we are using Mask mode with a Base prompt, we need to slightly adjust our prompting approach. Starting small, we activate "base prompt" and "common prompt", mask our area, and prompt:
score_9, score_8_up,score_7_up, source_anime,
BREAK forest, grass,
BREAK yae miko, from behind, sitting, full body, kneeling,
BREAK moon, full moon,
BREAK hill,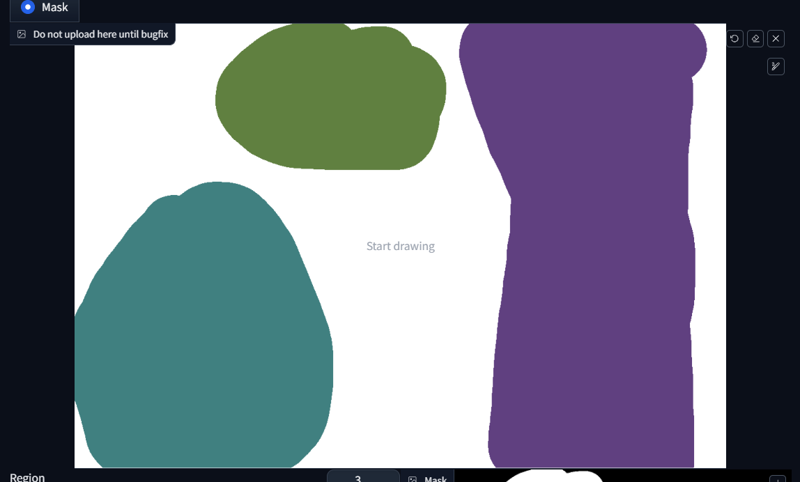
 Okay, what happend?
The first prompt: score_9, score_8_up,score_7_up, source_anime will be applied to all regions because it's our common prompt.
The first BREAK describes our base prompt, in this case BREAK forest, grass,.
Our first region begins with light blue mask and prompt yae miko, from behind, sitting, full body, kneeling.
Our second region is green with the prompt BREAK moon, full moon.
Our last region is pruple with the prompt BREAK hill.
Our three regions receive their respective prompts, and our base prompt fills out everything that is not painted.
Let's try something else, shall we? Now with LoRAs:
score_9, score_8_up,score_7_up, source_anime,

BREAK burning kitchen, messy, flames,

BREAK <lora:Doro_X_PDXL_V1:1>, doro, burning, cooking, creature, :3, chibi, pink hair, purple eyes, hair bun, hair bow, no humans, white skin, four legs, solid circle eyes, no pupils,

BREAK <lora:elie-pdxl-nvwls-v1:1>, zeroElie screaming, horrified, arms up, hands behind head, standing, black hairband, hair ribbon, long hair, ascot, uniform, long red sleeves, white dress, pencil skirt, belt, white hair,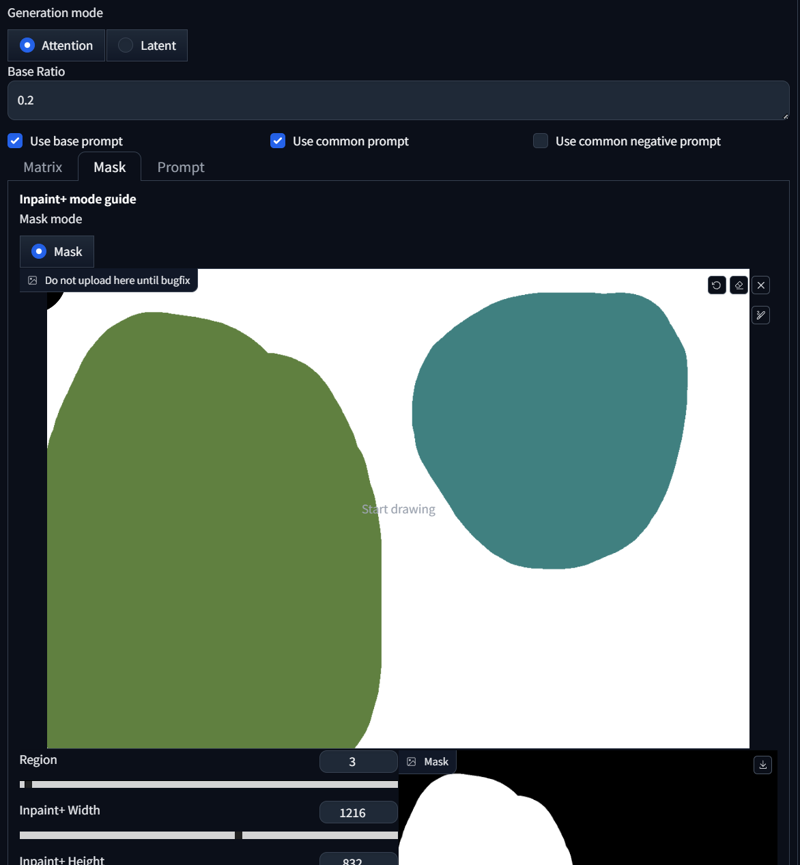
 As you can see, both regions received our dedicated prompt. That was pretty simple. What else can we do? We can create crossover regions. Here's an example:
score_9, score_8_up, score_7_up, source_anime, 2girls, princess carry,

BREAK cherry blossoms, outdoors, day,

BREAK raiden shogun, expressionless, holding person, black shirt, jeans,

BREAK yae miko, happy, black pantyhose, pencil skirt, white shirt, office lady, 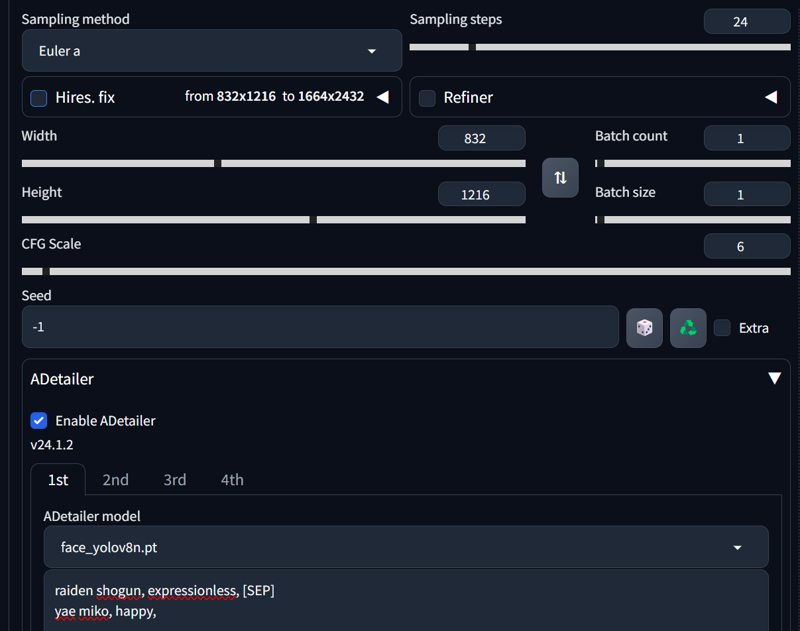

 We also have to adjust Adetailer, as we learned before. As you can see, we can overlap two regions if the interaction extends across a region. Unfortunately, such things don't work in Matrix mode, but Mask mode facilitates this.
It's not only about overlapping; elements can also coexist within a single inner region. Here's another example:
score_9, score_8_up,score_7_up, source_anime,

BREAK cherry blossom,

BREAK 1girl, red eyes, black hair, white shirt, long hair, seductive smile, holding creature, holding pikachu,

BREAK pikachu, pokemon (species), smile, open mouth,

BREAK bird, flying bird
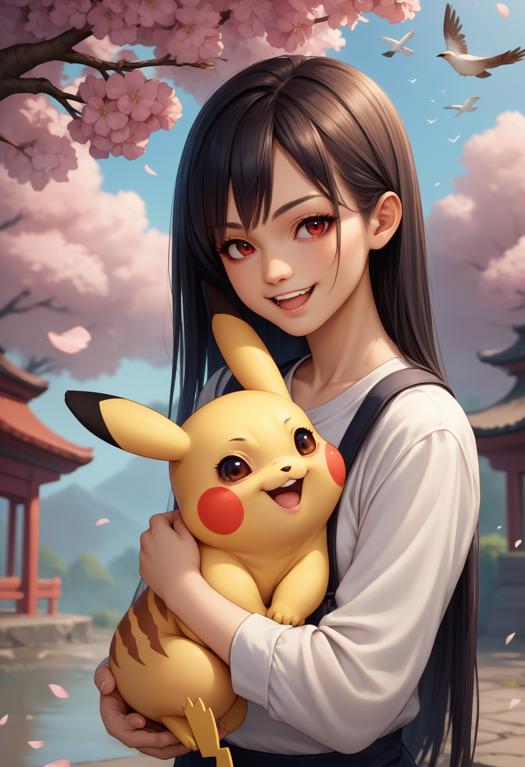 This makes holding animals or objects rather easy. But sometimes, you want to capture the imprint of the object, and SD doesn't quite catch it. You can also accomplish this in Mask mode.
If we prompt without Regional Prompt
score_9, score_8_up, score_7_up, source_anime, 1girl, cherry blossoms, shirt, watermelon, watermelon print, jeans, yae miko, it tends to give us this Result:
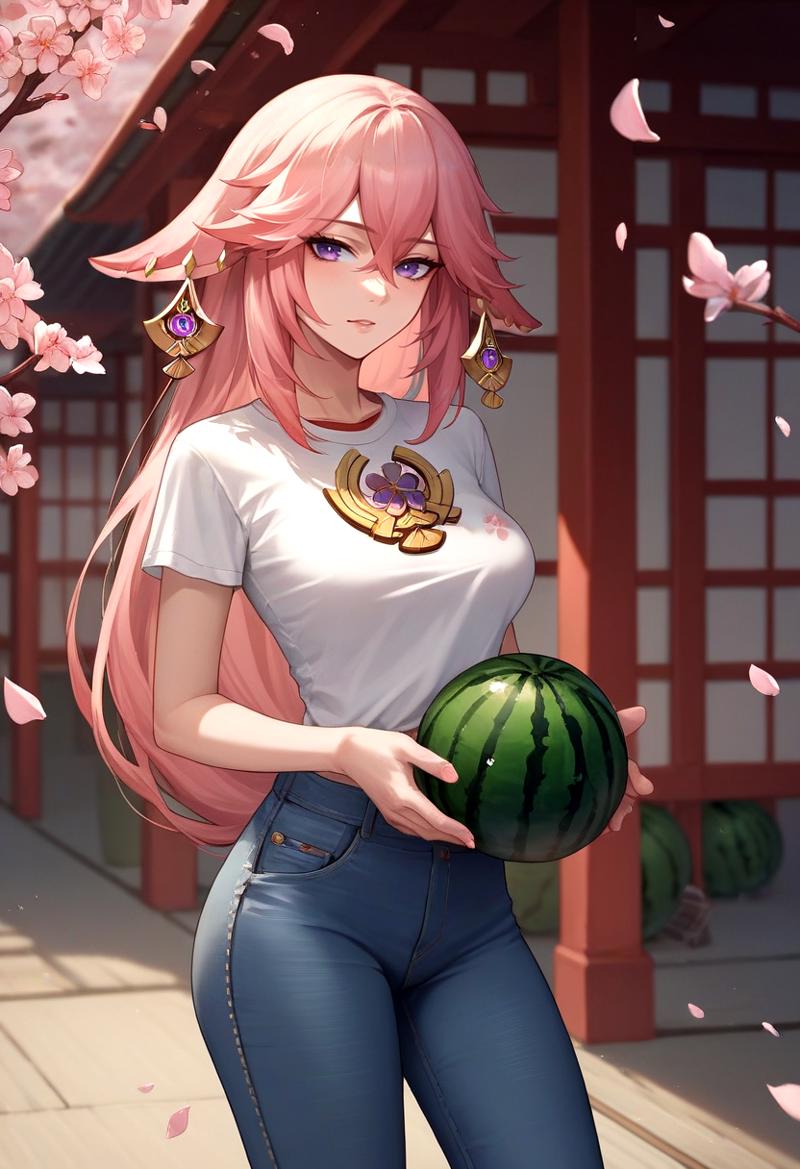 If we prompt without Regional Prompt, it tends to generate the object while holding it, despite prompting for a
 print. If we include Regional Prompt, that changes:
score_9, score_8_up, score_7_up, source_anime, 1girl,
BREAK cherry blossoms,
BREAK shirt, watermelon, watermelon print,
BREAK jeans,
BREAK yae miko, 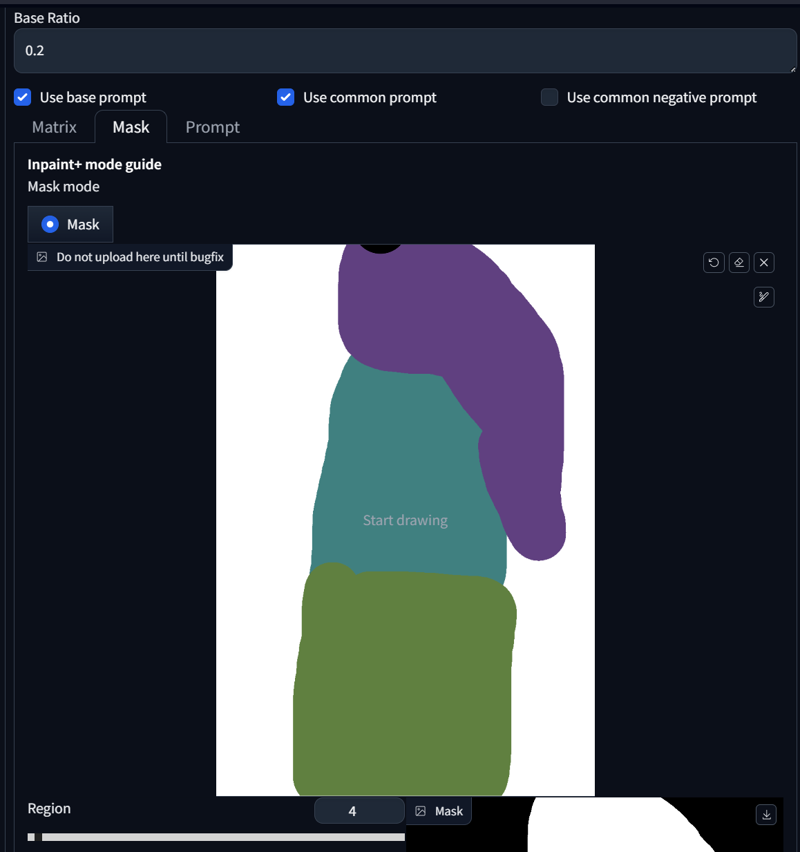
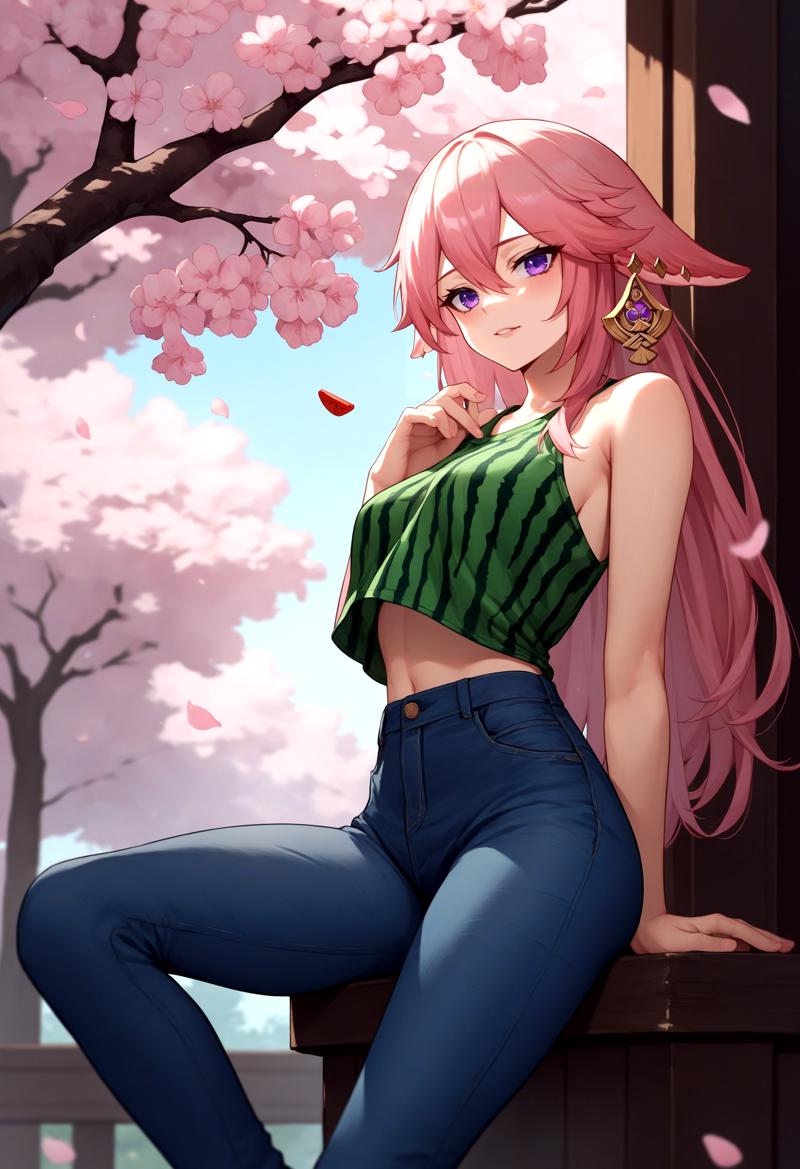 That's it. This part was rather quick because most of it was already explained before. I will be away for 3 weeks now, so the next update might take a while. The next part will include the Inpaint section on how to correct mistakes and reduce blur.
4. Forge Couple - Advanced
(Forge Couple works in ComfyUI. See here: Link1 & Link2)
Overall Settings:
After installing all necessary extensions, you’ll see a “Forge Couple” tab in both your txt2img and img2img interfaces.
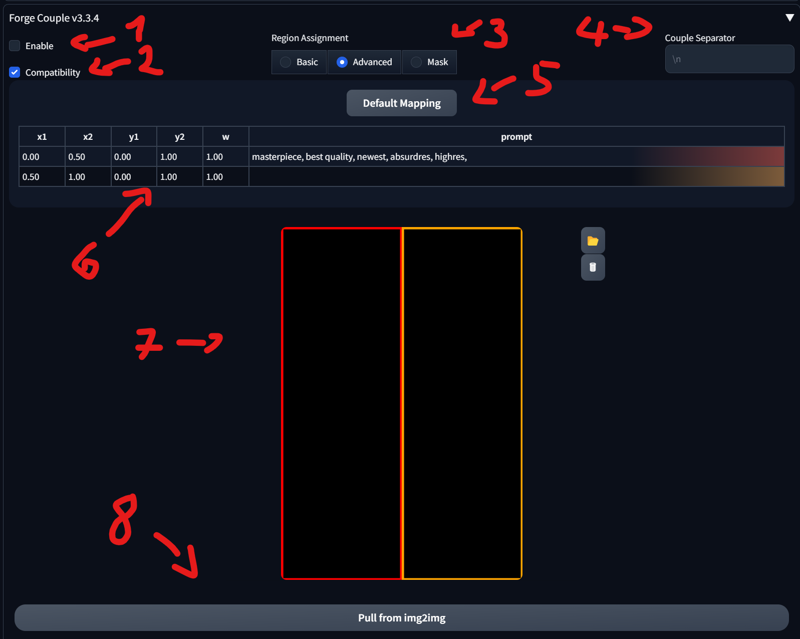

Enable/Disable
When the option is enabled: The extension will not function during the Hires Fix pass, to improve compatibility with other extensions..
Basic, Advanced, and Mask:
Basic: Divides the image into multiple tiles. You can configure the direction on this tab. I don’t use it much, so it won’t be covered here.
Advanced: Lets you specify each region manually.
Mask: Similar to Section 3 of this tutorial, where you can mask specific areas instead of using a matrix.
Couple Separator: When left empty, it defaults to “\n” (i.e., pressing Enter creates a new line). It’s best to leave it as is.
Default Mapping: Resets the current matrix.
Main Splitting: Allows you to change how the template is divided. Changing this updates the template accordingly.
Template: Shows a visual representation of the current splitting and mapping.
Pull image from img2img: Imports the image from img2img.
Presets: Lets you select or save your own presets.
Common Prompts: Lets you choose the syntax for common prompts.
Debug: Enables debugging.
SD Forge Couple - Advanced:
The mapping might seem overwhelming at first. Let’s start with the default configuration:
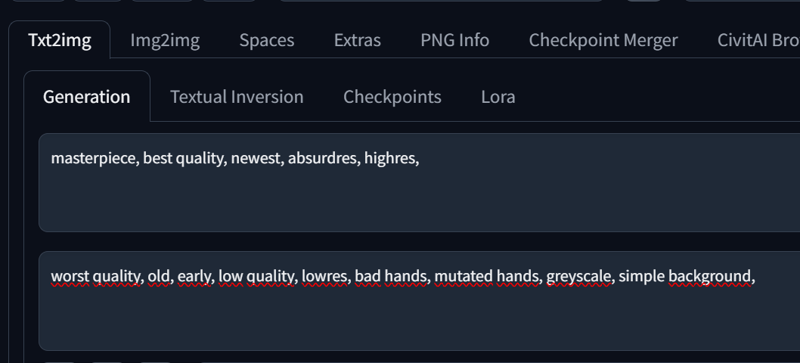
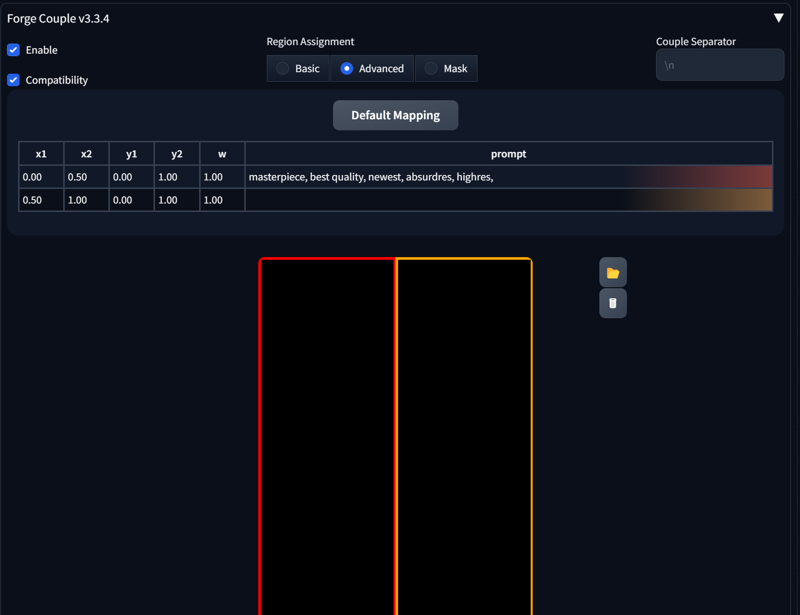 Enable Forge Couple and go to the Advanced section. The first line already contains a prompt; this is the prompt you use in your generation tab:
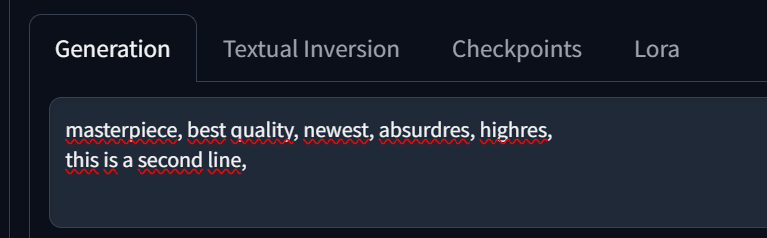
 When you add a new line, it appears as the second line. You can also edit the prompt directly in Forge Couple—whichever way you prefer.
 On the right, you’ll see colors indicating which region each prompt applies to. Clicking on a prompt will highlight the corresponding area in the template.
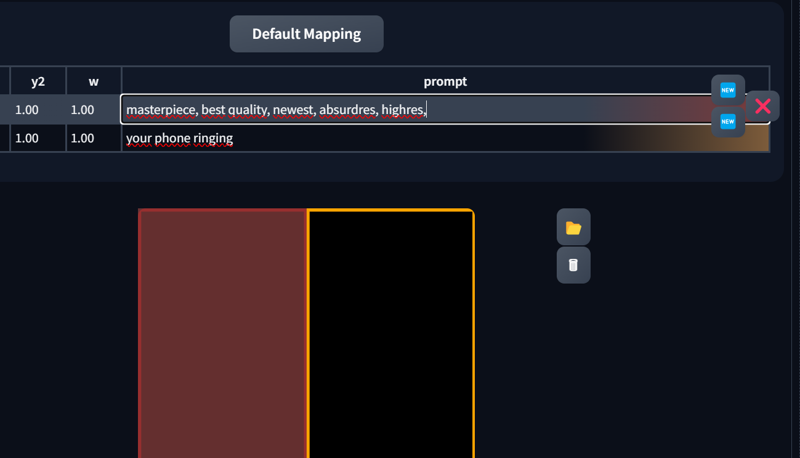
You can change the region size with x1, x2, y1, y2.
“w” sets the weight (leaving this at 1 is perfectly fine).
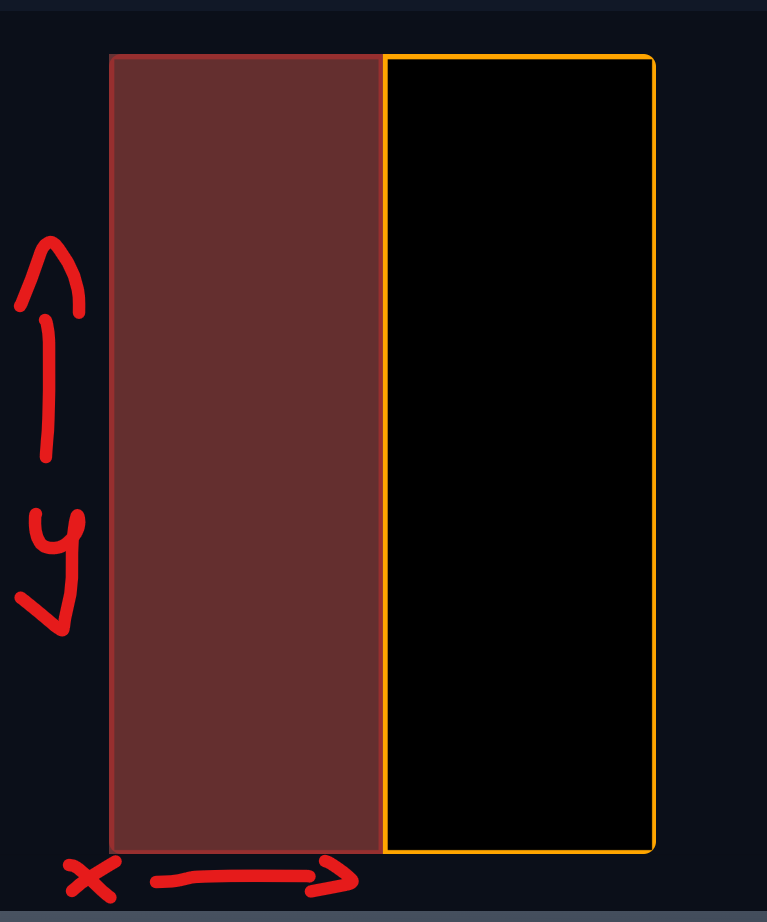
The horizontal axis is X, and the vertical axis is Y, with values ranging from 0 to 1.
Make sure not to leave gaps, or the generation may fail.
 When you click on a prompt, you’ll see two or three new buttons:
New: Creates another region.
X: Deletes the currently selected region.
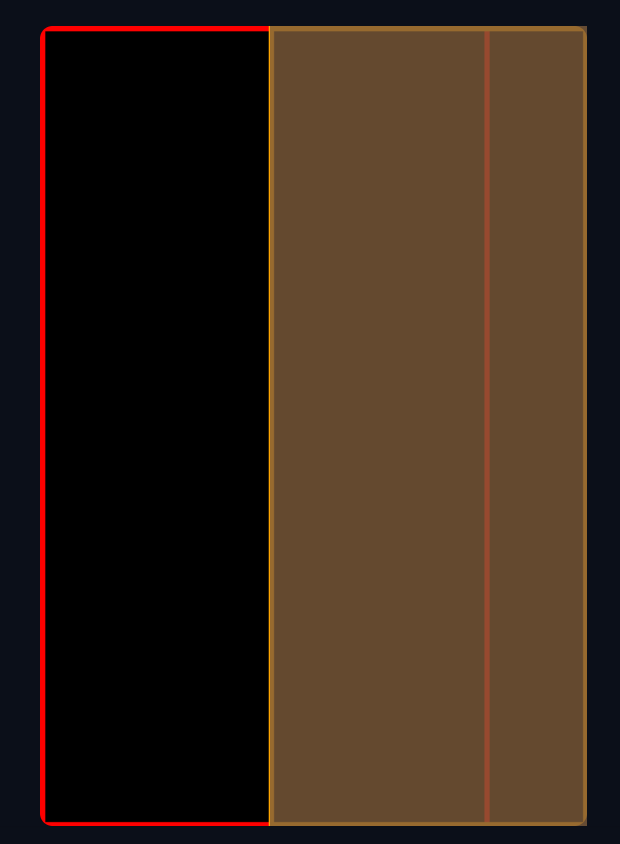
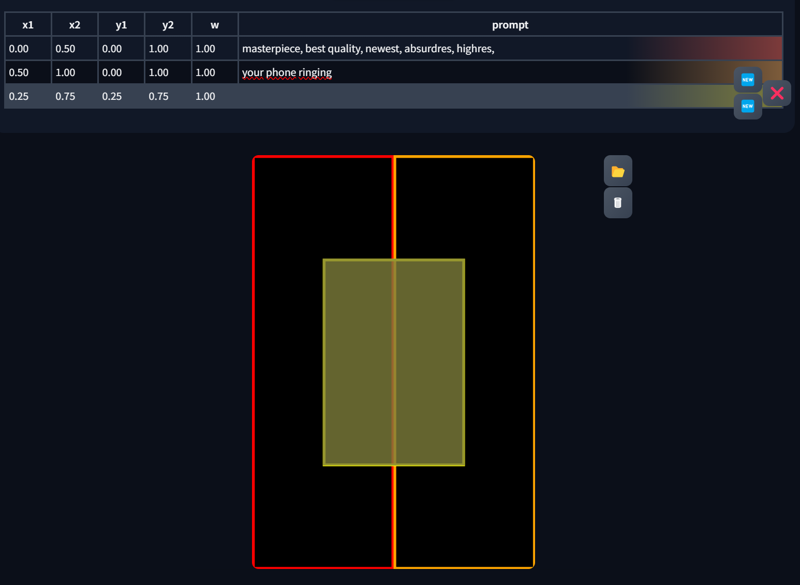 Adjusting the X and Y values will also change the template. Here are some examples:
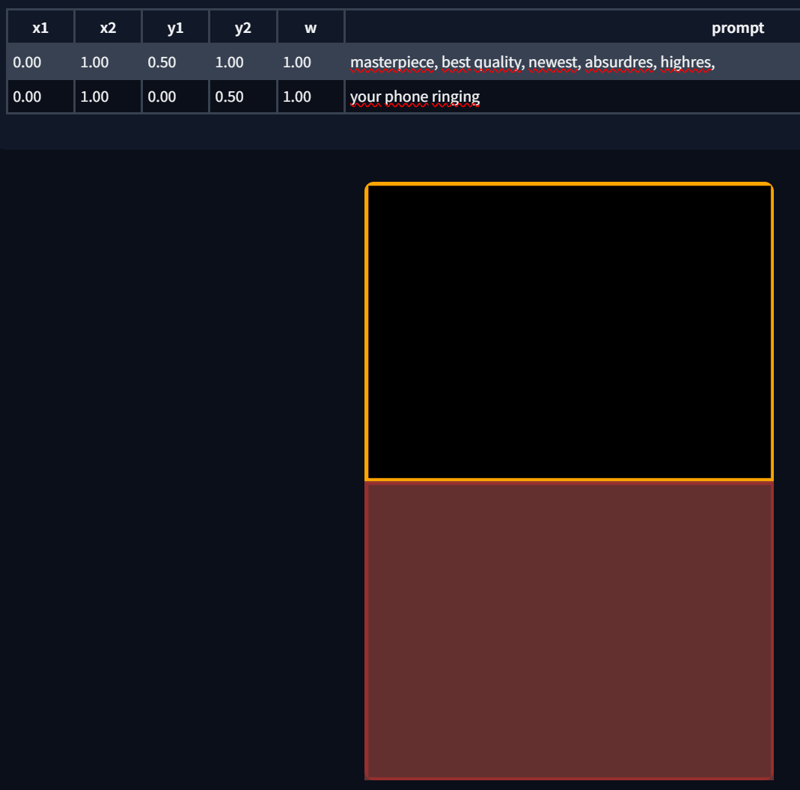
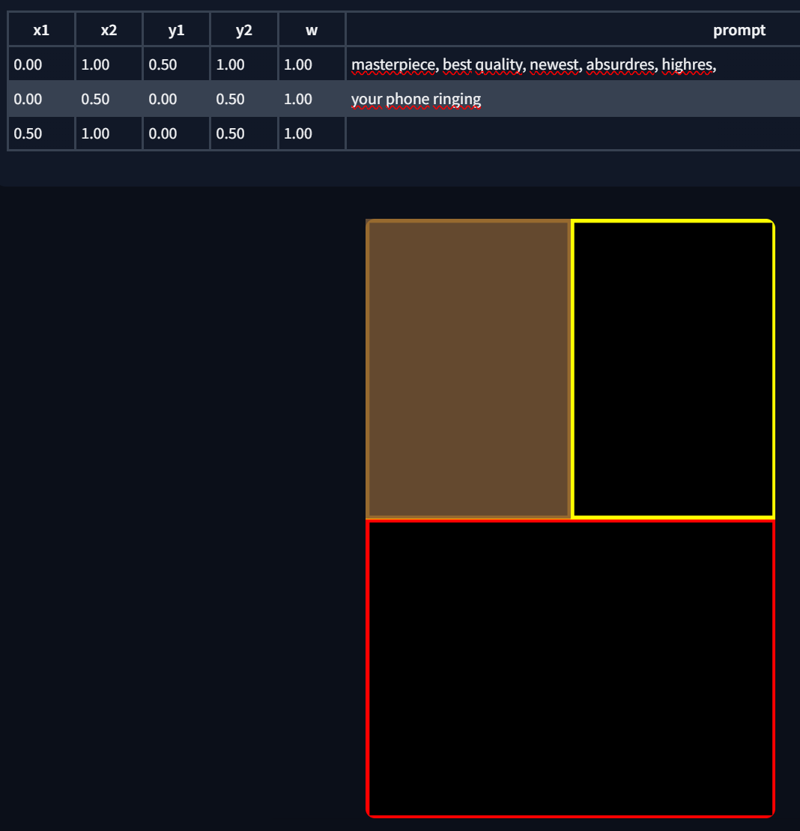
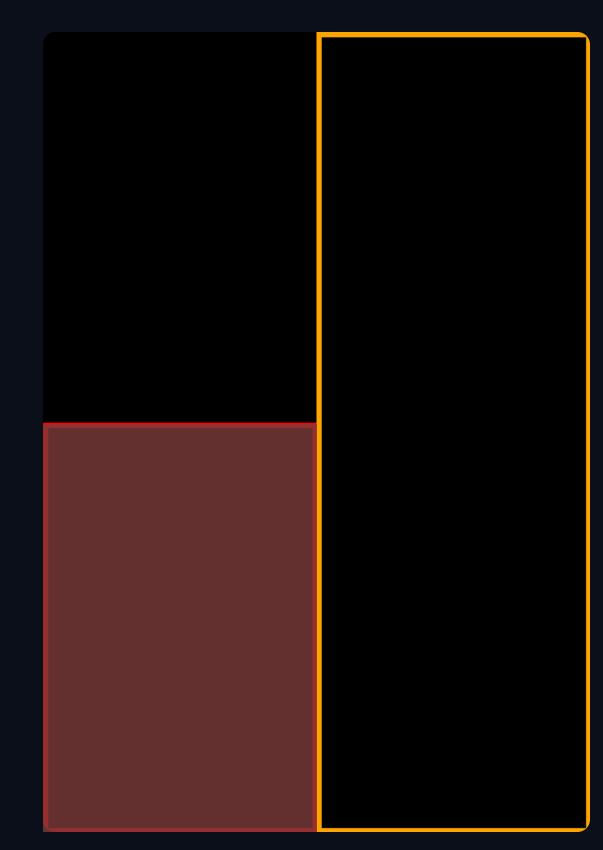
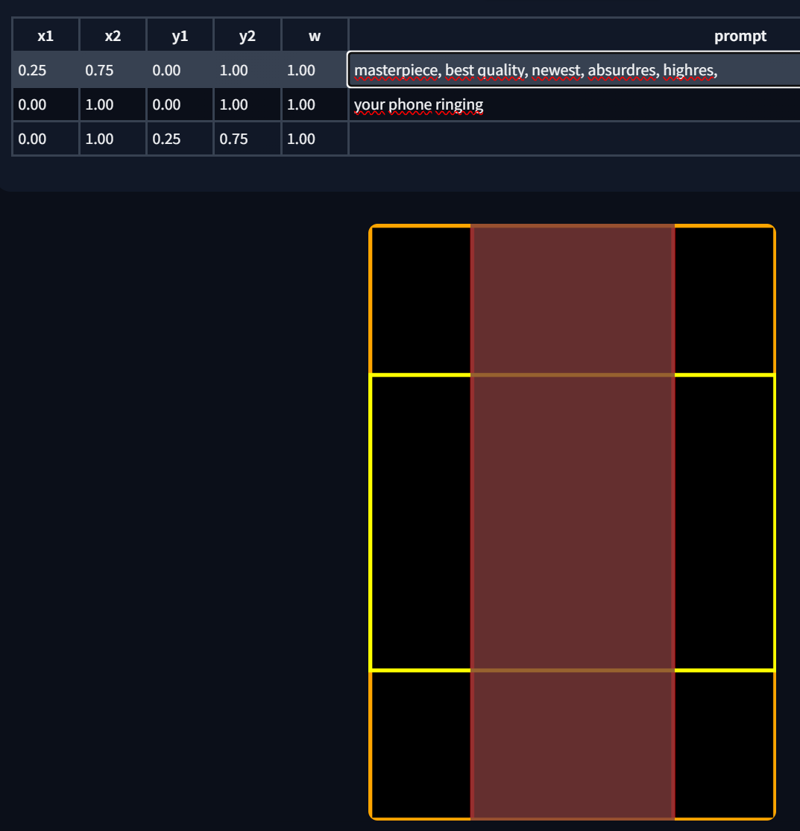 You can also edit the region directly from the template. Just highlight the corresponding region in the prompt list and make your edits. PS. Regions can also overlap.

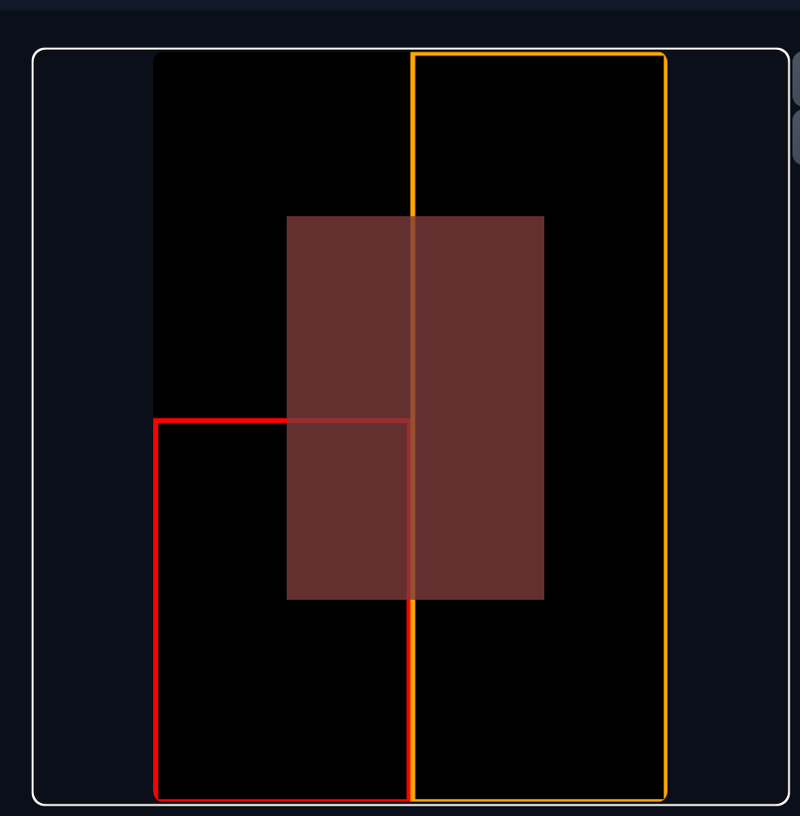
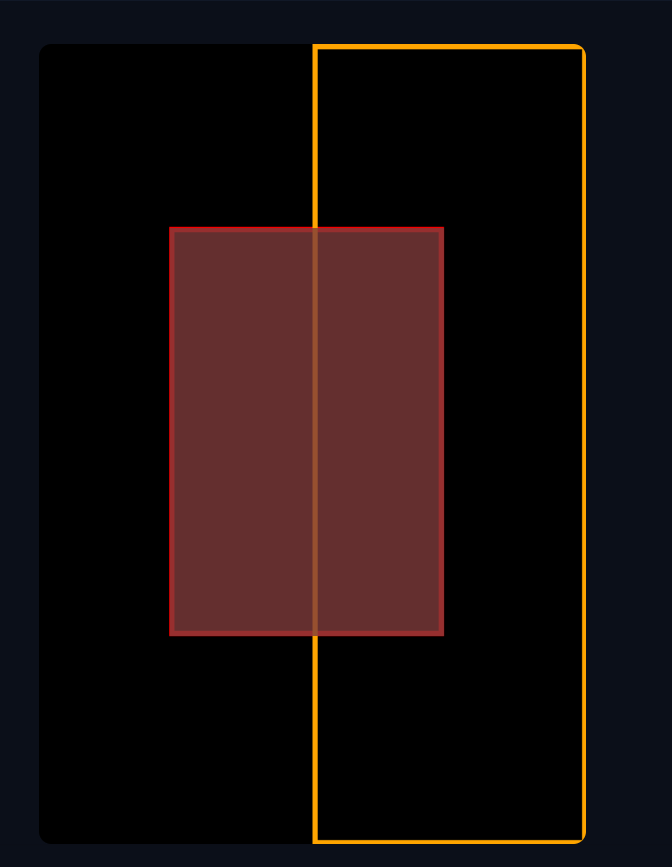
 That covers the basics of the “matrix” part. Below are some example images with their corresponding regions and metadata:
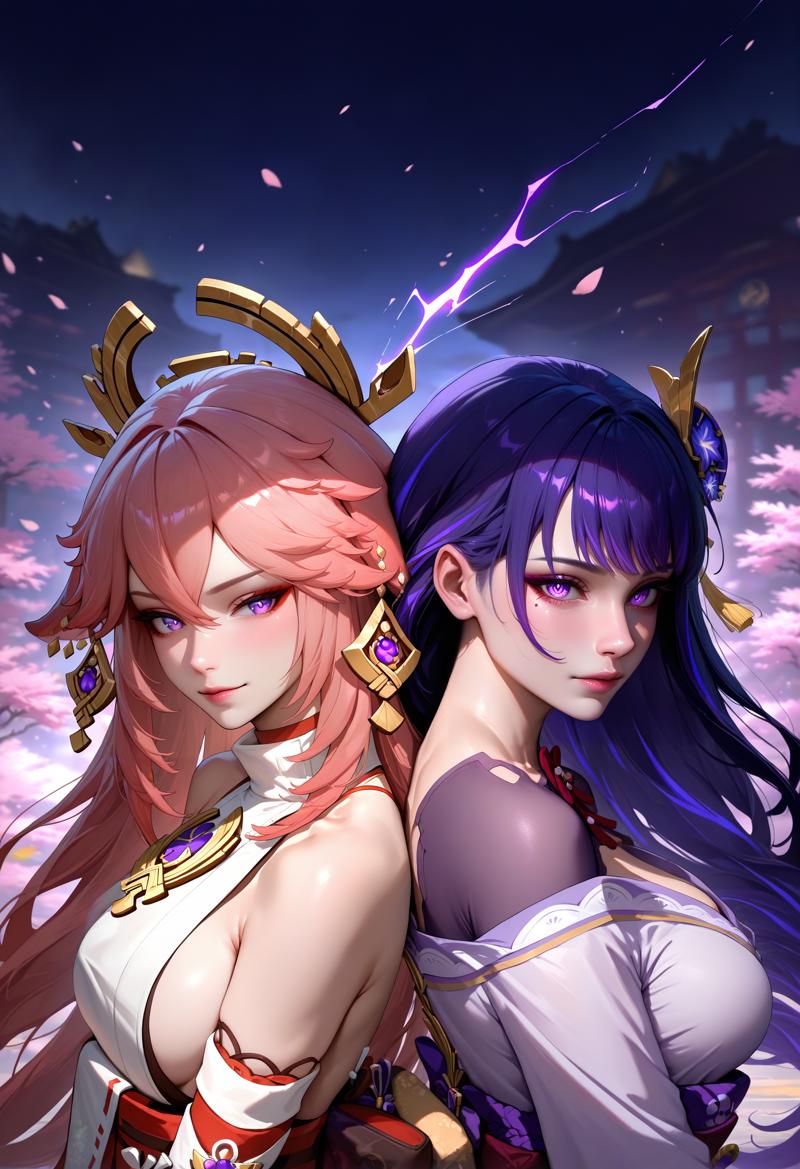
masterpiece, best quality, newest, absurdres, highres, 1girl, yae miko, back-to-back, anime,
masterpiece, best quality, newest, absurdres, highres, 1girl, raiden shogun, back-to-back, realistic,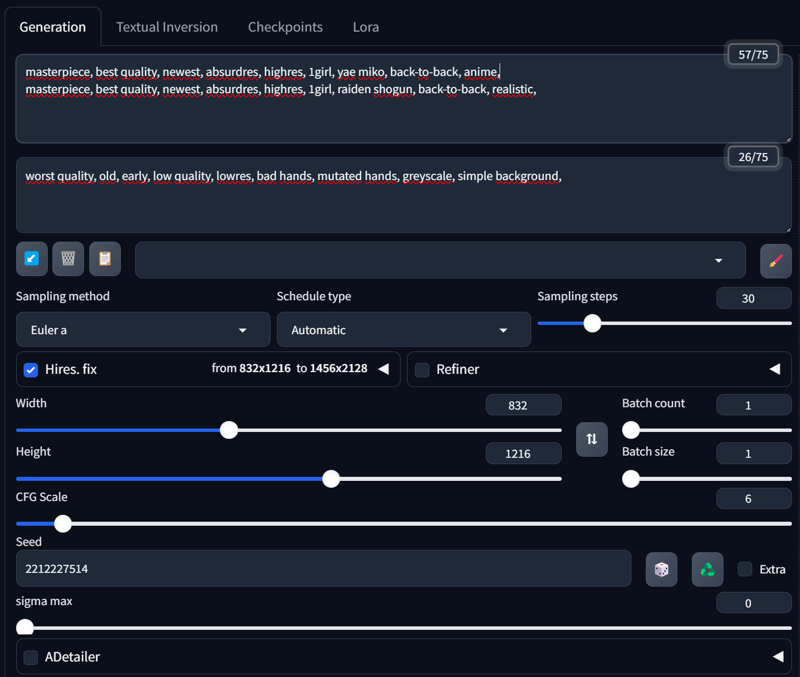

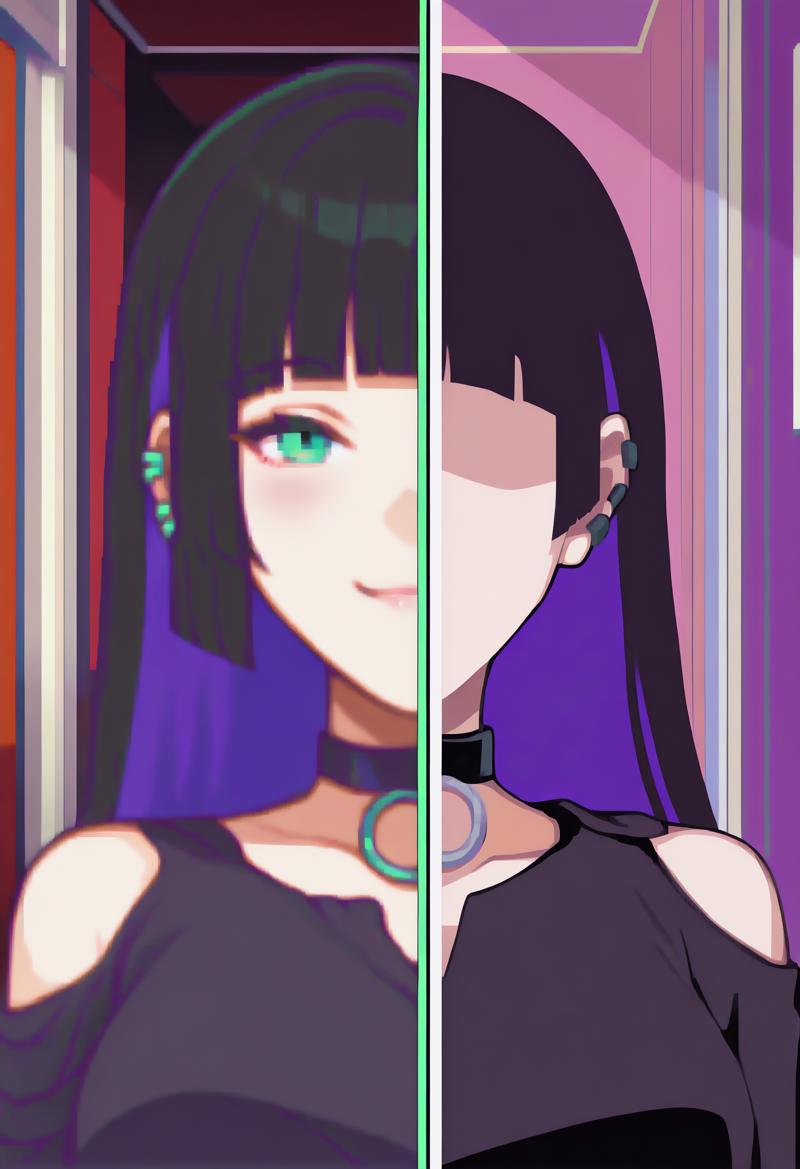
 A neat feature in Forge Couple is using LATENT, which allows you to separate styles for each region—something that wasn’t possible with the Regional Prompt Extension. Here’s an example:
masterpiece, best quality, newest, absurdres, highres, indoors, 1girl, SplitScreen, split screen, upper body, <lora:SplitScreen_illusXL_Incrs_v1:1>, pa-san, purple colored inner hair, ear piercing, hime cut, choker, black dress, long dress, shoulder cutout, seductive smile, green eyes, <lora:FEGBA-PortraitsV2-illus_Fp:1> portrait, pixel art,
masterpiece, best quality, newest, absurdres, highres, indoors, 1girl, SplitScreen, split screen, upper body, <lora:SplitScreen_illusXL_Incrs_v1:1>, pa-san, purple colored inner hair, ear piercing, hime cut, choker, black dress, long dress, shoulder cutout, <lora:MinimalismStyle-Illustrious-V2:1> flat color, limited palette, no lineart, no eyes,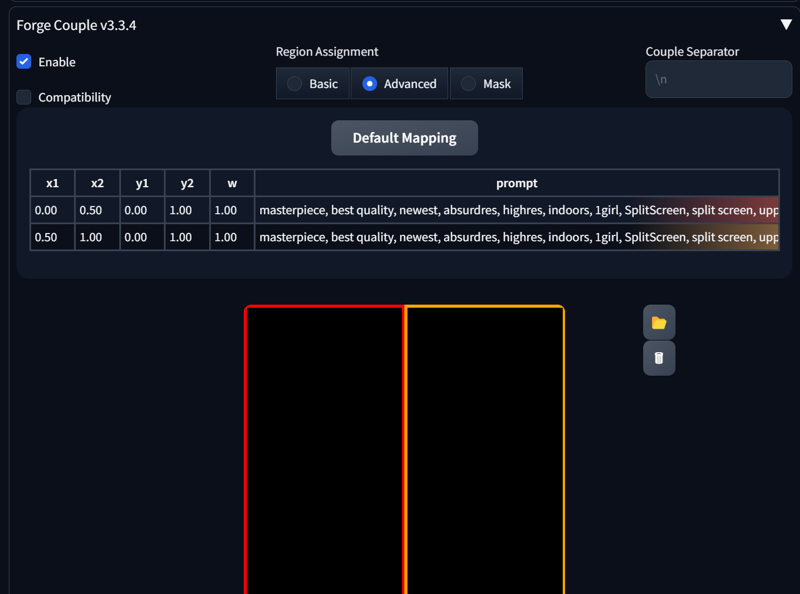
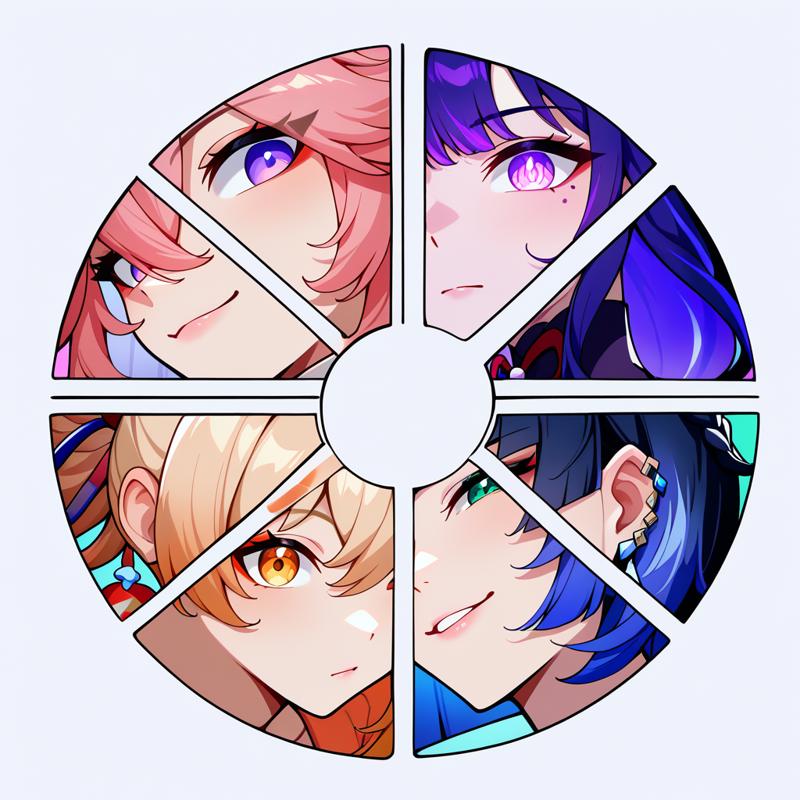
 And here’s a more complex setup:
masterpiece, best quality, newest, absurdres, highres, color wheel challenge, multiple girls, yae miko, close-up,
masterpiece, best quality, newest, absurdres, highres, color wheel challenge, multiple girls, raiden shogun, close-up,
masterpiece, best quality, newest, absurdres, highres, color wheel challenge, multiple girls, yoimiya \(genshin impact\), close-up,
masterpiece, best quality, newest, absurdres, highres, color wheel challenge, multiple girls, yelan \(genshin impact\),  close-up,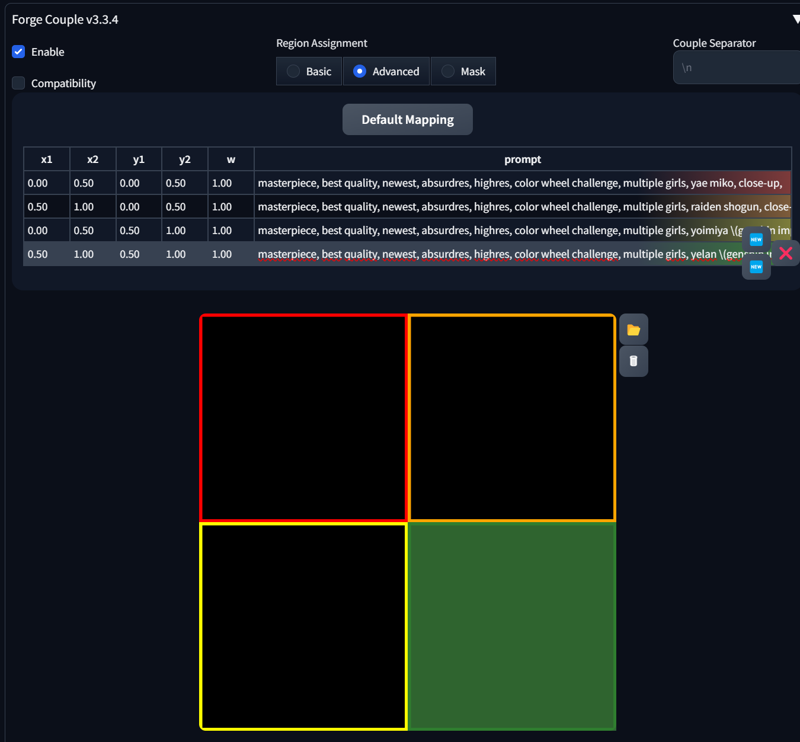
 That’s it for now. In the next section, we’ll focus on the Mask part of Forge Couple.
5. Forge Couple - Mask
6. Loopbackscaler
7. Inpaint
Description
FAQ
Comments (52)
Arigatou, FI-sensei ❤️ Favorited.
Instructions unclear, got prompt in my region.
⊙﹏⊙∥
Throw this error
What interface/application is this in the axreenshot? Sorry i am new to all this?
It really isn't as easy as this makes it seem. Like, AT ALL. Working with regional prompter is an absolute fucking nightmare. Sometimes it works perfectly, but 90% it doesn't and just ignores prompts or blends characters.
It really shouldn't be this hard to do such a simple task, but that's AI for you. It really is a gacha simulator sometimes.
Same, pretty much given up on regional prompter now and will mostly stick to single-character images.
I heard Krita AI can do it better but I heard it doesn't work well with Pony.
I can't make heads or tails of Controlnet either.
i have a problem as well if i use either common prompt or base prompt i get this long list of errors but heres the thing if i dont use Common Prompt or base prompt then there are no errors at all none what so ever i have no clue at all as to whats causing all these errors Traceback (most recent call last):
File "D:\Stability Matrix\Packages\Stable Diffusion WebUI Forge\modules_forge\main_thread.py", line 37, in loop
File "D:\Stability Matrix\Packages\Stable Diffusion WebUI Forge\modules_forge\main_thread.py", line 26, in work
self.result = self.func(*self.args, **self.kwargs)
File "D:\Stability Matrix\Packages\Stable Diffusion WebUI Forge\modules\txt2img.py", line 108, in txt2img_function
processed = modules.scripts.scripts_txt2img.run(p, *p.script_args)
File "D:\Stability Matrix\Packages\Stable Diffusion WebUI Forge\modules\scripts.py", line 785, in run
processed = script.run(p, *script_args)
File "D:\Stability Matrix\Packages\Stable Diffusion WebUI Forge\scripts\AutoChar.py", line 829, in run
last_image_batch = text2img_hr(upscaler, scale_factor0)
File "D:\Stability Matrix\Packages\Stable Diffusion WebUI Forge\scripts\AutoChar.py", line 578, in text2img_hr
hr_output = process_images(p)
File "D:\Stability Matrix\Packages\Stable Diffusion WebUI Forge\modules\processing.py", line 752, in process_images
res = process_images_inner(p)
File "D:\Stability Matrix\Packages\Stable Diffusion WebUI Forge\modules\processing.py", line 922, in process_images_inner
samples_ddim = p.sample(conditioning=p.c, unconditional_conditioning=p.uc, seeds=p.seeds, subseeds=p.subseeds, subseed_strength=p.subseed_strength, prompts=p.prompts)
File "D:\Stability Matrix\Packages\Stable Diffusion WebUI Forge\modules\processing.py", line 1275, in sample
samples = self.sampler.sample(self, x, conditioning, unconditional_conditioning, image_conditioning=self.txt2img_image_conditioning(x))
File "D:\Stability Matrix\Packages\Stable Diffusion WebUI Forge\modules\sd_samplers_kdiffusion.py", line 251, in sample
samples = self.launch_sampling(steps, lambda: self.func(self.model_wrap_cfg, x, extra_args=self.sampler_extra_args, disable=False, callback=self.callback_state, **extra_params_kwargs))
File "D:\Stability Matrix\Packages\Stable Diffusion WebUI Forge\modules\sd_samplers_common.py", line 263, in launch_sampling
return func()
File "D:\Stability Matrix\Packages\Stable Diffusion WebUI Forge\modules\sd_samplers_kdiffusion.py", line 251, in <lambda>
samples = self.launch_sampling(steps, lambda: self.func(self.model_wrap_cfg, x, extra_args=self.sampler_extra_args, disable=False, callback=self.callback_state, **extra_params_kwargs))
File "D:\Stability Matrix\Packages\Stable Diffusion WebUI Forge\venv\lib\site-packages\torch\utils\_contextlib.py", line 115, in decorate_context
return func(*args, **kwargs)
File "D:\Stability Matrix\Packages\Stable Diffusion WebUI Forge\repositories\k-diffusion\k_diffusion\sampling.py", line 594, in sample_dpmpp_2m
denoised = model(x, sigmas[i] s_in, *extra_args)
File "D:\Stability Matrix\Packages\Stable Diffusion WebUI Forge\venv\lib\site-packages\torch\nn\modules\module.py", line 1518, in wrappedcall_impl
return self._call_impl(*args, **kwargs)
File "D:\Stability Matrix\Packages\Stable Diffusion WebUI Forge\venv\lib\site-packages\torch\nn\modules\module.py", line 1527, in callimpl
return forward_call(*args, **kwargs)
File "D:\Stability Matrix\Packages\Stable Diffusion WebUI Forge\modules\sd_samplers_cfg_denoiser.py", line 182, in forward
denoised = forge_sampler.forge_sample(self, denoiser_params=denoiser_params,
File "D:\Stability Matrix\Packages\Stable Diffusion WebUI Forge\modules_forge\forge_sampler.py", line 88, in forge_sample
denoised = sampling_function(model, x, timestep, uncond, cond, cond_scale, model_options, seed)
File "D:\Stability Matrix\Packages\Stable Diffusion WebUI Forge\ldm_patched\modules\samplers.py", line 289, in sampling_function
cond_pred, uncond_pred = calc_cond_uncond_batch(model, cond, uncond_, x, timestep, model_options)
File "D:\Stability Matrix\Packages\Stable Diffusion WebUI Forge\ldm_patched\modules\samplers.py", line 258, in calc_cond_uncond_batch
output = model.apply_model(input_x, timestep_, **c).chunk(batch_chunks)
File "D:\Stability Matrix\Packages\Stable Diffusion WebUI Forge\ldm_patched\modules\model_base.py", line 90, in apply_model
model_output = self.diffusion_model(xc, t, context=context, control=control, transformer_options=transformer_options, **extra_conds).float()
File "D:\Stability Matrix\Packages\Stable Diffusion WebUI Forge\venv\lib\site-packages\torch\nn\modules\module.py", line 1518, in wrappedcall_impl
return self._call_impl(*args, **kwargs)
File "D:\Stability Matrix\Packages\Stable Diffusion WebUI Forge\venv\lib\site-packages\torch\nn\modules\module.py", line 1527, in callimpl
return forward_call(*args, **kwargs)
File "D:\Stability Matrix\Packages\Stable Diffusion WebUI Forge\ldm_patched\ldm\modules\diffusionmodules\openaimodel.py", line 867, in forward
h = forward_timestep_embed(module, h, emb, context, transformer_options, time_context=time_context, num_video_frames=num_video_frames, image_only_indicator=image_only_indicator)
File "D:\Stability Matrix\Packages\Stable Diffusion WebUI Forge\ldm_patched\ldm\modules\diffusionmodules\openaimodel.py", line 55, in forward_timestep_embed
x = layer(x, context, transformer_options)
File "D:\Stability Matrix\Packages\Stable Diffusion WebUI Forge\venv\lib\site-packages\torch\nn\modules\module.py", line 1518, in wrappedcall_impl
return self._call_impl(*args, **kwargs)
File "D:\Stability Matrix\Packages\Stable Diffusion WebUI Forge\venv\lib\site-packages\torch\nn\modules\module.py", line 1527, in callimpl
return forward_call(*args, **kwargs)
File "D:\Stability Matrix\Packages\Stable Diffusion WebUI Forge\ldm_patched\ldm\modules\attention.py", line 620, in forward
x = block(x, context=context[i], transformer_options=transformer_options)
File "D:\Stability Matrix\Packages\Stable Diffusion WebUI Forge\venv\lib\site-packages\torch\nn\modules\module.py", line 1518, in wrappedcall_impl
return self._call_impl(*args, **kwargs)
File "D:\Stability Matrix\Packages\Stable Diffusion WebUI Forge\venv\lib\site-packages\torch\nn\modules\module.py", line 1527, in callimpl
return forward_call(*args, **kwargs)
File "D:\Stability Matrix\Packages\Stable Diffusion WebUI Forge\ldm_patched\ldm\modules\attention.py", line 447, in forward
return checkpoint(self._forward, (x, context, transformer_options), self.parameters(), self.checkpoint)
File "D:\Stability Matrix\Packages\Stable Diffusion WebUI Forge\ldm_patched\ldm\modules\diffusionmodules\util.py", line 194, in checkpoint
return func(*inputs)
File "D:\Stability Matrix\Packages\Stable Diffusion WebUI Forge\ldm_patched\ldm\modules\attention.py", line 547, in _forward
n = self.attn2(n, context=context_attn2, value=value_attn2, transformer_options=extra_options)
File "D:\Stability Matrix\Packages\Stable Diffusion WebUI Forge\venv\lib\site-packages\torch\nn\modules\module.py", line 1518, in wrappedcall_impl
return self._call_impl(*args, **kwargs)
File "D:\Stability Matrix\Packages\Stable Diffusion WebUI Forge\venv\lib\site-packages\torch\nn\modules\module.py", line 1527, in callimpl
return forward_call(*args, **kwargs)
File "D:\Stability Matrix\Packages\Stable Diffusion WebUI Forge\extensions\sd-webui-regional-prompter\scripts\attention.py", line 417, in forward
ox = matsepcalc(x, contexts, mask, self.pn, 1)
File "D:\Stability Matrix\Packages\Stable Diffusion WebUI Forge\extensions\sd-webui-regional-prompter\scripts\attention.py", line 185, in matsepcalc
context = contexts[:,tll[i][0] TOKENSCON:tll[i][1] TOKENSCON,:]
IndexError: list index out of range
list index out of range
*** Error completing request
*** Arguments: ('task(jfv9uqci8733wbz)', <gradio.routes.Request object at 0x000002082F6B47C0>, [], 120, 'DPM++ 2M Karras', 30, 1, 30, 768, 768, False, 0.5, 1.2, 'Latent (bicubic antialiased)', 60, 0, 0, 'Use same checkpoint', 'Use same sampler', '', '', [], 1, False, '', 0.8, -1, False, -1, 0, 0, 0, False, False, {'ad_model': 'face_yolov8n.pt', 'ad_model_classes': '', 'ad_tab_enable': True, 'ad_prompt': '', 'ad_negative_prompt': '', 'ad_confidence': 0.3, 'ad_mask_k_largest': 0, 'ad_mask_min_ratio': 0, 'ad_mask_max_ratio': 1, 'ad_x_offset': 0, 'ad_y_offset': 0, 'ad_dilate_erode': 4, 'ad_mask_merge_invert': 'None', 'ad_mask_blur': 4, 'ad_denoising_strength': 0.4, 'ad_inpaint_only_masked': True, 'ad_inpaint_only_masked_padding': 32, 'ad_use_inpaint_width_height': False, 'ad_inpaint_width': 512, 'ad_inpaint_height': 512, 'ad_use_steps': False, 'ad_steps': 28, 'ad_use_cfg_scale': False, 'ad_cfg_scale': 7, 'ad_use_checkpoint': False, 'ad_checkpoint': 'Use same checkpoint', 'ad_use_vae': False, 'ad_vae': 'Use same VAE', 'ad_use_sampler': False, 'ad_sampler': 'DPM++ 2M Karras', 'ad_scheduler': 'Use same scheduler', 'ad_use_noise_multiplier': False, 'ad_noise_multiplier': 1, 'ad_use_clip_skip': False, 'ad_clip_skip': 1, 'ad_restore_face': False, 'ad_controlnet_model': 'None', 'ad_controlnet_module': 'None', 'ad_controlnet_weight': 1, 'ad_controlnet_guidance_start': 0, 'ad_controlnet_guidance_end': 1, 'is_api': ()}, {'ad_model': 'None', 'ad_model_classes': '', 'ad_tab_enable': True, 'ad_prompt': '', 'ad_negative_prompt': '', 'ad_confidence': 0.3, 'ad_mask_k_largest': 0, 'ad_mask_min_ratio': 0, 'ad_mask_max_ratio': 1, 'ad_x_offset': 0, 'ad_y_offset': 0, 'ad_dilate_erode': 4, 'ad_mask_merge_invert': 'None', 'ad_mask_blur': 4, 'ad_denoising_strength': 0.4, 'ad_inpaint_only_masked': True, 'ad_inpaint_only_masked_padding': 32, 'ad_use_inpaint_width_height': False, 'ad_inpaint_width': 512, 'ad_inpaint_height': 512, 'ad_use_steps': False, 'ad_steps': 28, 'ad_use_cfg_scale': False, 'ad_cfg_scale': 7, 'ad_use_checkpoint': False, 'ad_checkpoint': 'Use same checkpoint', 'ad_use_vae': False, 'ad_vae': 'Use same VAE', 'ad_use_sampler': False, 'ad_sampler': 'DPM++ 2M Karras', 'ad_scheduler': 'Use same scheduler', 'ad_use_noise_multiplier': False, 'ad_noise_multiplier': 1, 'ad_use_clip_skip': False, 'ad_clip_skip': 1, 'ad_restore_face': False, 'ad_controlnet_model': 'None', 'ad_controlnet_module': 'None', 'ad_controlnet_weight': 1, 'ad_controlnet_guidance_start': 0, 'ad_controlnet_guidance_end': 1, 'is_api': ()}, {'ad_model': 'None', 'ad_model_classes': '', 'ad_tab_enable': True, 'ad_prompt': '', 'ad_negative_prompt': '', 'ad_confidence': 0.3, 'ad_mask_k_largest': 0, 'ad_mask_min_ratio': 0, 'ad_mask_max_ratio': 1, 'ad_x_offset': 0, 'ad_y_offset': 0, 'ad_dilate_erode': 4, 'ad_mask_merge_invert': 'None', 'ad_mask_blur': 4, 'ad_denoising_strength': 0.4, 'ad_inpaint_only_masked': True, 'ad_inpaint_only_masked_padding': 32, 'ad_use_inpaint_width_height': False, 'ad_inpaint_width': 512, 'ad_inpaint_height': 512, 'ad_use_steps': False, 'ad_steps': 28, 'ad_use_cfg_scale': False, 'ad_cfg_scale': 7, 'ad_use_checkpoint': False, 'ad_checkpoint': 'Use same checkpoint', 'ad_use_vae': False, 'ad_vae': 'Use same VAE', 'ad_use_sampler': False, 'ad_sampler': 'DPM++ 2M Karras', 'ad_scheduler': 'Use same scheduler', 'ad_use_noise_multiplier': False, 'ad_noise_multiplier': 1, 'ad_use_clip_skip': False, 'ad_clip_skip': 1, 'ad_restore_face': False, 'ad_controlnet_model': 'None', 'ad_controlnet_module': 'None', 'ad_controlnet_weight': 1, 'ad_controlnet_guidance_start': 0, 'ad_controlnet_guidance_end': 1, 'is_api': ()}, {'ad_model': 'None', 'ad_model_classes': '', 'ad_tab_enable': True, 'ad_prompt': '', 'ad_negative_prompt': '', 'ad_confidence': 0.3, 'ad_mask_k_largest': 0, 'ad_mask_min_ratio': 0, 'ad_mask_max_ratio': 1, 'ad_x_offset': 0, 'ad_y_offset': 0, 'ad_dilate_erode': 4, 'ad_mask_merge_invert': 'None', 'ad_mask_blur': 4, 'ad_denoising_strength': 0.4, 'ad_inpaint_only_masked': True, 'ad_inpaint_only_masked_padding': 32, 'ad_use_inpaint_width_height': False, 'ad_inpaint_width': 512, 'ad_inpaint_height': 512, 'ad_use_steps': False, 'ad_steps': 28, 'ad_use_cfg_scale': False, 'ad_cfg_scale': 7, 'ad_use_checkpoint': False, 'ad_checkpoint': 'Use same checkpoint', 'ad_use_vae': False, 'ad_vae': 'Use same VAE', 'ad_use_sampler': False, 'ad_sampler': 'DPM++ 2M Karras', 'ad_scheduler': 'Use same scheduler', 'ad_use_noise_multiplier': False, 'ad_noise_multiplier': 1, 'ad_use_clip_skip': False, 'ad_clip_skip': 1, 'ad_restore_face': False, 'ad_controlnet_model': 'None', 'ad_controlnet_module': 'None', 'ad_controlnet_weight': 1, 'ad_controlnet_guidance_start': 0, 'ad_controlnet_guidance_end': 1, 'is_api': ()}, True, 'keyword prompt', 'keyword1, keyword2', 'None', 'model keyword first', 'None', '0.7', 'None', True, 30, 0, 'full', 0, 'middle', 0, '', False, 7, 3, 0, 'full', 0, 0.0, 1.0, True, False, 'Matrix', 'Columns', 'Mask', 'Prompt', '1,1,1', '0.3,0.6', False, True, False, 'Attention', ['[', '"', '[', '"'], '0', '0', '0.4', None, '0', '0', False, False, 0.0, ControlNetUnit(input_mode=<InputMode.SIMPLE: 'simple'>, use_preview_as_input=False, batch_image_dir='', batch_mask_dir='', batch_input_gallery=[], batch_mask_gallery=[], multi_inputs_gallery=[], generated_image=None, mask_image=None, hr_option=<HiResFixOption.BOTH: 'Both'>, enabled=True, module='dw_openpose_full', model='control_v11p_sd15_openpose [cab727d4]', weight=1, image=None, resize_mode=<ResizeMode.OUTER_FIT: 'Resize and Fill'>, processor_res=512, threshold_a=0.5, threshold_b=0.5, guidance_start=0, guidance_end=1, pixel_perfect=True, control_mode=<ControlMode.BALANCED: 'Balanced'>, advanced_weighting=None, save_detected_map=True), ControlNetUnit(input_mode=<InputMode.SIMPLE: 'simple'>, use_preview_as_input=False, batch_image_dir='', batch_mask_dir='', batch_input_gallery=[], batch_mask_gallery=[], multi_inputs_gallery=[], generated_image=None, mask_image=None, hr_option=<HiResFixOption.BOTH: 'Both'>, enabled=True, module='inpaint_global_harmonious', model='control_v11p_sd15_inpaint [ebff9138]', weight=1, image=None, resize_mode=<ResizeMode.OUTER_FIT: 'Resize and Fill'>, processor_res=0.5, threshold_a=0.5, threshold_b=0.5, guidance_start=0, guidance_end=1, pixel_perfect=True, control_mode=<ControlMode.BALANCED: 'Balanced'>, advanced_weighting=None, save_detected_map=True), ControlNetUnit(input_mode=<InputMode.SIMPLE: 'simple'>, use_preview_as_input=False, batch_image_dir='', batch_mask_dir='', batch_input_gallery=[], batch_mask_gallery=[], multi_inputs_gallery=[], generated_image=None, mask_image=None, hr_option=<HiResFixOption.BOTH: 'Both'>, enabled=False, module='None', model='None', weight=1, image=None, resize_mode=<ResizeMode.INNER_FIT: 'Crop and Resize'>, processor_res=-1, threshold_a=-1, threshold_b=-1, guidance_start=0, guidance_end=1, pixel_perfect=False, control_mode=<ControlMode.BALANCED: 'Balanced'>, advanced_weighting=None, save_detected_map=True), False, 7, 1, 'Constant', 0, 'Constant', 0, 1, 'enable', 'MEAN', 'AD', 1, False, 1.01, 1.02, 0.99, 0.95, False, 0.5, 2, False, 256, 2, 0, False, False, 3, 2, 0, 0.35, True, 'bicubic', 'bicubic', False, 0, 'anisotropic', 0, 'reinhard', 100, 0, 'subtract', 0, 0, 'gaussian', 'add', 0, 100, 127, 0, 'hard_clamp', 5, 0, 'None', 'None', False, 'MultiDiffusion', 768, 768, 64, 4, False, False, False, True, 0.3, 'Latent (bicubic antialiased)', 0.5, 0.4, 0.5, 0.4, ['Automatic face inpaint', 'Automatic eyes inpaint'], 'Txt2Img', True, 2, 1.2, True, True, False, 5, 64, False, 0.3, 0.6, True, True, True, False, '', '', '', '', '', '', 60, 'DPM++ 2M Karras', 60, 'DPM++ 2M Karras', 100, 'DDIM', 'Use same checkpoint', 'Use same checkpoint', 'Use same checkpoint', 2.5, 1.5, 2, 2, False, False, 'positive', 'comma', 0, False, False, 'start', '', 1, '', [], 0, '', [], 0, '', [], True, False, False, False, False, False, False, 0, False, [], 30, '', 4, [], 1, '', '', '', '') {}
Traceback (most recent call last):
File "D:\Stability Matrix\Packages\Stable Diffusion WebUI Forge\modules\call_queue.py", line 57, in f
res = list(func(*args, **kwargs))
TypeError: 'NoneType' object is not iterable,*** Error running process: D:\Stability Matrix\Packages\Stable Diffusion WebUI Forge\extensions-builtin\sd_forge_controlnet\scripts\controlnet.py
Traceback (most recent call last):
File "D:\Stability Matrix\Packages\Stable Diffusion WebUI Forge\modules\scripts.py", line 803, in process
script.process(p, *script_args)
File "D:\Stability Matrix\Packages\Stable Diffusion WebUI Forge\venv\lib\site-packages\torch\utils\_contextlib.py", line 115, in decorate_context
return func(*args, **kwargs)
File "D:\Stability Matrix\Packages\Stable Diffusion WebUI Forge\extensions-builtin\sd_forge_controlnet\scripts\controlnet.py", line 565, in process
self.process_unit_after_click_generate(p, unit, params, args, *kwargs)
File "D:\Stability Matrix\Packages\Stable Diffusion WebUI Forge\venv\lib\site-packages\torch\utils\_contextlib.py", line 115, in decorate_context
return func(*args, **kwargs)
File "D:\Stability Matrix\Packages\Stable Diffusion WebUI Forge\extensions-builtin\sd_forge_controlnet\scripts\controlnet.py", line 310, in process_unit_after_click_generate
input_list, resize_mode = self.get_input_data(p, unit, preprocessor, h, w)
File "D:\Stability Matrix\Packages\Stable Diffusion WebUI Forge\extensions-builtin\sd_forge_controlnet\scripts\controlnet.py", line 215, in get_input_data
resize_mode = external_code.resize_mode_from_value(p.resize_mode)
AttributeError: 'StableDiffusionProcessingTxt2Img' object has no attribute 'resize_mode'Warning: Nonstandard height / width for ulscaled size
1,1,1 0.3,0.6 Horizontal
Regional Prompter Active, Pos tokens : [723, 257], Neg tokens : [1329],*** Error running process_before_every_sampling: D:\Stability Matrix\Packages\Stable Diffusion WebUI Forge\extensions-builtin\sd_forge_controlnet\scripts\controlnet.py
Traceback (most recent call last):
File "D:\Stability Matrix\Packages\Stable Diffusion WebUI Forge\modules\scripts.py", line 835, in process_before_every_sampling
script.process_before_every_sampling(p, script_args, *kwargs)
File "D:\Stability Matrix\Packages\Stable Diffusion WebUI Forge\venv\lib\site-packages\torch\utils\_contextlib.py", line 115, in decorate_context
return func(*args, **kwargs)
File "D:\Stability Matrix\Packages\Stable Diffusion WebUI Forge\extensions-builtin\sd_forge_controlnet\scripts\controlnet.py", line 572, in process_before_every_sampling
self.process_unit_before_every_sampling(p, unit, self.current_params[i], args, *kwargs)
KeyError: 0
Does this work on comfyui too?
Somehow the masking area doesn't work properly, I draw my regions and all, but it doesn't apply the prompts to the masked regions, anybody else has the problem? It doesn't matter if I use an SD1.5 model or pony.
Regional Prompt (Mask) IS DEAD.
When I try to use it, I get a bunch of errors. And nothing happens. Matrix does not cause errors.
Sosiki, does anyone have a solution? Or is it broken? Judging by the comments, I am no longer alone with this problem. XD
I found it working without using the Base prompt and using it like the Matrix portion it works 1/4 of the time from a batch of 4 images only one resembles the prompted mask but it works
@nonozone222653 How is this possible without using Base prompt?
When I try to inpaint a character in the side of the image, it is generated nowhere near the inpainted mask. Is there a way to fix that?
I tried replicating the first image (Yae Miko and Raiden Shogun), I've kept everything the same but I get Yae Miko twice with different clothes. Why is this?
same problem here. lol
I'm trying to use different lora character models and it just makes the same character twice instead of two separate characters
Everything worked well, except the last example (the watermelon shirt). She's keep holding watermelon instead of creating watermelon print shirt
Does regional prompter don't work with hires fix? I keep trying to make it work, the first downscale image is okay but it messes when upscaling it, I'm using it with Loras btw
It does for me. Is there a chance you are forgeting to change resolution of matrix?
@FutasArePeakOfEvolution I'm generating at 800x800 and upscaling it to 1600x1600, setting the matrix resolution to 800x800 fixes it in lower upscaling (1200x1200 for example) but not in 1600x1600 where I still get mixed results like the hair colors mixing with one character having the hair color of the other
This is amazing. One question: how do we train our own concept loras for this? Like the handshake and whatnot. I tried like I would train a normal lora and stable diffusion threw up on me.
Not working at all. I folowed the guide to the last word.
Where's that sosatel huev, the author? I remember there was a thread about his method not working. Slaves came running in to prove that it worked. Why did you delete that thread? Ne, moget vi zanyati tem chto drochite drug, drugu. And why don't you tell everyone else that it works and they're just idiots and can't do anything?
Can you make a guide like this for ComfyUI? Much appreciated!
Very useful guide, thank you.
regional prompter on newest forge is broken rn, you can extension use sd-forge-couple instead
Where can I find a guide on how to install and use it?
Edit: or not, I just tried with my own prompt, just replacing the characters with something else and it doesn't work at all. Actually, the prompts after BREAK are completely ignored and the AI generates whatever it wants.
I get better results when relying on luck.
I am so stupid, I was going to write that following your tutorial, I got the characters inverted with the first prompt, and their action and clothes inverted in the second.
Turns out, I had forgotten to check activate in regional prompter...
Thank you for your time and this tutorial.
Do I need to resize the image in matrix if I use hires fix?
I haven't resized the image in matrix when I use hires fix - from what I can tell, it generates the base image (using the matrix), and then the upscaler is applied to that image (so it knows nothing about the matrix). Same for adetailer.
@FallenIncursio Thanks for the tutorial (great work and much appreciated!), I couldn't find any info on Overlay on the git page so part that was super useful. For everyone thinking about using this - it takes a little bit of effort to learn, but the payoff is AMAZING.
I posted an example pic below, where with about 60 seconds of setup I could reliably get SD to give me a picture of two different women: different hair colour, different skin tone, different dress. And you can do so much more with just a little tweaking.
My big lesson though is that you need well made lora, by which I mean ones where the concept is well tagged to separate it from everything else in the training images, or it will f*** up your whole composition big time. (This may also be because I am using active rather than latent [which I don't think works with SDXL / Pony], and haven't experimented with dropping the overlay ration from its default 0.5.) But if you get the right Lora, this is great - you can apply it to just one cell quite reliably.
this! I was so frustrated due to multi-lora workflows not working until I understood that the quality of the Lora is one of the most important things. Thanks for writing the comment - it helps to know that it's not only me thinking this
This...is...mindblowing....so many possibilitys....thank you !
I am halfway with this and trying to do more with the BREAKS, before working on the more advanced adetailer scenes and then masking.
How would this work for NSFW scenes or anything else? I figured I would do the scenery or prompt above before the characters, but I get DBZ fusion characters instead XD
您讲的特别清晰,案例也很通俗易懂,希望您能继续更新后续的教程!
"If there is a prompt that says a girl in the common clause, region 1 is generated with the prompt a girl , red hair. In the base clause, if the base ratio is 0.2, it is generated with the prompt a girl * 0.2 + red hair * 0.8. Basically, common clause combines prompts, and base clause combines weights (like img2img denoising strength). You may want to try the base if the common prompt is too strong, or fine tune the (emphasis). The immediate strength that corresponds to the target should be stronger than normal. Even 1.6 doesn't break anything."
- author of the regional prompter
you're literally tripping
When applying ADetailer to fix any issues, this is something we would need to then generate or upscale the image right as that can also apply any prompts that we have correct?
why regional prompt not working on forge ? is there any solution or another way to generat multiple characters?
yeah sadly. it seems like all the extentions I was able to find that alows us to separate and prompt for different regions/characters arent working for forge...Gotta keep waiting for them to fix it I guess...
Until they fix it, you can use this instead. https://github.com/Haoming02/sd-forge-couple
@ipsylon0000 I never had any luck with forge couple, it just distorts and destroys the image most of the time, or ignores it entirely and does what it was going to do anyways.
It works fine, even if I put a style, but when I put Lora of characters it seems that the character is mixed with the rest, and I have no idea why, if there is the BREAK to differentiate, is it because of the intensity? lowering it to maybe 0.5 would work? in Pony XL
Might be due to what version of WebUi you are using, Forge is broken and even the sd-forge-couple extension someone made doesn't work that well.
From what I can tell it looks like a Forge update broke the Regional Prompter extension and I have no clue when it might be fixed, people were asking about it on Github back in August 2024. I also tried a Forge fork of Regional Prompter, but that didn't work as well, same bleeding and merging of character issues.
Sd-forge-couple was also having the same bleeding and merging issues, so I just downloaded a recent build of Automatic1111 WebUI, tested with the 6 character example and it works.
It works great, but there are some wierd stuff, like why is it not showing cleavages for me? I tried everything and its wierd how without using Regional Prompting, it will understand the prompt cleavage, but if I start using it, it does not understand it
How would I determine how the characters interact with each other?
I have 2 characters, from left to right.
I want character 1 to "hug" character 2 from behind.
But it consistently does the opposite, making character 2 hug character 1 from behind.
I have not found any sources to fix this issue, nor is there a tag for this in danbooru.
any tutorial for regional prompting on comfyui?
Awesome - please continue :)
AWEOSME
Cool
This might be the best guide I have seen including youtube. It not only says "yeah this does this" and just shows the most basic image everyone can generate like most youtube videos but goes further and complicate things with examples. Thank you for this guide.