
SVI Extend
https://github.com/vita-epfl/Stable-Video-Infinity/tree/svi_wan22
Create videos and extend them seemlessly using SVI.
Following SVI LoRAs are mandatory:
switch between default behaviour, anchor_samples and end_frames within the same subgraphs
connect an image to a part and enable the respective toggles to use end_frames or anchor_samples
NEW! v3
Extend existing videos using https://github.com/wallen0322/ComfyUI-Wan22FMLF
enable "video extension" toggle inside the settings
uses source video resolution by default
rescale video using the megapixel slider by enabling "video rescale" toggle
use included version of the nodes from inside .zip or download the latest version straight from the git if issues arise
More info inside the workflow.
AIO i2v+t2v
All in One workflow for for basic WAN 2.2 video generation.
Following features included:
Switch seemlessly between 2 and 3 sampler solutions
Toggle between i2v or t2v
Postprod
Facedetailer
uses t2v Model + LoRA for inpainting - resources needed included in workflow
Toggle between GIMM VFI and RIFE VFI Interpolation
Upscale
Tensorrt Upscale with Model
Basic Video Upscale with Model
RTX Video Super Resolution Upscale (insanely fast for decent quality)
Frame Clipper
Seamless Loops using custom RIFE nodes https://github.com/Artificial-Sweetener/comfyui-WhiteRabbit
Upscale + Interpolate
I recommend using this workflow instead of upscaling with the generating workflows, since you never really know what kind of results you get, ending up upscaling a bad video and wasting time. I included toggles so you can't use multiple interpolation or upscale nodes at once by mistake.
This includes:
WAN Facedetailer
use any WAN 2.2 T2V low model + the following T2V LoRA:
lower resolution from 768 to 512 if you have VRAM issues
Put the following file into "ComfyUI\models\ultralytics\bbox":
WAN Refiner (massive VRAM cost)
increase denoise if you want more inpainting
Sharpen, Gamma, Brightness and Contrast control
Frame clipper (remove unwanted frames at the start and/or end)
GIMM VFI + RIFE VFI interpolation (I recommend GIMM VFI, much higher quality but also much slower)
Tensorrt Upscale + Basic Video Upscale
both use basic image upscaling models
Tensorrt (faster than Basic Video Upscale) with AnimeSharp4x is recommended for anime
RTX Video Super Resolution Upscale
insanely fast
decent quality
FlashSVR + SeedVR2
experimental
Video upscale models that are more intricate than basic image upscaling models
haven't had great results for anime yet
takes a LOT longer
Saving last frame for manual extensions
mmaudio
added Audio combine node
combine audio from an existing video with the generated audio on top
generate nsfw audio with the nsfw model and then combine that video with another generated audio track from the base model for background noises
removed interpolation for easier and faster audio generation - you have the following options:
upload raw unupscaled video to MMAudio Video node and upscaled video to Combine video node
upload upscaled video to both nodes but lower custom_width and custom_height of the MMAudio video node to about half for faster generation and to prevent VRAM issues
upload raw video to both nodes and upscale afterwards
Inspired by https://civarchive.com/models/2137833
Following resources necessary (ComfyUI\models\mmaudio):
https://huggingface.co/Kijai/MMAudio_safetensors/resolve/main/mmaudio_synchformer_fp16.safetensors
Description
added Audio combine node
combine audio from an existing video with the generated audio on top
generate nsfw audio with the nsfw model and then combine that video with another generated audio track from the base model for background noises
removed interpolation for easier and faster audio generation - you have the following options:
upload raw unupscaled video to MMAudio Video node and upscaled video to Combine video node
upload upscaled video to both nodes but lower custom_width and custom_height of the MMAudio video node to about half for faster generation and to prevent VRAM issues
upload raw video to both nodes and upscale afterwards
FAQ
Comments (46)
Looking at the Upscale+Interpolate workflow and at the newest AIO workflow, it seems you have integrated all stuff from the Upscale+Interpolate into the AIO, exactly what an AIO is. Good work, man!
No need to switch between workflows now!
Little idea (you don't have to take it into consideration since I think you already did this):
- if you want to just copy and paste the upscale+interpolate workflow into the AIO one (with all the settings and stuff), there could be 2 sliders at the top with "Enable AIO" and "Enable Upscale&Interpolate", just saw this on other workflows. When the user will enable the second slider, the video will get passed into basically the Upscale+Interpolate workflow. Hopefully it makes sense.
But I'm a comfy noob, so maybe what I'm saying is already done.
Keep up the good work!
That is already how it's working as long as you don't unload your memory or start another generation. If you generate a raw video and then toggle the upscalers/interpolation and start another pass (with a fixed seed ofcourse) then it'll skip the generation step and go right into postprod. This only works if you have enough memory to keep the video loaded though.
I want to keep the workflows strictly seperate, I dislike those massive workflows that have literally everything in them. The AIO WF is about as far as I want to go, otherwise it'll just become unnecessarily complex and cluttered.
@LastAssignment I understand, excuse my lack of experience with comfyui. Then it already has everything as I thought, good to go!
@TekeshiX No problem, I like to help out :)
When I enable seedVR2 upscale, I encounter the following error: cudaMallocAsync does not yet support checkPoolLiveAllocations. If you need it, please file an issue describing your use case.
The workflow I'm using is UPSCALE + INTERPOLATE.
https://p.inari.site/guest/26-03/06/69aa8ce551805.png These are my settings.
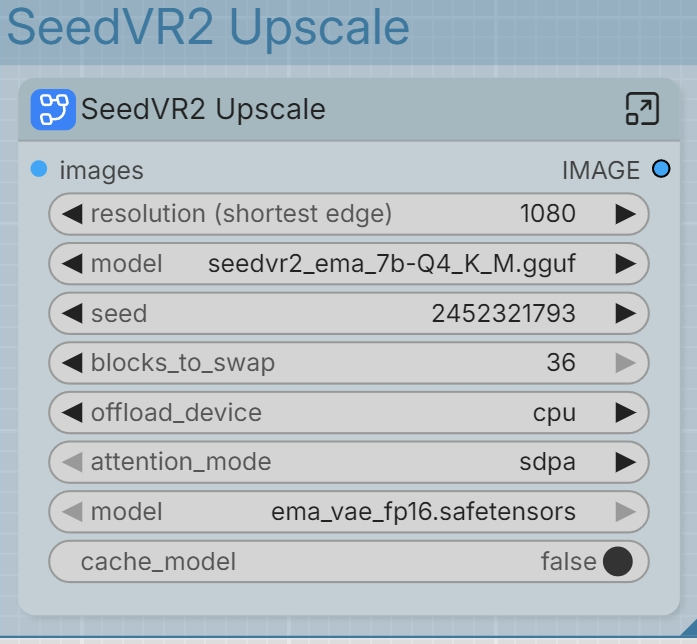
Try going into the subgraph and inside the SeedVR2 Torch Compile Settings change in backend from cudagraphs to inductor. I'll update the workflow soon by setting that part optional.
Edit: Update should be up at any moment.
@LastAssignment By the way, what's the difference between the Clownshark version and the Native version in the workflow?
@ggll The clownshark version uses the ClownsharKSamplers and is generally better even if you don't use the advanced features. The "Bongmath" toggle alone seems to help with prompt adherance so I just stick completely to that now. You do have some extra samplers etc. to play around with but Euler is still one of the best, imo. I also added that "sigmas from text" node if you want to get real deep but that's more something for advanced users.
Here a nice and easy to understand video if you want to learn what sigmas are: https://www.youtube.com/watch?v=egn5dKPdlCk
@LastAssignment Thank you very much for your detailed reply!
In the latest workflows there's this specific node that simply doesn't install and doesn't work even if installed manually. Running on latest Comfy
https://github.com/jhj0517/ComfyUI-CustomNodes-Template
Ignore that, it's an issue with the SVI FLF2V node but it'll work just fine without it.
@LastAssignment Okay, thanks, so basically that node just cuts the frames with flashes? Just so I can understand what it does.
Also just to be sure I understood correctly because with 3 samplers I get too fast motion for my likings:
- for more/faster motion -> 3 samplers are recommended and activate them by putting Base Steps >= 1; Schedulers: Beta57/Simple; Shift: 21.92/11.22
- for normal motion -> 2 samplers are recommended and activate them by putting Base Steps = 0; Scheduler: Simple; Shift: 7-8
Thanks!
@TekeshiX 3 samplers are not just for faster but also more lively motion, you just need to prompt properly with speed related words like slowly, sensually, rapidly, quickly etc. Shift always depends on the amount of steps and scheduler, there's no hard values there. The Shift 21.92 is tied to the 2-3-4 steps + beta57 scheduler, otherwise it won't sync up to the exact 10/90% denoise ratio.
The FLF2V node is the one that enables the last frame feature.
@LastAssignment, one curiosity. Why do you recommend to disable NAG when using High/Low CFG > 1? Is it because CFG higher than 1 disables the NAG functionality or what's the reason behind it? What about disabling NAG when using 3 samplers? Same curiosity: what's the reason behind deactivating NAG in those 2 cases?
Thanks for understanding! I'm trying to learn...
@TekeshiX Because negative prompt is disabled on 1.0 cfg and enabled on anything above 1.0. The only reason to use NAG is if you use 2 samplers at 1.0 cfg. 3 samplers circumvent this since the base sampler already sets the foundation with higher than 1.0 cfg so NAG is just wasted, not to mention the effect NAG has is miniscule at best to begin with.
Is it possible to somehow raise that resolution slider past the value of 1? I wish to see how the videos would look at a higher default resolution since I rent H200 GPU. Is this even recommended? I remember generating some 1920x1080 videos out of the box a few months ago on a different workflow that didn't have sliders.
This is what AI suggested, but idk if it's the best way:
"Method 2: The Quick JSON Hack
If you want to keep the visual slider but just increase its limit, you can edit the file directly before loading it into ComfyUI.
Open the .json file you shared with me in any basic text editor (like Notepad).
Use Ctrl+F (or Cmd+F) to search for "Total Megapixels / Resolution".
Look a few lines down for the line that says "max": 1.
Change the 1 to 2 (or higher), save the file, and then drag it back into ComfyUI. The slider will now let you drag up to your new maximum."
@TekeshiX Just right click the slider -> properties panel -> set max value to whatever you want. WAN 2.2 expects 720p output at most, anything above that is basically a waste of generation time.
@LastAssignment 720p meaning like around a max of 720x1280?
@TekeshiX Yea, which is around 0.92 megapixels.
When I use the mmaudiov2 workflow, I get the following error: (MMAudioFeatureUtilsLoader bigvgan_vocoder_model must be provided for 16k mode), I have downloaded the four models needed for the workflow, but it seems I'm missing one. I don't know where to download it.
Set mode to 44k instead of 16k, it is 44k by default in the workflow. You probably set it to 16k by mistake.
@LastAssignment Are all 4 models placed in the mmaudio folder? I set it to 44K but it still throws an error.(MMAudioFeatureUtilsLoader
An error happened while trying to locate the files on the Hub and we cannot find the appropriate snapshot folder for the specified revision on the local disk. Please check your internet connection and try again.)
@ggll You're probably missing https://huggingface.co/Kijai/MMAudio_safetensors/blob/main/apple_DFN5B-CLIP-ViT-H-14-384_fp16.safetensors
@LastAssignment I checked, he didn't miss anything. I deleted and re-downloaded it, but it still gives an error.
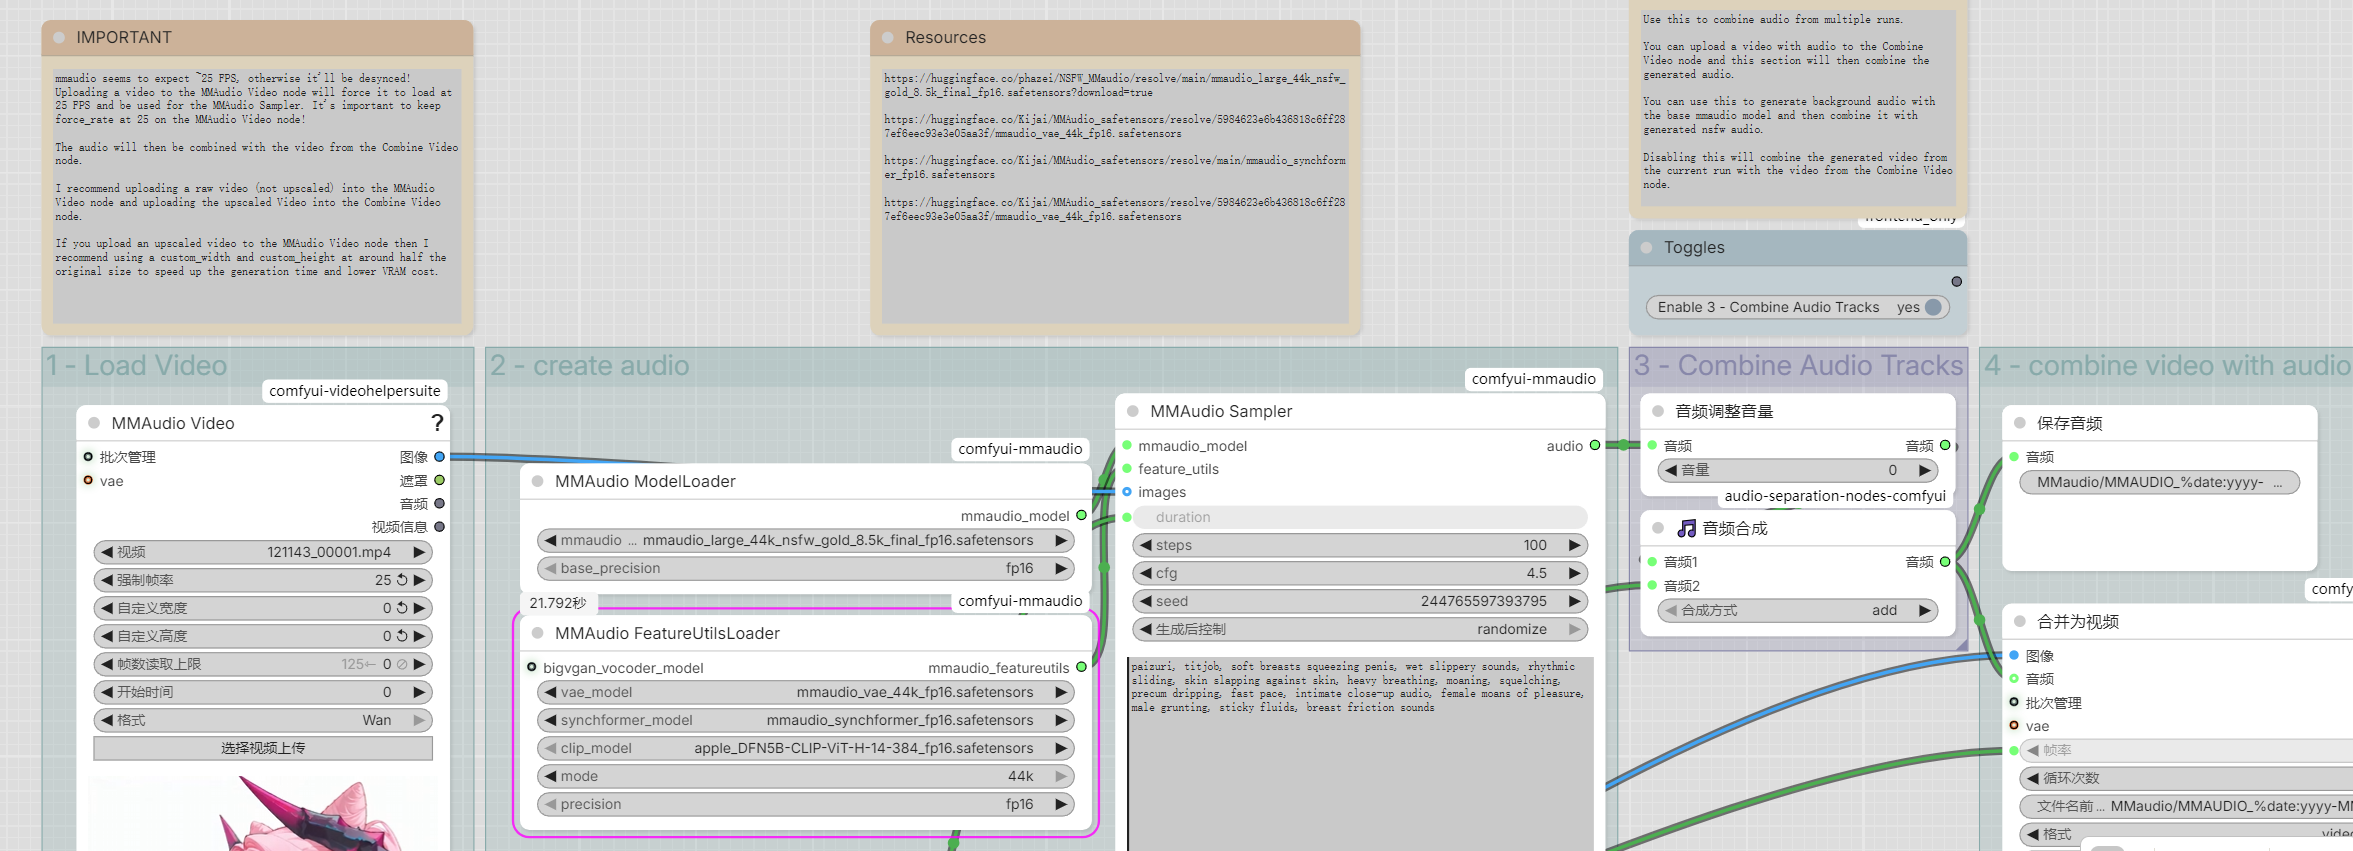
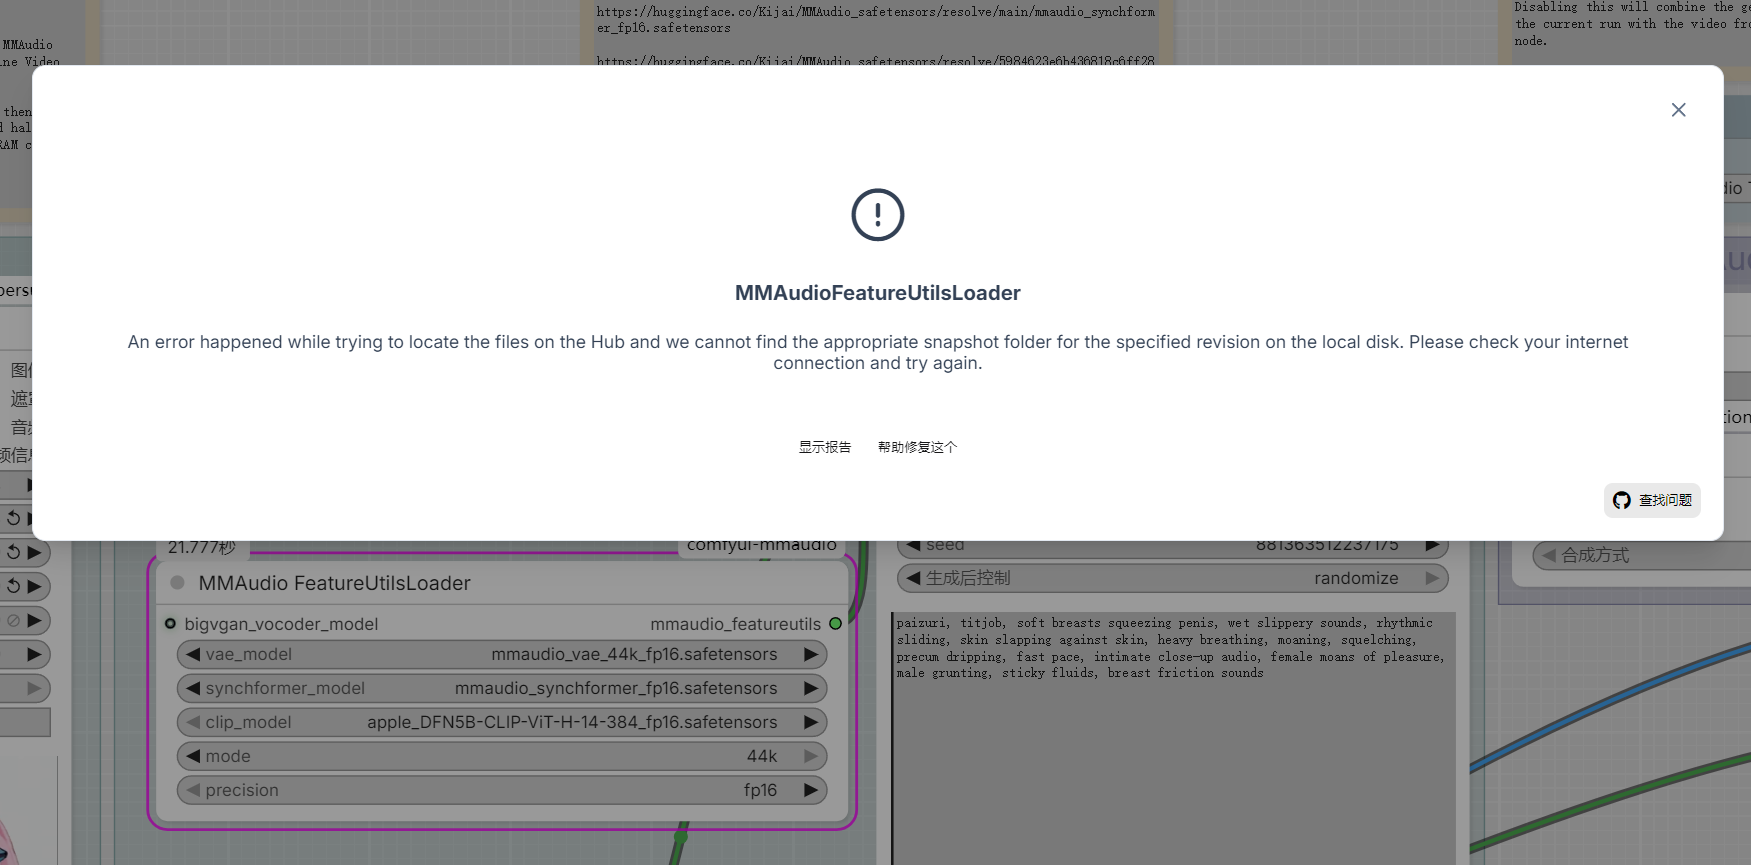
@ggll Did you double check by selecting all models from the dropdown and making sure the files are all in ComfyUI/models/mmaudio ? This error should only happen if the node cannot find the selected files.
@LastAssignment I've confirmed via the dropdown menu, and the folder name is correct. Perhaps I should reinstall the mmaudio node, as my first attempt via Manager failed, and the second time I installed it via git.
hkchengrex/MMAudio: [CVPR 2025] MMAudio: Taming Multimodal Joint Training for High-Quality Video-to-Audio Synthesis (github.com) ,kijai/ComfyUI-MMAudio (github.com),Is there a difference between hkchengrex and kijai? Which one should I install?
@ggll hkchengrex github has nothing to do with ComfyUI. You have to clone the one by kijai.
Im getting this error when running -
SyntaxError: Unexpected non-whitespace character after JSON at position 4 (line 1 column 5)
the end of my logs throw this error:
class_type = node_struct["class_type"]
KeyError: 'class_type'
not sure how to fix if you could help me out
It's an issue with the FLF2V SVI nodes.
What seems to fix the issue is deleting the folder ComfyUI\custom_nodes\ComfyUI-Wan-SVI2Pro-FLF and then manually installing the node by cloning his git https://github.com/Well-Made/ComfyUI-Wan-SVI2Pro-FLF
Opening the Example workflow I get a huge list of missing nodes.
"This workflow has missing nodes" and lists them
UnetLoaderGGUF
CR Data Bus In
CR Data Bus Out
Upscaler Tensorrt
LoadUpscalerTensorrtModel
ClownSamplerSelector_Beta
Sigmas From Text
SigmasPreview
ClownsharkChainsampler_Beta
ClownsharKSampler_Beta
WanImageToVideoSVIProFLF
WanCutLastSlot
UltralyticsDetectorProvider
Then after trying to install, I try running and get the following missing node
"High Model" (Node ID #268:268)
No Idea what any of this is. Would appreciate a vid by someone explaining how to unpack this if there is some form of process for it.
Thx for this SVI 2.1 workflow
The outputs are so good looking.
I do have a few questions:
- Can i change the output resolution ?
I do not see a common setting for this.
- To add a Lora to a 2nd and further scene i just add such in the subgraph of the extend correct ?
You can adjust the resolution using the Megapixel / resolution slider. WAN 2.2 expects 720p at most which is 0.92mp, 480p would be around 0.4mp. The slider is just an easy way to scale images so you don't have to give a shit about aspect ratio.
If you want to use LoRAs only for a specific part then you want to add them to those subgraphs, yes. Depending on the video I may only use the subgraph LoRAs so I have more control if I need to disable a LoRA further down the line. For short 10s clips (2x 5s extensions) I only really use the basic LoRA loaders near the settings which apply to all subgraphs.
bro,thank you so much for creating and sharing this workflow! I've been using it for a while now and the results are excellent,really appreciate all your hard work!I have a small suggestion,if you don't mind,Would it be possible to add a [Add Exact Loop] switch node to the AIO workflow?
When creating multiple animations using first and last frames, I found the transitions and connections to be unsatisfactory. Although I could use cut last latent frames, merging multiple animations would disrupt the connections between them, resulting in a choppy experience. Add Exact Loop, however, perfectly solves these transition and connection issues, as I've used it in DASIWA's workflow before,
Of course, this is just my personal feedback — if it's too much work or not in your plans, please feel free to ignore it!Thank you again for your amazing work and continuous updates! Looking forward to future versions~Best regards
I don't plan to add that anytime soon since I don't use the normal AIO workflow at all atm. If you want those nodes then you can just copy the loop subgraph out of dasiwas workflow yourself, you can connect it after the Backend subgraph to images and the output to the video output.
I will actually update both soon, lmao. I also reworked the facedetailer so it actually makes sense to post a new version.
@LastAssignment Thank you, Looking forward to your update,I encountered a problem today while using AIO-V2. The video output is normal when I input vertical and horizontal images, but when I input a square image, the video output is black.
@ggll Did you use last frame? I just generated a square video with the workflow and it worked fine.
@LastAssignment I know where the problem lies, let me explain my solution. I remember you mentioned before that models using the built-in Light Lora model need to have their base steps set to 0. My situation is the opposite; in fact, the base steps for my models using the built-in Light Lora model have always been >0, otherwise it will output a black video. After restarting ComfyUI, setting the base steps to 0 solved the black video problem for the square image.
I'm confused as to why models using the built-in LightLoRa with base steps > 0 work correctly, which contradicts what you said.
@ggll It will work but it doesn't mean the result will be good. It's basically a waste of time to enable 3 samplers for models with built-in lightning LoRAs because the 3rd sampler is only useful if there are NO lightning LoRAs enabled, otherwise you just increase generation time for no real gain. The base sampler is what makes the motion look so good because it doesn't use lightning LoRAs by default because the lightning LoRAs are what make the motion so dull.
@LastAssignment Oh, I see now. I've always thought that wrong settings would output a black video. Thanks for your reply
@ggll btw I recommend using the frame clipper, cut last latent frames and seamless loop together, makes loops much better than just using the loop nodes. You basically want to cut all still frames to make the transition smoother.