


ComfyUI Detailer/ADetailer Workflow
If you're having ANY issues with this workflow, please include the error log from your console when writing a comment here on this page. Chances are 99.98% i can help you with your issue - but i need the error log. And me not having to ask for it first will save you potentially hours. Chances are also high the solution to your problem is already documented in the FAQ here.
You can now support me on my Ko-Fi if you have too much money (✿◡‿◡)
Requirements for each version are listed below or can be found inside a Note in the Workflow itself.
Because of the many connections among the nodes, I highly recommend turning off the link visibility by clicking the "Toggle Link visibility" (Eye icon) in the bottom right of ComfyUI.

Description
I originally came from A1111 WebUI to ComfyUI and, honestly, a lot of things felt way more complicated than they needed to be. I couldn’t find workflows that were both visually pleasing and showed me all the important options without requiring a deep understanding of every little thing in ComfyUI.
Over a few months I learned the ins and outs of Comfy and built my own very barebones, simple workflow (v1) with one main goal: streamline the process and make it visually understandable. I released it here thinking it might help others who also want to make the jump from A1111 to Comfy.
Over the last year I’ve kept adding more and more features as people started using the workflow and requesting things. The workflow has grown a lot, but I’m still trying to keep the same ease-of-use that this whole journey started with. The main goal is still the same: give you a lot of powerful options in a layout that’s as clean, readable, and as user-friendly as ComfyUI will allow.
At this point I feel like I have a pretty solid understanding of how Comfy works, and I’ve even created my own custom nodes to add missing functionality so this workflow could match the ideas I had for it. I try to hide as much of the technical complexity as possible — but if you’re ever curious or confused about anything, please feel free to ask!
Thanks to all of your suggestions, the workflow now includes features like:
Single-image and batch generation
Automatic detailers for specific body parts
Upscaling
v-pred models
LoRAs
ControlNet
IPAdapter
Hires fix / refiner
Manual inpainting
Thank you to every single person who uses this workflow, donates Buzz, or shares images on this page.
I really appreciate you taking those extra steps to support and promote the project. ♥️
Requirements
v4.4 and above require ComfyUI version 0.3.51 or above and also need the frontend to be AT LEAST 1.24.3 or later.
v5.1 - Full List
v5.0 - Full List
v4.4 - Additions to v4.3 (IMG2IMG Only)
Otherwise same as v4-4.3 below
v4.2-4.3 - Additions to v4.1
Otherwise same as v4.1 (incl. v4) below
v4.1 - Additions to v4 (IMG2IMG Only)
Otherwise same as v4 below
v4 - Full List
v3 - v3.2 - Full List
v2.2 - Additions to v2
Otherwise same Custom-Nodes as v2 but you can remove Comfyui-ergouzi-Nodes
v2 - Full List
v1 - Full List
How to use
Since all of the different versions work differently, you should check the "How to use" Node inside of the Workflow itself.
I promise that once you read the explanation of the workflow itself, it'll click and it will be a simple plug and play experience.
It's the simplest I could've made it coming from someone who's only started using ComfyUI 4-5 months ago and had been exclusively an A1111WebUI user before.
When were what functionalitys added?
Starting from v3, ControlNet is included.
Starting from v4, IPAdapter is included.
Starting from v4.3, HiRes Fix and Dynamic prompts(wildcards) is included.
Starting from v4.4, Refiner is included.
Starting from v5.0, Manual Inpainting is included.
Any errors during execution?
If you're running into any errors during the execution of the workflow, please check the FAQ of my Guide first. The guide is written for the IMG2IMG Workflow but when issues arise that people run into frequently i'll add the solutions and what's hapenning to that FAQ section.
If you can't find the problem you're running into there - feel free to write me a comment on the model page so that i can help you and other people might benefit from it as well.
Feedback
I'd love to see your feedback or opinion on the workflow.
This is the first workflow I have ever created myself from scratch and I'd love to hear what you think of it.
If you want to do me a huge favor, you can post your results on this Model page.
I'll make sure to send some buzz your way!
Description
Changelog
no longer requires ergouzi nodes, removed float sliders to the mxToolkit's ones for consistent look & feel
Now requires ComfyUI_Comfyroll_CustomNodes
Upon request brought back the LoRA Bypass control to enable/disable them inside of the function control
Introduced seperated prompts, now being able to use Pre- & After prompts for quality.
This is often used in noobAI checkpoints where you prepend and append quality tags.
These three prompts get combined without weight-shifting, so use them as recommended from your checkpoint. Prompts will be automatically seperated by a comma, so just use as in example.Added control to make start & end quality prompts optional
removed unnecessary preview of image being saved
Added image-saver into backend to save images with full prompts, model information, sampler information and used loras/embeddings. Helps with automatic resource tagging when uploading to civitai
Added prompt preview in Debug section so you can see how your prompt is being combined with pre & after quality prompts
FAQ
Comments (31)
Hello my dear dude, I have a little suggestion ... maybe can you do a video explain your workflow?
I will use this treasure this weekeng :)
Heya my friend :)
I've tried to make this workflow as easy to understand as possible.
It might look overwhelming in size but the steps required are really simple.
You only really need to check the "How to use" Section inside of the workflow itself.
It's as easy as downloading the models you want to use, dropping them in the correct folder and then selecting them in the workflow. After you've done that you can just select what you want to use or not use from the control panel. I don't think the complexity of it requires a video (yet).
If you need any help with any part of the workflow you can let me know here or through dm's tho and i'll help out gladly!
Hi hi again,, realIy, really I understand the workflow, but my advice is to get more feedback and YouTube is a great platform for that
hello, first of all thank you for this amazing work flow. even though it doesnt fully work for me yet it somehow fixed a different problem that i had for a long time so thank you for that !
im kind of struggeling to understand what causes this error :
* SAMLoader 21:
- Value not in list: model_name: 'sam_vit_b_01ec64.pth' not in []
Output will be ignored
if you could guide me how to solve it i would greatly appreciate it .
Hey, i'm happy to hear that it has fixed another problem you've had!
This sounds like the SAMLoader (Node #21) has not found the model.
Could it be that you're using a portable version of comfyUI? Or maybe you've installed the ImpactPack with a parameter to not download additional models?
Usually in a normal ComfyUI installation once you install ImpactPack it also downloads the sam_vit_b model.
You can first check if you have the model by either checking your models/sams folder or by clicking on model_name in the SAMLoader (Impact)-Node in the Workflow: https://i.gyazo.com/16231f32318fc873053c0f2f6d832e5f.png
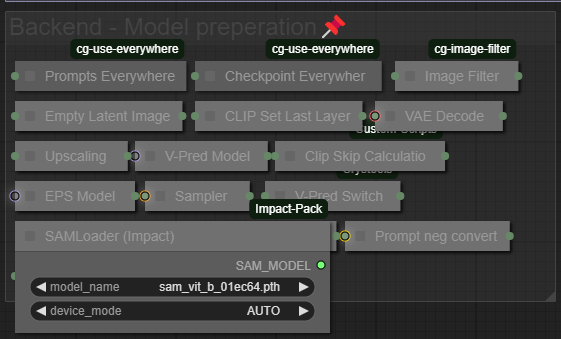
If you're missing the model you can fix it by doing either of these:
1. Go into your ComfyUI Manager, then click on Model Manager(should be somewhere in the middle) and then search for the "ViT-B Sam"-Model and install it:
https://i.gyazo.com/5cc96ed026eeb3368affe74db032a4eb.png
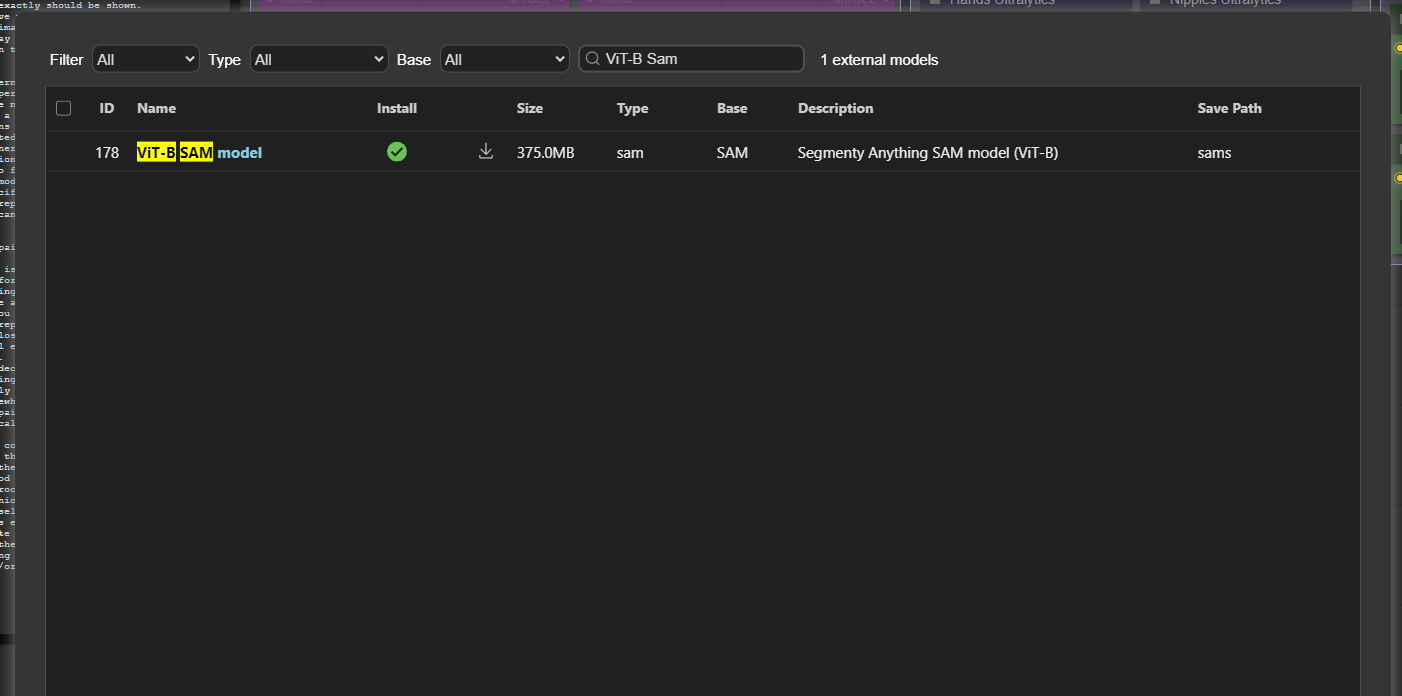
or
2. you can download the model here for example: https://huggingface.co/datasets/Gourieff/ReActor/blob/main/models/sams/sam_vit_b_01ec64.pth
And move it into your models/sams folder
After doing either of these you have to refresh your browser window that you have comfyUI opened in and you should be good to go!
@vslinx thanks now it's fixed.
This workflow has been wonderful to me over the last few days as I get reacquainted with ComfyUI and image generation after some time away, so thanks so much for putting in the work to put this together for us!
Today, however, I did some updating when prompted (I know) and the Everything Everywhere nodes in the workflow ceased to function. Replacing Checkpoint Everywhere with a new Anything Everywhere3 node and Prompts everywhere with a new Prompts Everywhere node got it running again. Thought I'd share in case anyone else has the issue and comes here looking.
Thanks for the feedback @Darkhymn and i'm glad you're enjoying the workflow! 🥰
I'll keep an eye on it, i have updated my comfyui and nodes a week ago, but it might be that a new update broke some base of the Anything Everywhere nodes. Thanks for letting me and other users know!
Absolute noob here, I have a really dumb question, how can I reduce the batch size of 4 pics to 1? I can't seem to move the batch slider, the size one does work.
I have red X on some segm_detectors for face, eyes and nose? https://imgur.com/a/ry8ZdhP
I downloaded these and placed them on the models/bbox folder
https://huggingface.co/Tenofas/ComfyUI/tree/d79945fb5c16e8aef8a1eb3ba1788d72152c6d96/ultralytics/bbox
What am I missing?
Heya,
If you only want to create 1 image you can move the slider (i don't have any issues with it and nobody has reported any problems with it so far). But if it doesnt work you can also try double clicking the number in the batch selection which opens the manual entry.
There should be no issues after placing the models into the correct folder, bbox models don't need the segm connector so it'll show as an X but it wont make any issues. it just means it's not in use :)
@vslinx Ay, thanks! I managed to edit the slider value rather than move it.
If I wanted to add one more lora, is that possible? Your workflow allows for 4
And one last thing, are you planning on updating your workflow? I use controlnet for poses, I can add it myself to the workflow, but yours is so neat, I can't achieve that and the workflow looks ugly with my tweakings haha, that's why I wonder if you will update it with more features in the future. It's not a request, you already did enough sharing this one with all, I never was able to use any detailer until I found your workflow
@AciesGecko no problem!
I'm really happy to hear that the workflow is helping you! i also had a few issues getting the ultralytics detailer working in comfyui. So i thought it might help some people :D
You can easily add another lora by rightclicking the LoRA 3 node and selecting "Add 🐍 LoRA", that automatically places a new lora node between number 3 and 4, automatically and correctly connecting between the two of them! :)
I have been working on a 3.0 version that includes controlnet, mainly because a lot of checkpoints still did awful hands and i wanted to fix that with automatic control net correction by using specific preprocessor's but i've stopped doing that because i have just switched to better alternatives :D
I'm still working on a 3.0 that just simply allows you to optionally use control net for image creation, i might be able to put something out by the middle of next week or even earlier!
@vslinx That would be amazing, if you have time to update it, I will be looking forward to it. One last question, sorry, is it possible to detail a picture that I already generated previously, and load it on with this workflow? Because I have no idea how to load the picture and detail it on another workflow by myself
@AciesGecko that should be fairly easy, let me cook something up real quick and i'll upload it on mediafire for you. I have planned to do an img2img workflow too, which is why i have named the versions with (txt2img), but haven't gotten around it just yet.
@AciesGecko Here my friend, i whipped this up in 5-10 minutes - but it should work! i at least tested it with a few images from civitai really quick :D
https://www.mediafire.com/file/vv5f70cmrmjl8mx/IMG2IMG-vslinx-FaceDetailer-v1.json/file
@vslinx Thank you so much! Works wonders!
@AciesGecko nice! happy to hear that 🥳
@AciesGecko i just released v3.0 with ControlNet! :)
Thanks for all the effort you put into this.
I solved almost all issues with missing nodes, but I have two IDk how to solve it.
Where I can find the node "workflowStart quality prompt" and "workflowEnd quality prompt"?, thanks.
Heya @lyoneel,
have you installed all of the nodes in the description?
I have linked all of them there and in the workflow itself inside of a note.
The Start quality prompt and End quality prompt are just groups i have created, the two nodes it consists of are Crystools and Comfyroll, you can find the links in the descriptions or through the ComfyUI Manager!
@vslinx yes I did, or I thought I did, Ill check them again, thanks for your quick response.
it seems like comfy does not update something in the process, I reloaded the workflow, and it worked.
@lyoneel glad it works now!
You always have to refresh the window of comfyui once after installing new nodes, sadly comfyui doesn't do that itself :D if you need any more help let me know!
@lyoneel ...
I discover this now?!!! Spent an hour straight trying to fix those accursed two + controller, restart ComfyUI a dozen times... and the solution was to update all AND reupload the workflow back again, instead of keeping the "old" one?
Screams in UX researcher wanting the head of the devs who thought this function (the "you need to reload the workflow too, not just restart Comfy) was a good UX for the end-user
@The_rule_of_Thetra yeah trust me, as a frontend dev this also makes 0 sense to me 😂
I do not understand why they do not flush the cache for the nodes at least when restarting comfyui, the fact that you have to refresh the page to trigger an actual reload of the custom_node memory cache will never make sense to me haha
@vslinx seems like the latest version does something like that, it ask you after reconnect if you want to refresh the page.
@lyoneel yeah, now after updating/installing new nodes it'll ask you if you want to refresh the browser. It only does that when you have ComfyUI Manager though - no idea why they haven't implemented it into the main comfy yet.
Hi! I never noticed this before, but there's an embedding in the negative prompt that gives an error message in the terminal. I am curious as to what embeddings are, I haven't heard of them before.
Hey!
Oh that makes sense, i guess i forgot to remove the embedding that i've used in the past.
I don't use it anymore right now since noobAI got somewhat good at doing hands.
If you want to use it tho you can find it here: https://civitai.com/models/16993/badhandv4
Embeddings were the first step in customizing before LoRA's existed.
I also have a few embeddings on my profile because back then lora's didn't exist :D
When training a lora you basically train the language model of the checkpoint itself to recognize a specific algorithm like a character, style or position/concept. An embedding was basically just you teaching a checkpoint what a character, style or position looks like and then extracting only that part.
Benefit was/is that it's usable in basically every single model. Doesn't matter if it's SD1.5, SDXL, Illustrious or NoobAI, because it's basically just telling the model that this trigger word is supposed to create a character i.e. with green hair, a mask, glasses etc.
Nowadays they're not used anymore because they've become pretty obsolete, but badhandsv4 for example was trained on a lot of horrible looking hands, so putting it in the negatives made sure to tell the model "this is what it's NOT supposed to look like". If that makes sense :D
I'll release a new version of this workflow tomorrow that includes ControlNet capabilities, by that time the embedding will also be removed from the negative prompts :P
@vslinx Oh, that's very interesting! Thank you for the information, I was wondering why Inoue Orihime was labeled an an embedding on your profile 😄.
@scottegg472795 no problem!
back then it was horrible to create characters since models weren't trained on the names of characters 😂
We've come a long way in the last 2 years!