


ComfyUI Detailer/ADetailer Workflow
If you're having ANY issues with this workflow, please include the error log from your console when writing a comment here on this page. Chances are 99.98% i can help you with your issue - but i need the error log. And me not having to ask for it first will save you potentially hours. Chances are also high the solution to your problem is already documented in the FAQ here.
You can now support me on my Ko-Fi if you have too much money (✿◡‿◡)
Requirements for each version are listed below or can be found inside a Note in the Workflow itself.
Because of the many connections among the nodes, I highly recommend turning off the link visibility by clicking the "Toggle Link visibility" (Eye icon) in the bottom right of ComfyUI.

Description
I originally came from A1111 WebUI to ComfyUI and, honestly, a lot of things felt way more complicated than they needed to be. I couldn’t find workflows that were both visually pleasing and showed me all the important options without requiring a deep understanding of every little thing in ComfyUI.
Over a few months I learned the ins and outs of Comfy and built my own very barebones, simple workflow (v1) with one main goal: streamline the process and make it visually understandable. I released it here thinking it might help others who also want to make the jump from A1111 to Comfy.
Over the last year I’ve kept adding more and more features as people started using the workflow and requesting things. The workflow has grown a lot, but I’m still trying to keep the same ease-of-use that this whole journey started with. The main goal is still the same: give you a lot of powerful options in a layout that’s as clean, readable, and as user-friendly as ComfyUI will allow.
At this point I feel like I have a pretty solid understanding of how Comfy works, and I’ve even created my own custom nodes to add missing functionality so this workflow could match the ideas I had for it. I try to hide as much of the technical complexity as possible — but if you’re ever curious or confused about anything, please feel free to ask!
Thanks to all of your suggestions, the workflow now includes features like:
Single-image and batch generation
Automatic detailers for specific body parts
Upscaling
v-pred models
LoRAs
ControlNet
IPAdapter
Hires fix / refiner
Manual inpainting
Thank you to every single person who uses this workflow, donates Buzz, or shares images on this page.
I really appreciate you taking those extra steps to support and promote the project. ♥️
Requirements
v4.4 and above require ComfyUI version 0.3.51 or above and also need the frontend to be AT LEAST 1.24.3 or later.
v5.1 - Full List
v5.0 - Full List
v4.4 - Additions to v4.3 (IMG2IMG Only)
Otherwise same as v4-4.3 below
v4.2-4.3 - Additions to v4.1
Otherwise same as v4.1 (incl. v4) below
v4.1 - Additions to v4 (IMG2IMG Only)
Otherwise same as v4 below
v4 - Full List
v3 - v3.2 - Full List
v2.2 - Additions to v2
Otherwise same Custom-Nodes as v2 but you can remove Comfyui-ergouzi-Nodes
v2 - Full List
v1 - Full List
How to use
Since all of the different versions work differently, you should check the "How to use" Node inside of the Workflow itself.
I promise that once you read the explanation of the workflow itself, it'll click and it will be a simple plug and play experience.
It's the simplest I could've made it coming from someone who's only started using ComfyUI 4-5 months ago and had been exclusively an A1111WebUI user before.
When were what functionalitys added?
Starting from v3, ControlNet is included.
Starting from v4, IPAdapter is included.
Starting from v4.3, HiRes Fix and Dynamic prompts(wildcards) is included.
Starting from v4.4, Refiner is included.
Starting from v5.0, Manual Inpainting is included.
Any errors during execution?
If you're running into any errors during the execution of the workflow, please check the FAQ of my Guide first. The guide is written for the IMG2IMG Workflow but when issues arise that people run into frequently i'll add the solutions and what's hapenning to that FAQ section.
If you can't find the problem you're running into there - feel free to write me a comment on the model page so that i can help you and other people might benefit from it as well.
Feedback
I'd love to see your feedback or opinion on the workflow.
This is the first workflow I have ever created myself from scratch and I'd love to hear what you think of it.
If you want to do me a huge favor, you can post your results on this Model page.
I'll make sure to send some buzz your way!
Description
fixed a bug that didn't let you deactivate controlnet after using it
FAQ
Comments (33)
Thanks a lot for the update. I saw you uploaded a 3.1, for some reason on the 3.1 the control net doesn't seem to work, but going back to 3.0 does work. Might be an issue on my side so don't take me too serious, I've been touching stuff.
I've edited the workflow and I added a few more detailers, I've added these
https://civitai.com/models/1089176/adetailer-head-accessory-segmentation
https://civitai.com/models/257904/adetailer-footyolov8xpt
I'm trying this one too, but I can't seem to make it work
https://civitai.com/models/158108/booba-detection-adetailer
As suggestions if you want to expand the detailers.
I'm currently also using the other workflow you made for img2img detailer, but could the same workflow have a switch to swap txt2img to img2img? I have no idea if that's possible, or is that too complicated? I also want to use inpaining but I'm getting ahead of myself because I have no idea how to inpaint yet. Sometimes I want to tweak small stuff and I have no idea how.
I'm also getting ahead of myself, and I have no idea what I'm talking about, for now I am generating solo pictures because adding two characters make the features mix, I think some workflows have fixes for that, but my brain does not understand, if you want to take a look at that too.
Heya @AciesGecko,
i checked the workflow again after downloading it from civitai and it does work for me.
Maybe something went wrong when you imported it?
The Hair ornament detailer is probably nice but the booba one probably won't work well since it's too broad of an area and having it clothed/unclothed etc. will probably lead to a lot of bad results in general.
That's why i stuck to the nipple ones because they cover the area that's usually responsible for bad generation. I'd say that boobs in itself usually get generated pretty well itself.
But exactly like you do it'd be perfect if people adapt the workflow to their own needs!
That's also why i wrote how to add new detailers in the manual section ♥️ Since model, clip etc. already get added automatically it's as easy as throwing in new prompts and maybe a lora if you want 🙏
The txt2img and img2img switch is possible, i've seen other workflows do it but they're usually way less complicated than this one. There's a lot of conditions i have to remove/rework to make a switch between TXT2IMG and IMG2IMG since the sampler and everything connected and required by it have to be bypassed as well as controlnet having to be disabled etc.
I have plans to continue working on the Workflow, releasing a proper IMG2IMG Workflow and then in the future releasing a "full/complete" version that has both options in 1 Workflow. But right now i sadly don't have tenough time to fully invest in that 🥲
I probably won't implement the last one, since i want my workflows to be one continous process, the workflow's you're talking about are using conditional prompting which requires drawing masks, some use pre-processing models that can automatically find characters and draw the maps themselves. But it means that you have to activate 1 group, do the sampling there, then deactivate group 1, activate group 2, do the masking manually and then go to group 3 etc. I don't like this kind of workflow for myself since i want to generate images in one continous workflow, but there are a few workflows who do that that you can find here ♥️
@vslinx
The controlnet might have been some tinkering I did, thanks for checking though, sorry.
"That's also why i wrote how to add new detailers in the manual section" Another thing that I like about this workflow is how easy it is to add new detailers and loras, I can add them without the whole workflow becoming a mess, since this one is so clean.
"I have plans to continue working on the Workflow"
I'd love to know what sort of features are you planning on implementing, I am very curious!
"and then in the future releasing a "full/complete" version that has both options in 1 Workflow."
I do like better the "all in one" workflows, but if it's too complicated then maybe having a main workflow and then a secondary one for refinements with upscaled, detailers, inpainting etc.
"generate images in one continous workflow"
I agree with that, again that's why I enjoy this workflow so much! The masking manually, I'm not a fan of that either, I'd rather have the workflow to do it automatically if it's ever possible. It's not because I'm lazy to edit the generation, it just feels less interesting to do it that way?
I've now also added a style and composition IPAdapter. Kinda messy, because I had no idea if it would work, but it seems to work.
https://i.imgur.com/4LUdVyk.png
Anyways thanks a lot for the workflow, I'm enjoying it a lot, also having fun customizing it!

Thank you so much for all the compliments @AciesGecko! hehe
Really glad you enjoy the workflow this much 🥰
I'm happy it's easy to understand and add stuff! :D that was ultimately the goal why i started working on this workflow!
Once i release a full version that has txt2img as well as img2img i'll be working on all 3 at the same time.
So when i release a new version it'll always be for txt2img, img2img and full. But first i gotta find the time to work on the full version! 🙏 Since it's quite complicated to do a chain of events and bridges that bypass multiple nodes and groups by simply switching from 1 value to another, but i should find some time to do that in the next 2 weeks :)
I think the main issue with the manual masking for me and probably a lot of others is that we like to generate new concepts and images and barely anyone uses AI in this form commercially where they have to refine a lot of features over and over until they're happy with the result. So i'd rather generate an image again than work for half an hour to get 1 feature down the perfect way. So i gotta agree with it being more interesting to just generate than to refine for hours :D
The main problem of an automated regional prompt is most likely the recognition of individual characters and giving the ability to prompt them individually then, as far as i know there is currently no node for comfyui capable of doing that.
The IPAdapter implementation actually looks really cool and it made me test around with it a bit too!
It's probably best used in combination with ControlNet like this where you use the control net pre-processor to create a canny image, use a canny model for controlnet and inject it in the prompt while you use IPAdapter for the Model. It's actually a cool approach that i haven't thought about yet and will most likely implement in the next version! Just gotta see how IPAdapter behaves in combination with LoRA's and if i gotta disable them when IPAdapter is used etc. :D Thanks for this idea!
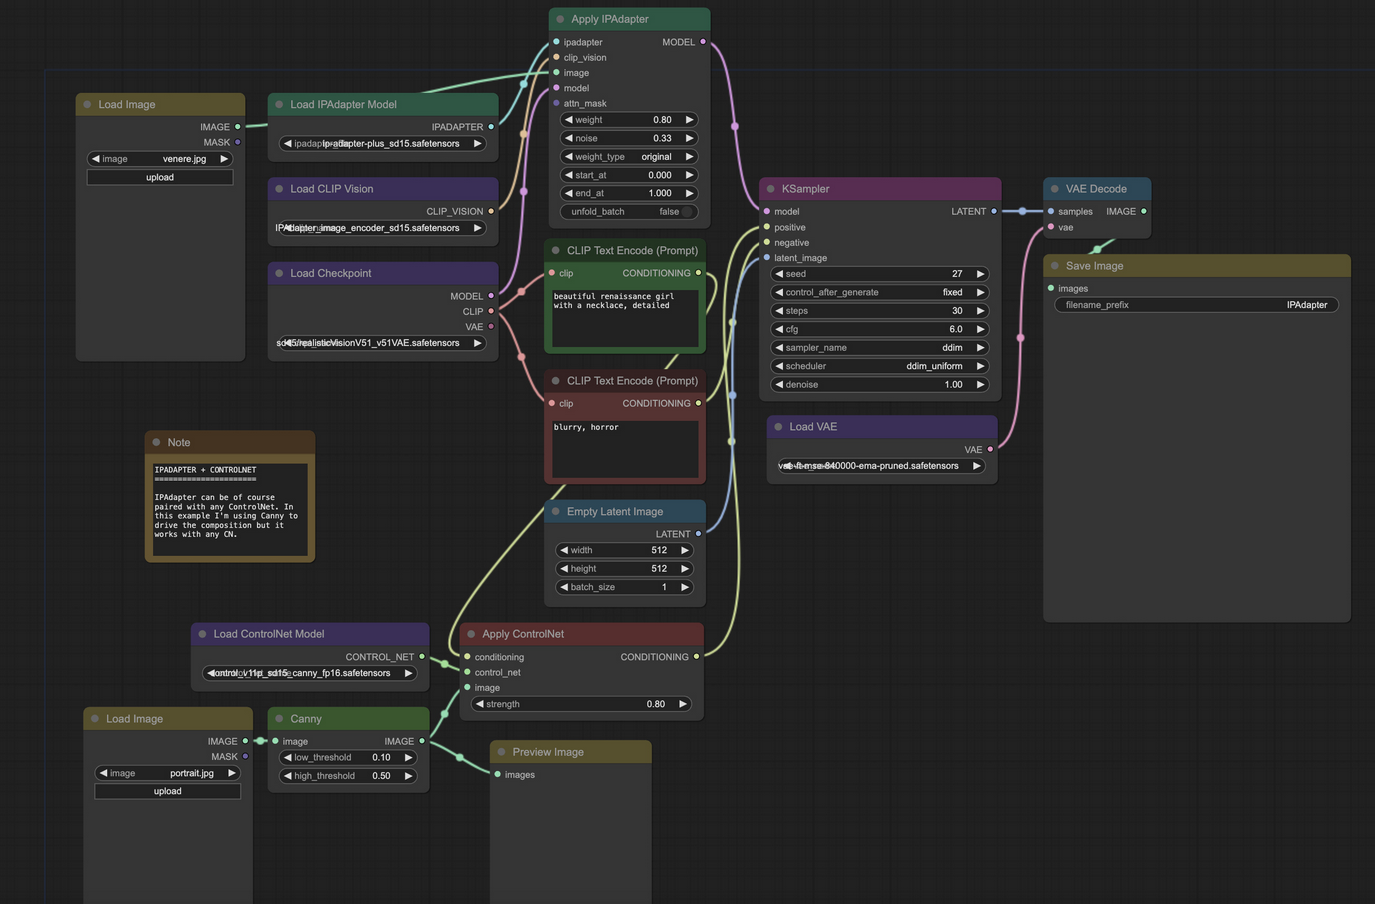
Regarding the planning of features as of right now is probably this:
- Release of IMG2IMG
- Implementation of IPAdapter for TXT2IMG(Maybe IMG2IMG too to make the base model obsolete)
- Release of full version witch IMG2IMG & TXT2IMG switch
- (Possibly) manual masking/inpainting with automated pull from latest output image(similar to this one)
These are all the planned features so far with your IPAdapter implementation considered.
I have not had any feature requests made beyond that yet and currently have no other needs i need to be fulfilled, but if it's something feasible and you got any ideas you're always free to drop them! :D
@vslinx
"Working on all 3 at the same time." It's nice, but will be worth it to maintain three different versions?
I've been digging a little into regional prompting, from this guide https://civitai.com/articles/10156/how-to-use-potatcats-comfy-regional-prompter-workflow
There doesn't seem to be much manual work, and it has options to enable and disable masks, up to 5 but can be made less or more. And there doesn't seem to have the sampling issue of having to go one by one, seems to generate it in one go.
In any case, I will be tinkering with it myself to see if it's worth it, since maybe I didn't understand it properly.
I'm glad you liked the IPadapter suggestion! I have also been testing it, and it's really interesting, the fact that it can copy styles so easy it's a little scary haha
I like tinkering, and adding as much useful features on my workflows, that's why I thought of sharing what I have been finding, like the IP adapter.
In the end I spend more time tweaking and testing workflow stuff than actually generating pictures lol , it's sort of addictive, finding out all the stuff that can be added, how to improve it , etc
I'm fairly new to ai image gen, I installed comfyui and illustrious around a week ago, and now I am hooked! If I find more interesting stuff I'll let you know, and you can add them if you want!
@AciesGecko That regional prompting workflow does work with this one! I used it on this image https://civitai.com/images/70317288
I think the metadata is in the image if you want it. I have also changed the workflow to use img2img and run through the workflow multiple times.
Hey @AciesGecko,
sry for the late answer, work has kept me quite busy the last few days :D
Working on all 3 won't be much of an issue, since i'll only work on the changes on the main workflow and then copy the changes over to the other two :)
The workflow you sent kinda showed exactly what i mean with it not really being a continous thing.
It's a little different in the sense that you draw the masks beforehand, but it still requires you to draw the masks of where it's supposed to go and then prompt the masks individually.
As soon as the scene changes - you'd have to adapt the masks again and then change their prompts too.
Another good example on a conditional prompting workflow that first generates an image and then lets you mask individuals for prompting would be this one. I've tried it in the past and i'd say it has the best implementation of it being able to generate an image and then letting you change specific parts of the image if you'd want to.
Yeah IPAdapter can be scary haha
It's basically a 1-Image-LoRA and very powerful, but also quite hard to control even with the IPAdapter_plus extension which lets you use a different image for composition and style - it often times still ends up copying character or composition characteristics, but it's definitely a cool tool to work with!
And i feel you with that 😂
I also usually end up investing way more time into refining my workflow and adapting it to my needs than i actually spend time generating images :'D
I'm surprised you started with comfyui! Most people usually tend to start with Automatic1111 Webui or Forge and then never wanna switch to Comfyui since it's more programmatic instead of just a ui that guides you.
You can always drop some suggestions or errors you find here! :D always up to hear them 🙏
@vslinx No worries, I'm setting aside the regional prompting for now. I am trying to learn how to make Loras, I can't keep still it seems.
I also noticed the IPadapter copying the characters sometimes, but it's still a very interesting tool that I like to keep around.
I have no idea why I picked ComfyUI but it seems the most customizable and even though the learning curve is a little complicated, once getting the hang of it I like it more than what I've seen of A1111.
I can't shut up either so I will always drop suggestions and ideas as I find them :P
@scottegg472795 Ah amazing!! For some reason I never got a notification for your reply, sorry! Thanks a lot for sharing the workflow, I wish I had seen this message sooner🥲
@AciesGecko no worries! I am new to comfy ui as well and I had a lot of the same thought processes as you (tinkering and adding features :))! I have recently tried making loras as well. If you find out anything interesting about making loras, please let me know! I am still not certain what number of sample images, epochs, or tags works best.
@vslinx that conditional prompting workflow is also really good at assigning specific loras to masked regions! When I try to use other forms of regional prompting with multiple character loras, they tend to have details mismatched (typically hair ornaments, eye colors, color of clothing).
@scottegg472795 I go with trial and error with the loras to be honest, but it's rare that things won't work out. I copied the civitai settings and I train locally with kohya ss,
I used these tutorials
https://civitai.com/articles/6990/guide-on-lora-making-with-multiple-outfits
https://civitai.com/articles/10872/training-sdxl-lora-in-kohyass-with-8gb-12gb-or-higher-vram
https://civitai.com/articles/1716/a-fresh-approach-to-sdxl-and-pony-xl-lora-training
https://civitai.com/articles/3105/essential-to-advanced-guide-to-training-a-lora
https://civitai.com/articles/9005/a-detailed-beginners-guide-to-lora-training-on-civitais-trainer
Tagging was trial and error, for styles I use automatic tagging and it works out, for characters it's better to auto tag and then carefully tag manually.
@AciesGecko Thank you so much! I didn't know about Kohya! Thank you for the articles and the auto-tag tips, I did all mine manually in text files 😅.
Heya @AciesGecko,
v4.0 is out now containing IPAdapter!
In case you're going through the nodes and wondering why i'm not using the node that does both style and composition at once, it's because the ipadapter by default only support square img's like 512x512 - which is why you usually feed the images through a "prepare for clip vision" node but even then you kinda cut out part of the image (top, center etc.) and denoise that. So i've decided to use 2 single ipadapter's that do style and concept each but work with tiling, meaning it seperates the image in multiple tiles of 512x512 and then creates the model out of the full image instead of a cutout!
A1111 and even forge have dropped support so it's very likely that neither of these 2 are going to be around for much longer, even though they are still really amazing for inpainting! So they'll always have some use :D With ComfyUI you'll definitely be future-proof with all these geniuses that develop new nodes on the day of releases like WAN and other new models :D
Sorry for the late reply, i don't know why but it seems civitai's notifications are broken, for some reason i don't get notifications for half of the comments anymore. Sometimes i get some and sometimes i don't 🥲
Hope you'll enjoy v4.0!
I'm already working on a full version with both txt2img and img2img and found a way to make it feasable.
Now it's more about positioning, user interface and some brain spaghetti of what to connect where 😂
(Also am working on an additional Inpaint area that'll be included where you can draw a mask yourself etc. since NoobAI has now officially released a controlnet inpaint model, even though it was sadly removed from civitai)
@scottegg472795 i'm also using kohya_ss for all of my lora's :D
i can also recommend to use https://lorainfo.tools/ and drag your lora's in there that you like.
This way you can inspect all the parameters the person has used to create the lora + see how many images they have used. There's a lot of information out there on good parameters like AciesGecko already wrote but i can also recommend this part of this training guide for steps/epochs/repeats.
https://rentry.org/59xed3#number-of-stepsepochs
This is for SD1.5 but still pretty much applies to Illustrious & Noobai Models nowadays.
So i'd check some lora's that you like to use where you like the quality of them and use the tools website to check for their settings + total steps and then adapt your repeats/epochs according to that :)
@vslinx amazing update! And as neat and clean as always! :D
The notifications are definitely broken, but I already suspected it and came to check this post, and yep, you replied to me and I did not get any notification.
I was wondering about the style ipadapter, because I also tried the separate version and it seemed to work much better, I just had no idea why.
It's always nice to have these little features (in my opinion) so it's great they got added to the workflow!
The additional inpaint area would be more than great, as well as perhaps an option do to full img2img? Instead of just a segment.
Although I use the img2img for small tweaks, having the option of a general img2img, maybe to change art style or whaveter.
Personally I am trying to figure out a hair detailer, surprisingly there are segmentations for every body part, for hair ornaments and jewelry but there is nothing for hair, maybe it's too complicated. But the controlnet inpaint model could do the hair thing I guess.
I see that you are using noobai over illustrious, I'm not sure if to switch from illustrious to noobai, but do the il loras work on noob? noob doesn't seem to have as much content, but I see that things like controlnet for noobai work for ilustrious so maybe they're both compatible?
I also discovered a neat node for comfyui, it's called lora blocker, I plan on writing an article about this, that is if I stop being a lazy ass. I also made a few loras I should release and I'm too lazy to upload.
It's lora block weight
Basically it lets you block specific layers from a lora, for example, style, composition, pose etc.
The use I am doing out of it, is to block styles from loras. Example:
Take this clothes lora
https://civitai.com/models/1500259
It's trained on realistic pictures so the clothes, even though worn on an anime character, the shading looks sort of realistic.
We disable the outer layers
Picture of the lora block node https://i.imgur.com/g8Sw52W.png

0,0,0,0,1,1,1,1,1,0,0,0
And we go from this
https://i.imgur.com/Tjv4PYz.png

to this
https://i.imgur.com/Zxc0qhb.png

Now the outfit has the same anime style as the rest of the picture.
I know lowering the strenght lora can also help, but then the clothes stop being as consisent, example:
https://i.imgur.com/NkUkJPs.png

vs style block
@vslinx Thank you! That's such a cool tool! I can confirm the notifications aren't working, I didn't get notified when you sent this.
@AciesGecko I tried to figure out inpainting in ComfyUI but it never worked for me. Usually I just use Reforge for inpainting.
@scottegg472795 I'll give reforge a try but I like the all in one approach so I don't have to use so many different programs
@AciesGecko @vslinx Thank you so much for your help regarding kohya ss! I managed to make a Lora with it today, although the training process almost took almost a full day 😅. I had to turn Blocks to Swap very high because I have 8gb VRAM.
Hey, I just opened this workflow and installed all the the nodes, but it keeps saying that there's two nodes missing: Start Quality and End Quality. Where do I download these nodes because the manager isn't finding them anywhere?
I've updated everything, but those nodes are still missing
Hey @Killua_Morales,
have you installed all of the nodes in the description?
I have linked all of them there and in the workflow itself inside of a note.
The Start quality prompt and End quality prompt are just groups i have created, the two nodes it consists of are Crystools and Comfyroll, you can find the links in the descriptions or through the ComfyUI Manager!
After installing them (check the console of comfyui to see if any of them say "(Import failed)") you also have to refresh the window your comfyui is running.
@vslinx It says import failed on quality-prompts and comfyui-prompt-reader-node. Also, there's this popup on Comfyroll: Using an outdated version has resulted in reported issues with updates not being applied. Trying to reinstall the software is advised.
@Killua_Morales you have to go into your ComfyUI Manager -> Custom Nodes Manager -> On the top left you change the filter to "Import failed" and then click on "try to fix" on all of them.
@vslinx Everything is fixed. including the crystools and comfyroll. Now the only thing that import failed is quality prompts.
@vslinx I got it to work now.
@Killua_Morales just for clarity for me that i don't have anything wrong, was the solution to refresh the page afterwards? After fixing the import you usually still get this error until you refresh the instance.
How did you got it to work? I don't have any missing nodes and comfy says I need:
workflowControlNet Models
workflowEnd quality prompt (Optional)
workflowStart quality prompt (Optional)
@GesugaoDVA hey, please read the comment above
"The Start quality prompt and End quality prompt are just groups i have created, the two nodes it consists of are Crystools and Comfyroll, you can find the links in the descriptions or through the ComfyUI Manager!
After installing them (check the console of comfyui to see if any of them say "(Import failed)") you also have to refresh the window your comfyui is running."
It's important that after installing you re-start your comfyui instance AND refresh the browser.
It can't hurt to also close the workflow and open it again. All of the errors you have is because of missing custom_nodes. Please install them first
Looks like Image Filer is broken thanks to some recent updates. I was wondering if there was an alternative to Image Filter.
Heya @Zibbernaut,
which version are you using? i know the image-filter from v1.0 is deprecated but the cg-image-filter node is still working for me, i set up a completely new system with all nodes and comfy on the most recent version 4 days ago and everything worked. What error are you getting? maybe another node is causing the issues in combination with image-filter
I fixed my problem by rolling back to ver. 1.4.2 and everything works.