

ComfyUI Detailer/ADetailer Workflow
If you're having ANY issues with this workflow, please include the error log from your console when writing a comment here on this page. Chances are 99.98% i can help you with your issue - but i need the error log. And me not having to ask for it first will save you potentially hours. Chances are also high the solution to your problem is already documented in the FAQ here.
You can now support me on my Ko-Fi if you have too much money (✿◡‿◡)
Requirements for each version are listed below or can be found inside a Note in the Workflow itself.
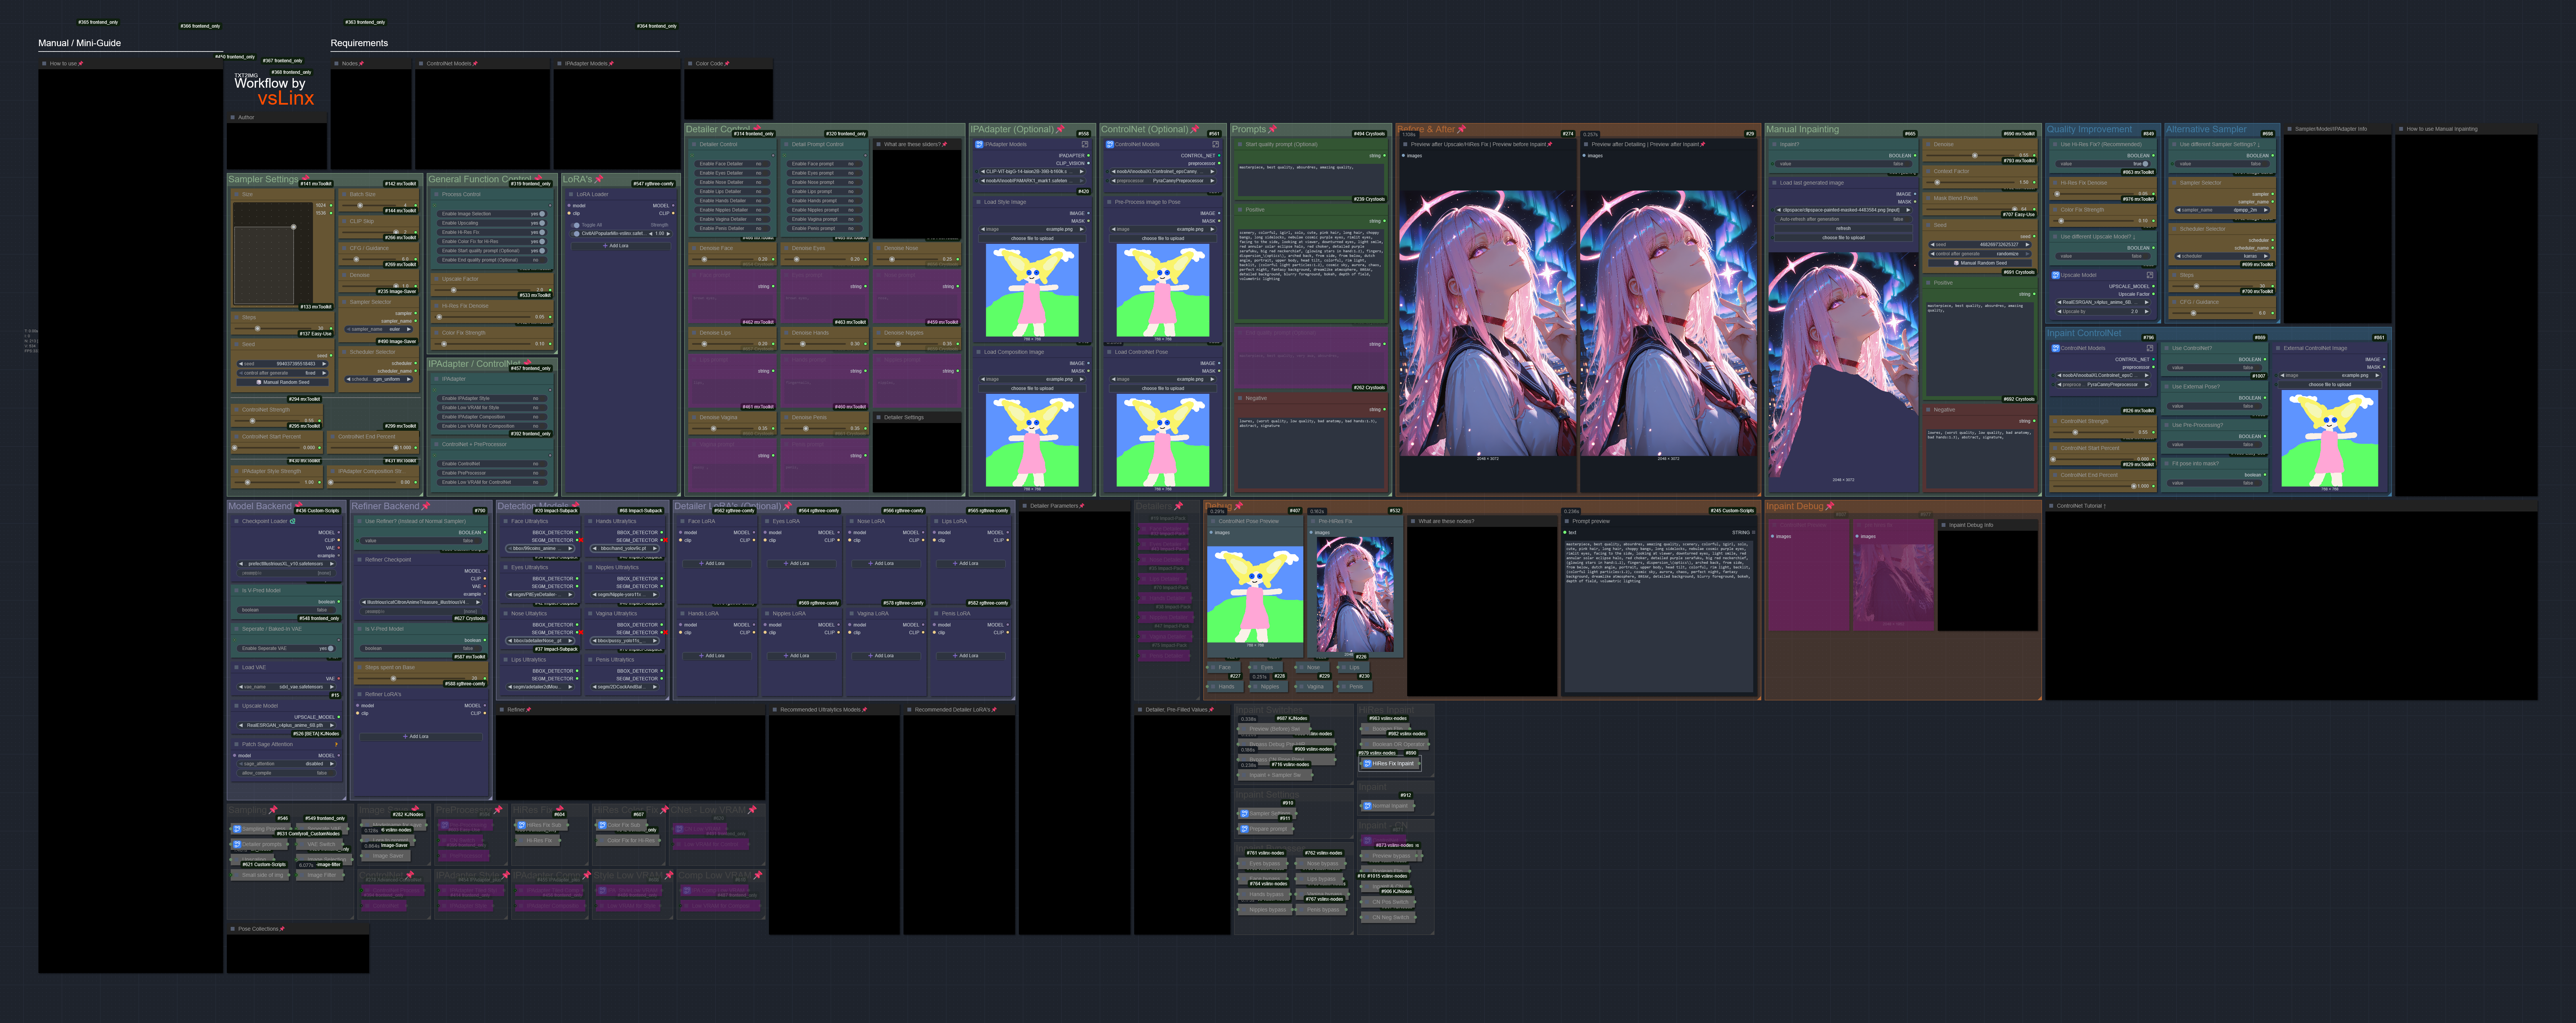
Because of the many connections among the nodes, I highly recommend turning off the link visibility by clicking the "Toggle Link visibility" (Eye icon) in the bottom right of ComfyUI.

Description
I originally came from A1111 WebUI to ComfyUI and, honestly, a lot of things felt way more complicated than they needed to be. I couldn’t find workflows that were both visually pleasing and showed me all the important options without requiring a deep understanding of every little thing in ComfyUI.
Over a few months I learned the ins and outs of Comfy and built my own very barebones, simple workflow (v1) with one main goal: streamline the process and make it visually understandable. I released it here thinking it might help others who also want to make the jump from A1111 to Comfy.
Over the last year I’ve kept adding more and more features as people started using the workflow and requesting things. The workflow has grown a lot, but I’m still trying to keep the same ease-of-use that this whole journey started with. The main goal is still the same: give you a lot of powerful options in a layout that’s as clean, readable, and as user-friendly as ComfyUI will allow.
At this point I feel like I have a pretty solid understanding of how Comfy works, and I’ve even created my own custom nodes to add missing functionality so this workflow could match the ideas I had for it. I try to hide as much of the technical complexity as possible — but if you’re ever curious or confused about anything, please feel free to ask!
Thanks to all of your suggestions, the workflow now includes features like:
Single-image and batch generation
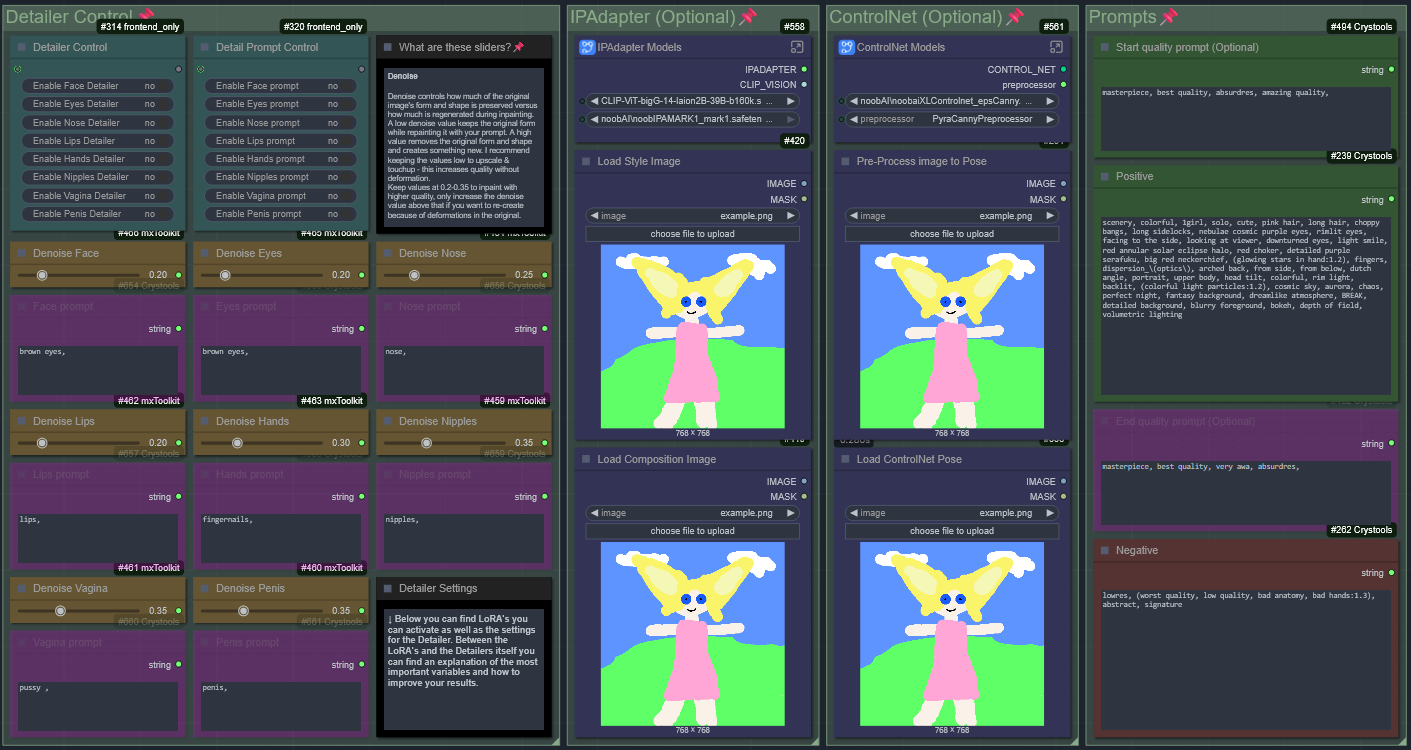
Automatic detailers for specific body parts
Upscaling
v-pred models
LoRAs
ControlNet
IPAdapter
Hires fix / refiner
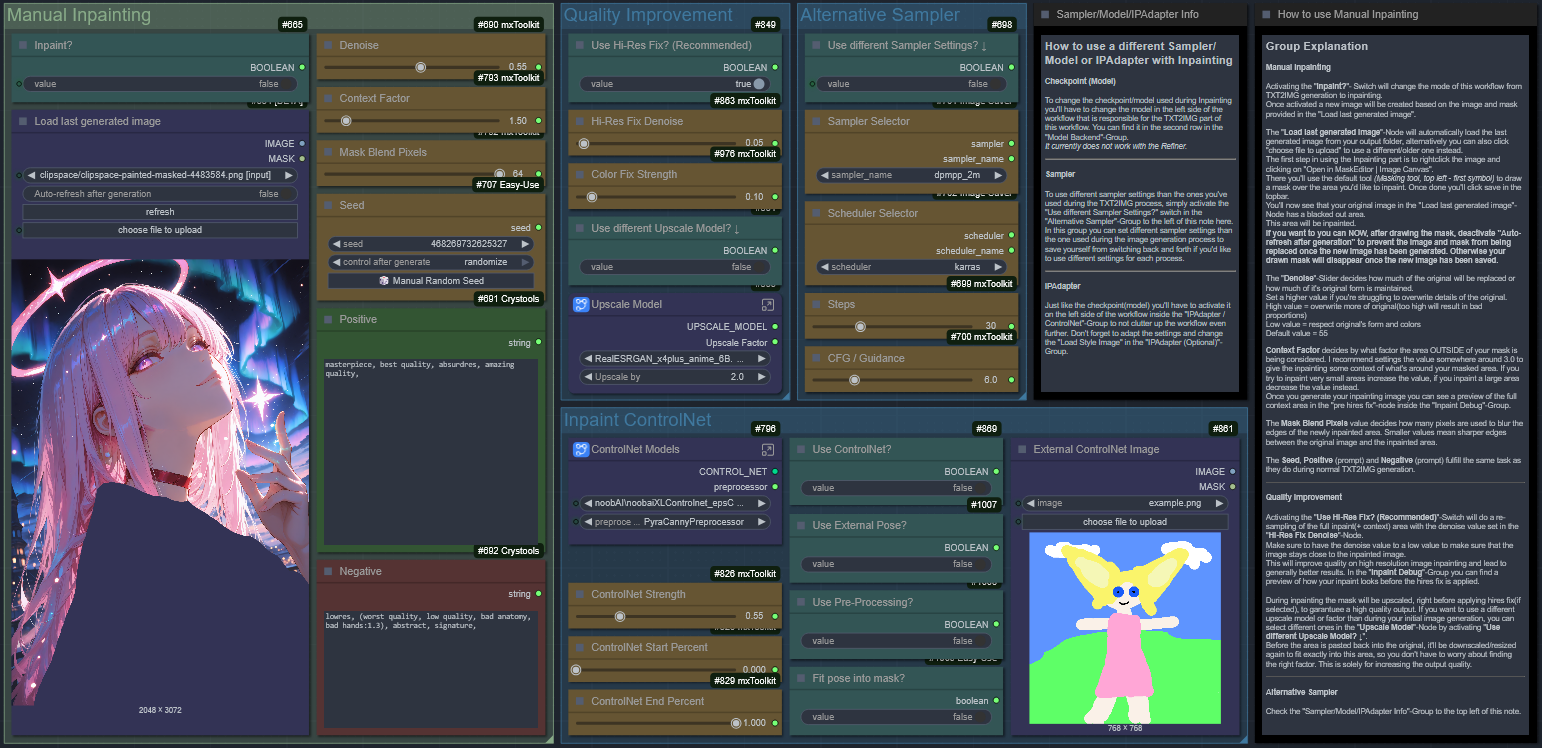
Manual inpainting
Thank you to every single person who uses this workflow, donates Buzz, or shares images on this page.
I really appreciate you taking those extra steps to support and promote the project. ♥️
Requirements
v4.4 and above require ComfyUI version 0.3.51 or above and also need the frontend to be AT LEAST 1.24.3 or later.
v5.1 - Full List
v5.0 - Full List
v4.4 - Additions to v4.3 (IMG2IMG Only)
Otherwise same as v4-4.3 below
v4.2-4.3 - Additions to v4.1
Otherwise same as v4.1 (incl. v4) below
v4.1 - Additions to v4 (IMG2IMG Only)
Otherwise same as v4 below
v4 - Full List
v3 - v3.2 - Full List
v2.2 - Additions to v2
Otherwise same Custom-Nodes as v2 but you can remove Comfyui-ergouzi-Nodes
v2 - Full List
v1 - Full List
How to use
Since all of the different versions work differently, you should check the "How to use" Node inside of the Workflow itself.
I promise that once you read the explanation of the workflow itself, it'll click and it will be a simple plug and play experience.
It's the simplest I could've made it coming from someone who's only started using ComfyUI 4-5 months ago and had been exclusively an A1111WebUI user before.
When were what functionalitys added?
Starting from v3, ControlNet is included.
Starting from v4, IPAdapter is included.
Starting from v4.3, HiRes Fix and Dynamic prompts(wildcards) is included.
Starting from v4.4, Refiner is included.
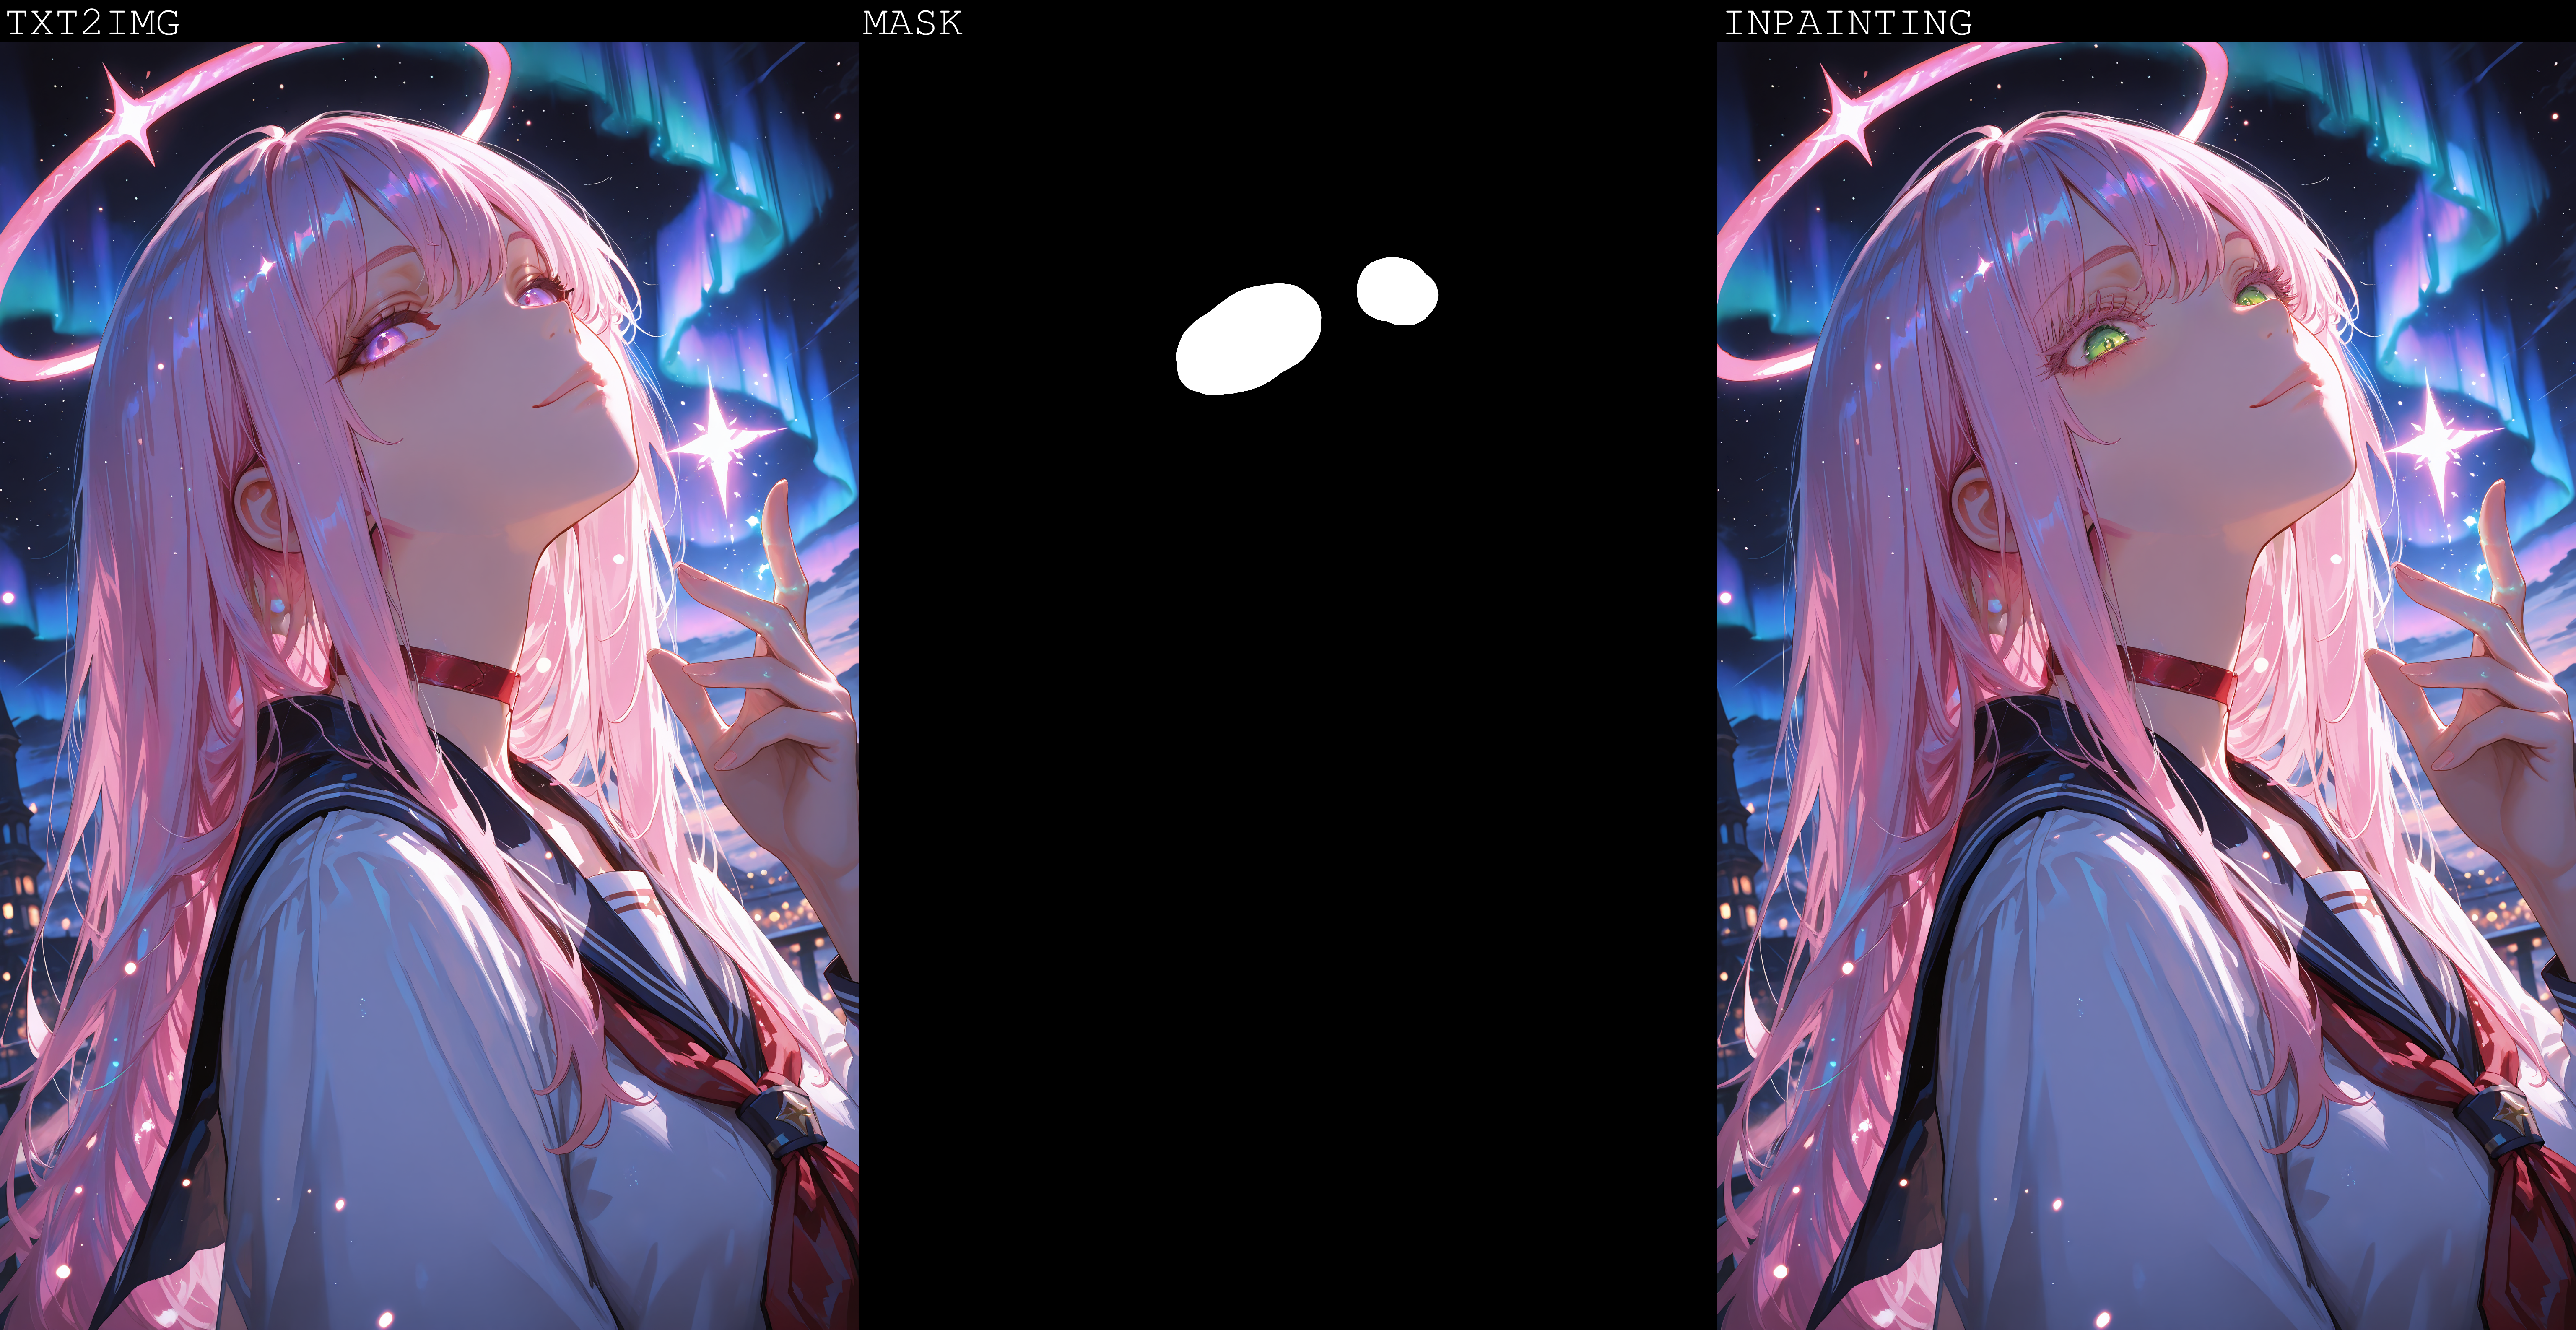
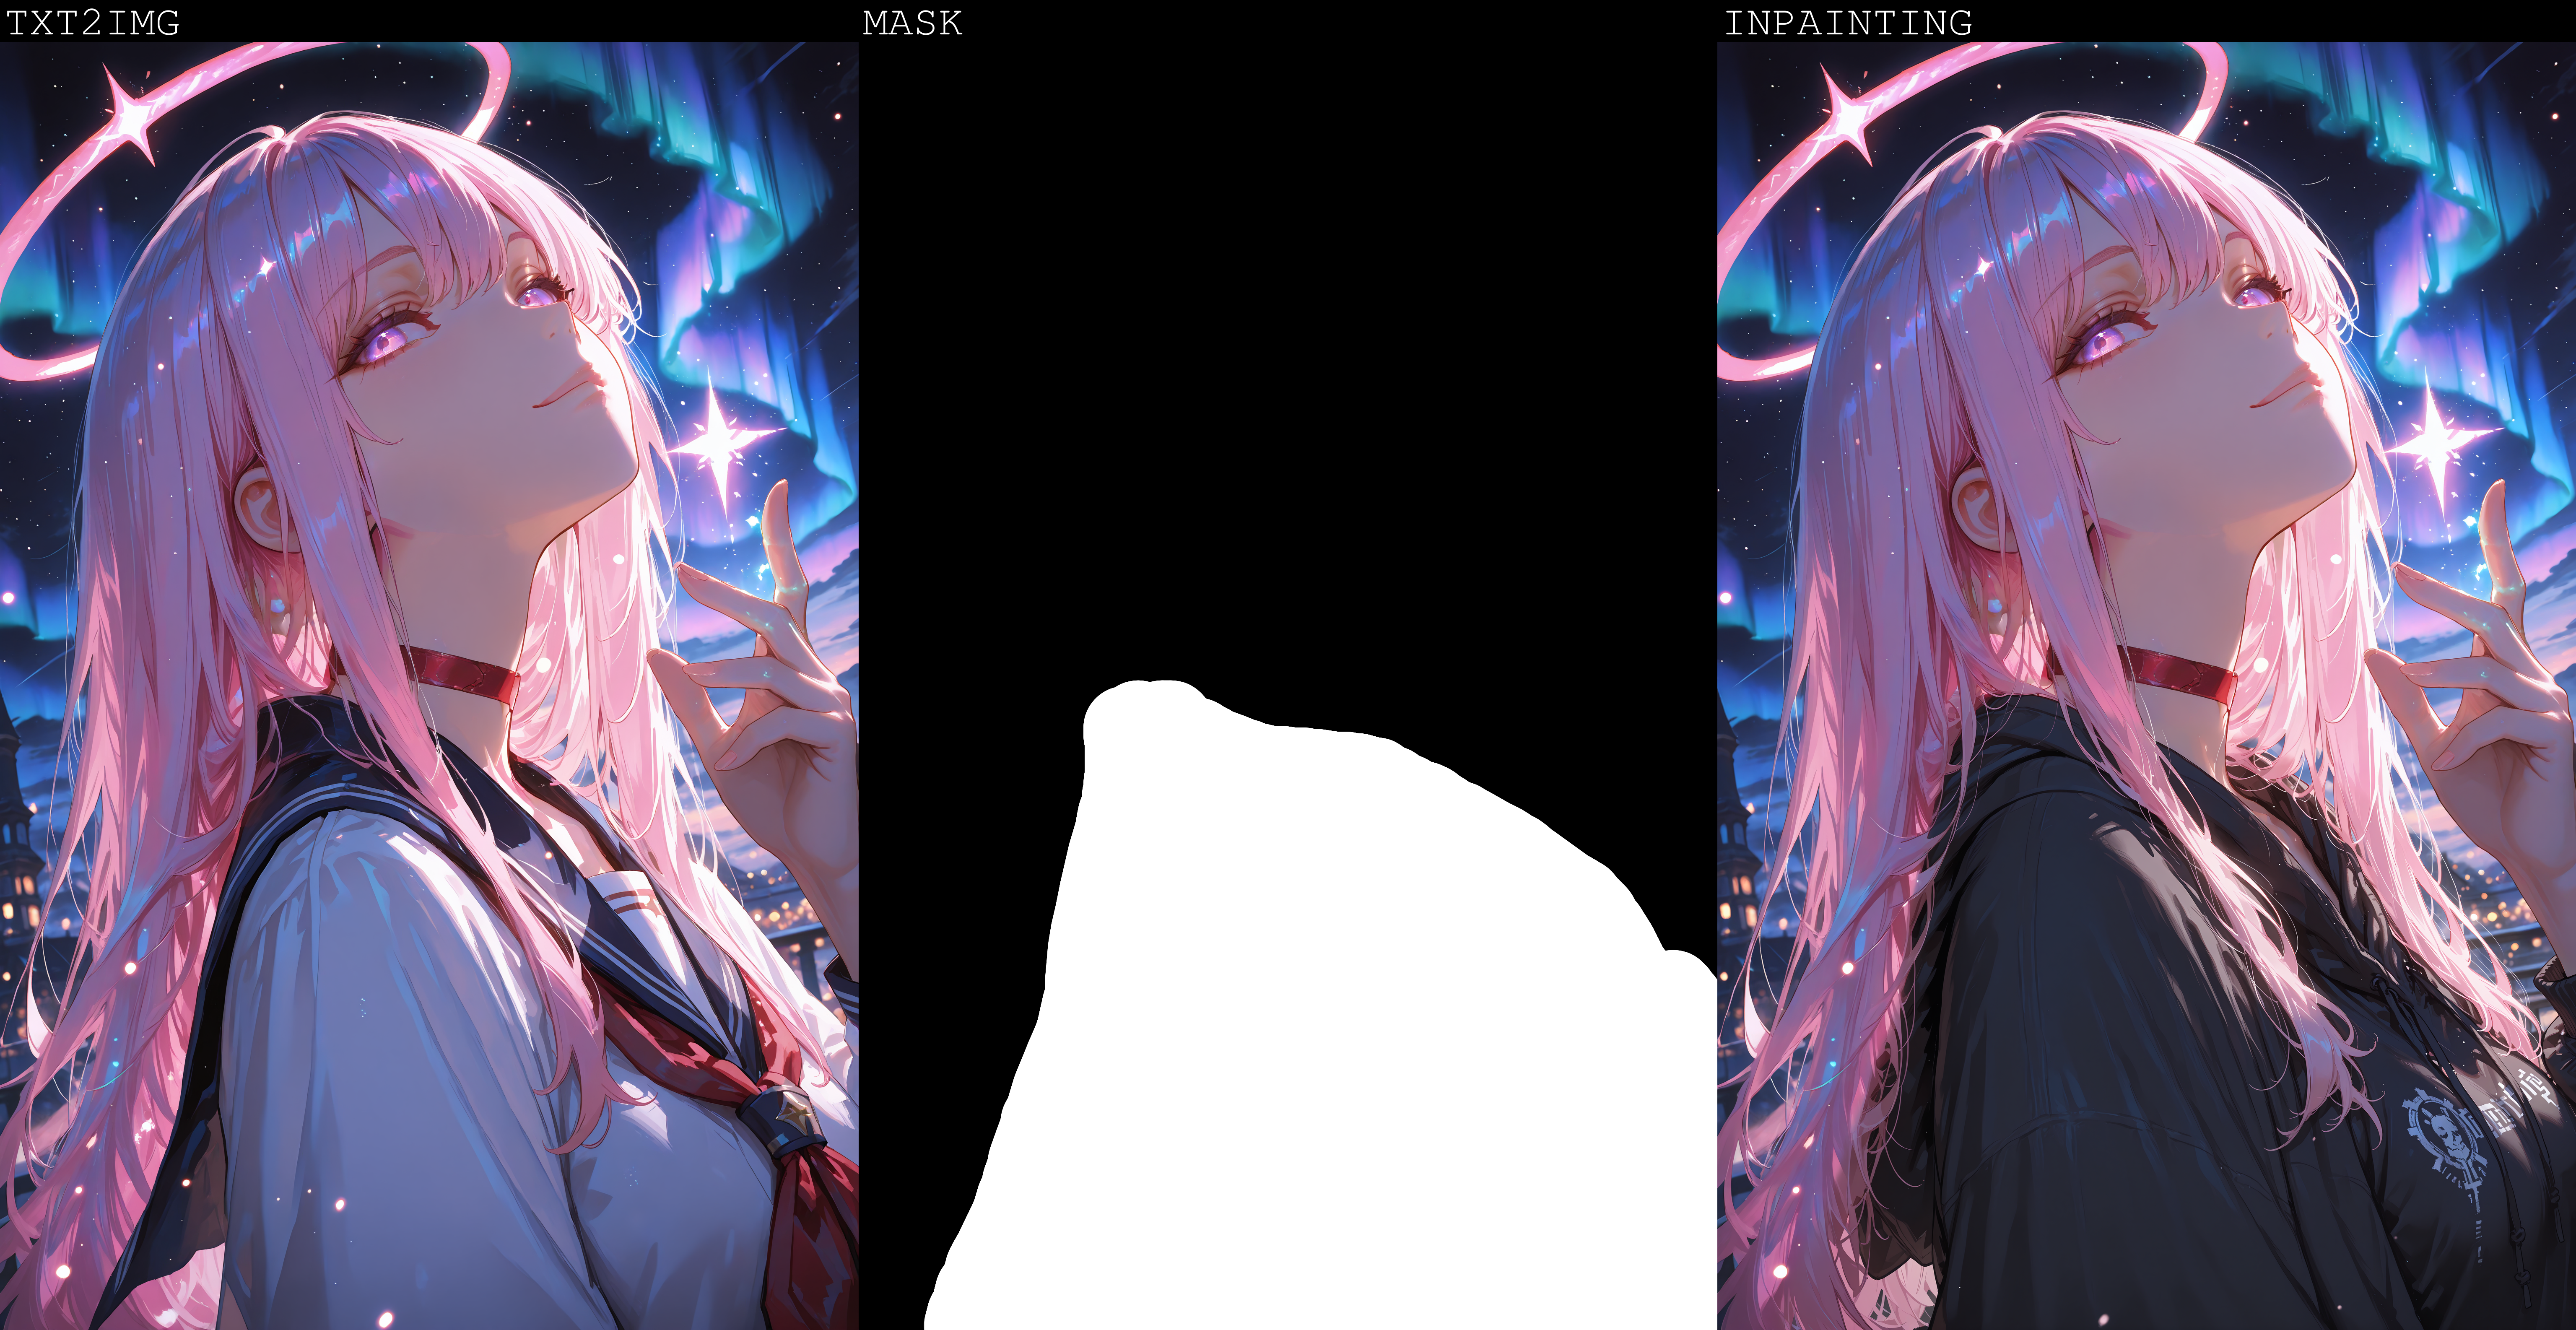
Starting from v5.0, Manual Inpainting is included.
Any errors during execution?
If you're running into any errors during the execution of the workflow, please check the FAQ of my Guide first. The guide is written for the IMG2IMG Workflow but when issues arise that people run into frequently i'll add the solutions and what's hapenning to that FAQ section.
If you can't find the problem you're running into there - feel free to write me a comment on the model page so that i can help you and other people might benefit from it as well.
Feedback
I'd love to see your feedback or opinion on the workflow.
This is the first workflow I have ever created myself from scratch and I'd love to hear what you think of it.
If you want to do me a huge favor, you can post your results on this Model page.
I'll make sure to send some buzz your way!
Description
additional info below the changelist!
Changes:
Implementation of Manual inpainting
Changed refiner selection with bool and lazy switch for an easy activation/deactivation
more lazy switches implemented so workflow only runs nodes required for final result(better performance)
changed hires fix steps calculation to use the same step count if steps below 10 (lightning/dmd2 loras for low vram)
saves lora information now from all activated loras in general lora power loader
removed Anything Anywhere nodes due to repeating problems after comfy updates since introduction of subgraphs
added a slider for the color fix strength
v5.0 is finally done - it took longer than expected due to a lot of problems and bugs i had to fix introduced with new comfy updates revolving around the subgraphs.
Expect the img2img v5.0 update in the following week due to some issues with the img2img transfer in combination with the manual inpainting process. (At least to make it visually smooth)
If you're experiencing any bugs, please let me know and i'll try to fix them as soon as possible!
FAQ
Comments (23)
Hi author, I ran into a problem when setting up this wf. When I ran it, it ends prematurely in ~1s and does nothing. The logs look like this: https://pastebin.com/v8a2F7d8 and I have checked FAQ and made sure I didn't have the res4lyf thing installed, but that didn't solve the issue. Any help please😢
Hey @amemiyaharuka5391,
this problem is definitely caused by res4lyf being installed :/
Maybe your comfy manager just isn't showing the custom node anymore.
Make sure you go into your comfyui folder -> custom_nodes and then check if there is a RES4LYF folder still in your custom_nodes folder.
If that is the case you can simply delete it, restart comfy and then (very important) refresh your browser window where you have comfy open. Comfy persists a lot of things in the cache until you refresh the browser with comfy open manuall once.
@vslinx Thanks for answering! Actually I fixed the issue a few hours after commenting. Seems like some other custom node pack did roughly the same thing as res4lyf, and thus a likewise bug occurred. It's probably my own bad since I haven't updated my plugins for a long time, but thank you for answering, and sorry for the inconvenience anyway. 🥰
@amemiyaharuka5391 aaaaaaaah!
I'm glad you managed to fix it. I have not heard of another custom_node yet that adds the scheduler to the list and causes this issue. If you ever find out which node it was, feel free to let me know and i'll add it to the FAQ part about this problem 🫡
I hope you'll enjoy the workflow! ♥️
@vslinx I had a similar issue. Sampler added by RES4LYF were not being seen by comfyui-image-saver's sampler selector node causing a miss match in ksampler and ksampleradvanced.
@jess_aitrash that issue is "sadly" already well known. The image saver and the detailers don't do well with the RES4LYF node since there's a mismatch between the schedulers/samplers.
The RES4LYF node overwriting the default dialog but no subnodes is bad design and has to sadly be solved by the developer :/
Great work on v5, but the final output isn’t being saved.
Case:
After finishing the Penis Detailer, it’s supposed to start the Preview and save the output like in v4.5. Now there is an in-paint phase that takes the output which is not saved in the output directory and the pipeline stops without showing an error, only reporting
"""
0 models unloaded.
Warning: Ran out of memory when regular VAE decoding, retrying with tiled VAE decoding.
Prompt executed in 265.15 seconds
"""
hey @moddimourad,
this looks like a common out of memory error during vae decoding.
The active node you see during in-paint is most likely just something called a lazy node that is only active for branching and basically does nothing but expect an image and then forward it once it get's it. It's required to do a seamless forwarding of the image.
If you ran out of memory during VAE decoding it most likely means that the image had too big dimensions for your GPU during the decoding.
What GPU do you have?
If you provide me a full error log i might be able to see where the problem is coming from.
Does this only happen when you're running a detailer? Or also when ur trying a normal txt2img process?
Hi @vslinx
I found a simple workaround: I just added an old image to the output directory. The inpainting step then loads that image, processes it correctly, and saves a new output without any issues.
For the logs:
https://pastebin.com/aXa7WsiT
You can see the warning still coming, but with this workaround the "ComfyUI-Image-Saver: Calculating sha256 for 'CyberRealistic_Pony_v14_1'" comes out this time
I also don’t think this is an OOM issue. The same configuration was working fine on v4.5, except for the new inpainting.
Thanks for taking a look at my problem.
hey @moddimourad,
sadly there has to be an image inside the output folder for comfyui to correctly execute all steps of the workflow. If you haven't generated an image yet or have it inside a subfolder in the output folder you'll have to click "choose file to upload" inside the "Load last generated image"-Node.
This is imo an oversight from the default comfy node and i might write my own node with better value handling for these cases in the future to avoid this until comfy fixes that behaviour.
When you have added a picture to the inpainting "Load last generated image"-Node, does this fix your issue and an image actually gets saved? If yes you could also just bypass that node for the time being until you'd like to use the inpainting part.
Hi @vslinx
Yes, adding an image makes it work, but if I bypass loading the image, it throws an error in the switch below.
Anyway, it works, and that's good enough. Thanks for the great work and support!
@moddimourad all right, thank you for the feedback! ♥️
I hope you'll enjoy the workflow and i'll see what i can do to fix this issue in a future v5.1 where i'll remove the comfy-core node and implement my own.
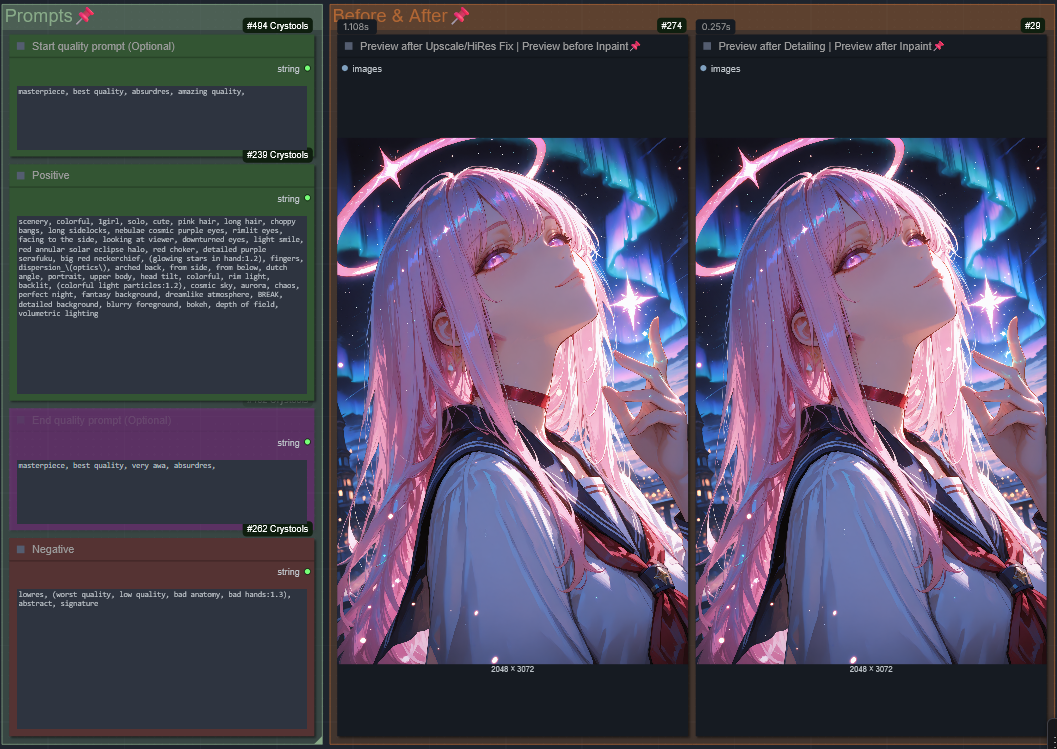
Im having a hard time finding where the actual final image is after all possible adjustments/enhancements/fixes so I can pass that to the image saver. The "Preview after Detailing | Preview after Inpaint" node never gets any images
hey @emdomenic,
if you don't have a final image in the "Preview after Detailing"-Node it means that the workflow had an error at some point during execution.
Please check your comfy console and let me know what error is being thrown there.
You can also check the FAQ section to see if the error you have might be listed there already.
And no worries, once the final preview actually appears(when the error is fixed), the image will be saved with all metadata information.
Hi, thank you for great workflows. Do you have plan to add function or already have workflow that deals "face transfer"? I built my own simple ipadapter faceid workflow, but result is somehow disappointing.
Hey @willshawn2519,
implementing faceid is currently not intended as it is a little bit too niche for my workflow and since you can mostly do it already (without using faceid).
You could either use a face detailer and activate the prompt and prompt which face you want it replace by OR you could use the manual inpainting part and mark the area you want to change and then prompt the character you want it to be replaced by.
It might not be as convenient as faceid but it works really well and i've done it frequently before ^^
Sadly faceid is not on my to-do list currently as there are some things i'd like to fix and implement first, but maybe along the way i'll add it!
@vslinx Thank you for clarifying, I need to play around more with functions you mentioned.
ends with an error
TypeError: 'CLIP' object is not subscriptable
log here https://pastebin.com/DxjxxRT9 pls help)
Hey @timsatyr981,
it seems that your comfy installation is a little bit broken.
Your main issue seems to come from a Image Preview node receiving a "CLIP" instead of an "Image". Usually comfy doesn't even allow such a connection to begin with, so it's very likely that your installation is broken and upon loading the workflow your comfy started re-wiring node connections wrongfully.
The node in question is the "Eyes"-Node in the Debug section. You could try removing/bypassing it to see if that'd make the workflow run normally.
But there are some other things that are throwing failures in your Comfy Setup, i'll mark the things you can change, in order to probably make it work, fat:
You have two nodes that fail during import, maybe update them through Comfy Manager or remove them:
- ComfyUI-GGUF-FantasyTalking
- comfyui-reactor
You have not selected a Checkpoint in the "Refiner"-Section. While you don't have to use the refiner and i usually would not use it, Comfy still expects a valid value in the Node. So just go down to the "Refiner"-Group next to the model selection and choose 1 of your models, doesn't really matter which one unless you actually want to use the Refiner functionality.
You do not have a example.png in your input folder. This image usually comes with every comfy installation and provides one common image for everyone to share workflows with. You might have deleted it from your ComfyUI/input folder. Your options are to either load an image into all of the "Load image"-Nodes (ControlNet, IPAdapter & "Load last generated Image" in the Inpainting section) or simply copy any .png file into your ComfyUI/input folder and rename it to example.png.
Fixing these Problems SHOULD make the workflow run. Make sure that you update all your custom nodes beforehand and then re-load the downloaded workflow and then refresh your Comfy Page to make sure the cache is cleared.
If this does not fix your issue your Comfy Installation might be too corrupted. In that case i can recommend to install Comfy through git instead of the installer, as it is way better at keeping dependencys local to the comfy installation instead of globally inside your AppData folder.
This makes things way easier for you and your comfy. If you don't know how to do it you could download my Installer from here by downloading the "nvidia-windows.bat" and executing it where you want comfy to be installed. It installs the newest Comfy via git including all the dependencys required for this workflow and the workflow itself. It also lets you choose if you want to download the controlnet models etc.
I frequently have people with the comfy installer or the portable comfy since they are more prone to running into errors and quite a few have switched to the git installation through my script.
I hope that helps, if you need anything more let me know :)
@vslinx thank you very much i'll try!
@timsatyr981 No problem! Let me know how it goes 🥰
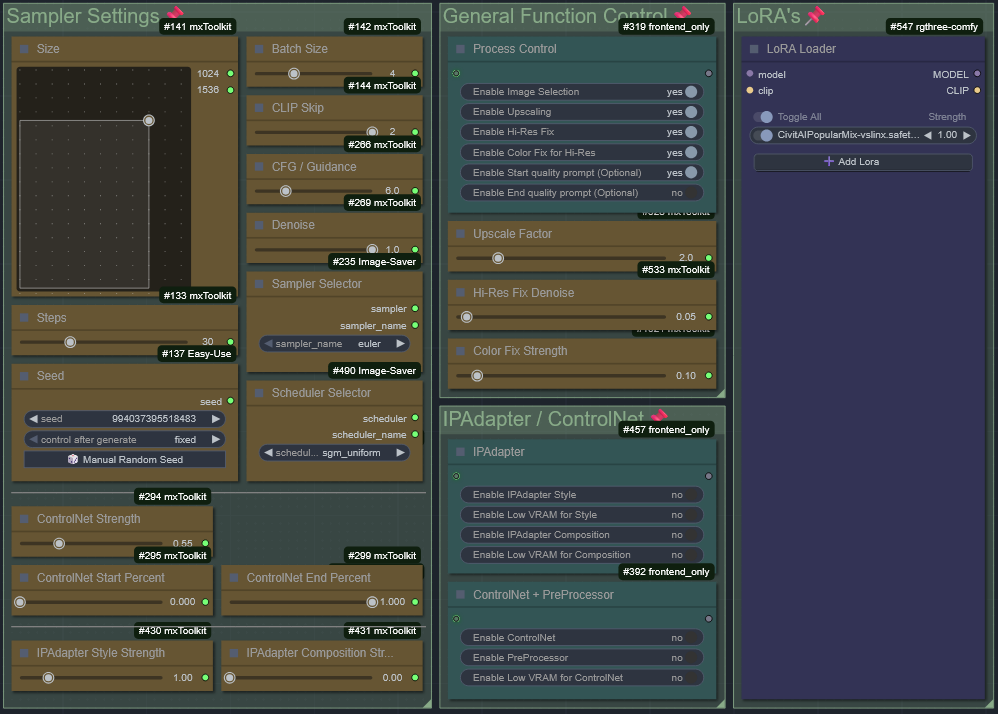
I noticed that the Hi res fix has no setting to change the upscaler to simply latent? Can you please help.
hey @Darkbiology,
there is currently no option to just upscale the latent instead of upscaling the decoded img with an upscale model.
This feature is currently also not planned to not overload the workflow even more since most people rather use an upscale model instead of upscaling the latent :/
If you're concerned about colors washing out i can recommend the color fix option with a small strength like 0.1