Since CivitAI is going down THE DRAIN
I won't be updating this workflow here anymore, and I won't post any more models from now on.
I hope to find interest from people to keep updating this. Thanks everyone!
Keep following this workflow development and more on my new Discord server: https://discord.gg/EwKE8KBDqD
Get new releases from GitHub: https://github.com/diodiogod/Comfy-Inpainting-Works
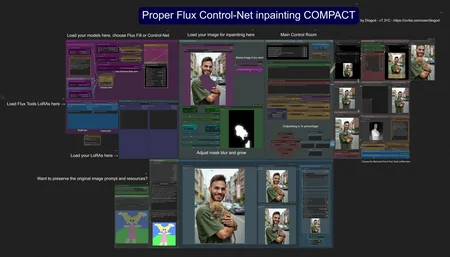
Now there is a "simple/compact" version that I will update together with the normal one.
Read "about this model" on the right panel please!! I recommend reading v6.0, v5.0, v5.1 as well.
This is a proper inpainting with alimama control-net + Flux Fill + Flux Tools (Depth an Canny) support from V7 and above.
I try my best to avoid hiding the workflow flow, while balancing keeping it clean and user-friendly.
This workflow will make sure your image is composited in the end to prevent VAE degradation AND from v5 will make sure your image is a multiple of 8 (so it doesn't get resized by ksampler) at the same time it avoids resizing at all (unless you want to) since resizing will degrade the original image as well.
For inpainting that leaves a face and changes the whole background and character, Alimama works way better. Alimama also works better for LoRas. Alimama is terrible at outpainting and Flux Fill is amazing. You should test both. My comfyUI OOM or crashes when switching from one to the other IF my system memory page file is not large enough. With a pagefile of 50GB I can freely switch from Flux Fill to normal Flux Dev now.
It does use a lot of custom nodes to make life easier and workflow cleaner. Use manager to install the missing ones.
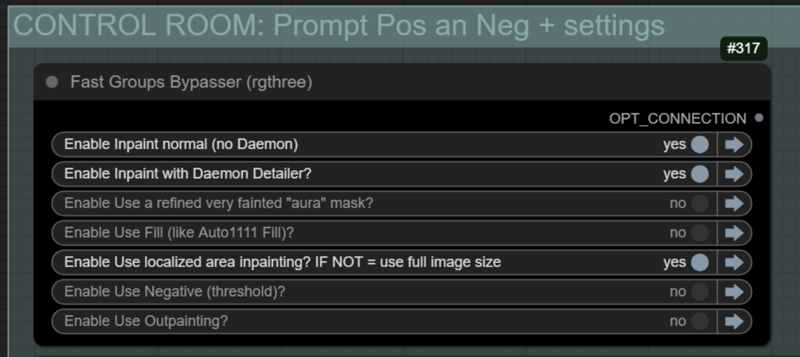
Supports loading of an external mask (need to match the image size) or doing the inpainting within the right-click "Open MaskEditor" on the image itself.
Supports FILL -the normal fill, like Auto1111- (use FastBypasser - black node)
Supports area inpaiting x full image inpaiting (use FastBypasser - black node)
Supports variable denoise (Change denoise on the CONTROL ROOM)
Supports Negative (use FastBypasser - black node)
Proper composite so no VAE degradation
Support for Flux Tools (Depth an Canny) with Alimama
I added LoRa support and Daemon Detailer support (both are optional)
Description
I Finally got the time to refactor and bring Compact up to speed with the expanded workflow.
I implemented the changes from 7.2 and 7.3 - 17/05/25
Changelog
v7.3
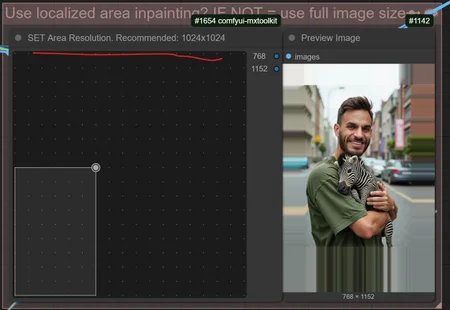
1. ❗ Compact only (for now): I added a slider node where you can set the resolution for the Localized Area inpainting in an easier way.
2. ❗ mask were mismatched when the image was resized. The workflow will now resize mask before cropping (to ensure they are divisible by 8).
-----------------------------------------------------------------------------------------
v7.2 - Bug fixes
1. ❗ New: Option to invert aura direction. Useful when inpainting the whole background leaving a small area to not change, in this cases the aura grows OUT of the not painted area, not inside it. Another way to put it: a black aura grows inside the inpainted area when this is ON.
Use case: if you want to inpaint the BG and leave the charcater, but want the Ksampler to understand the boundaries of said character, using a very fainted "black" aura makes the ksampler to keep the surrounding area in the beggining while slowly painting it over the denoising process since it is a gray area. (turn on ksampler preview so you can see this happening).
Recommended settings: Low visibility (30) with a small grow (5).
2. ❗ Anything Everywhere refactoring:
Change AE to Get and Set:
for Choice:
on "Auto Preprocessor for Canny OR Depth" group
on "control room" group
on "Conditioning Index Switch" after controlnet
on "Get Unet Chechpoint Name for Metadata" group
on Alimama ControlNet Hash "Switch (Any)" on save group
for lora_stacker:
on 💊 CR Apply LoRA Stack (directly connected)
on L"oRA Stack to String converter" on "Get LoRAs names..." group
for ALIMAMA_ControlNet on "ControlNetInpaintingAliMamaApply"
for VAE
on ControlNetInpaintingAliMamaApply and InpaintModelCon FOR Dev FILL
on "InstructPixToPixConditioning"
on VAE encode and 2 decodes
For CLIP on CLIP Text Encode (Prompt pos and neg)
For Model on Detailer Daemon Samples and Normal Ksampler
For EvalNeg
on "Using negative? switch"
on control room group
on "Inpaint with Detail Daemon?" group
For PositiveP on "Text Concatenate" for metadata
For Guidance for Flux Guidance
For Sampler and Sheduler on samplers and on save node
For Steps, Seed, CFG, Denoise...
3. Fixed: "Resize Mask" to "CropMask". Resize would mismatch the mask but would stretch it by some pixels if the image was not devisable by 8.
4. Fixed "clean_lora_names" group nodes that was not working correctly to clean the lora names. Also removed "logic" multiline to "was".
5. Positive and Neg Logic multilne node > Was
FAQ
Comments (32)
I Finally got the time to refactor and bring Compact up to speed with the expanded workflow.
❗ Compact only (for now): I added a mxtoolkit slider node where you can set the resolution for the Localized Area inpainting in an easier way.
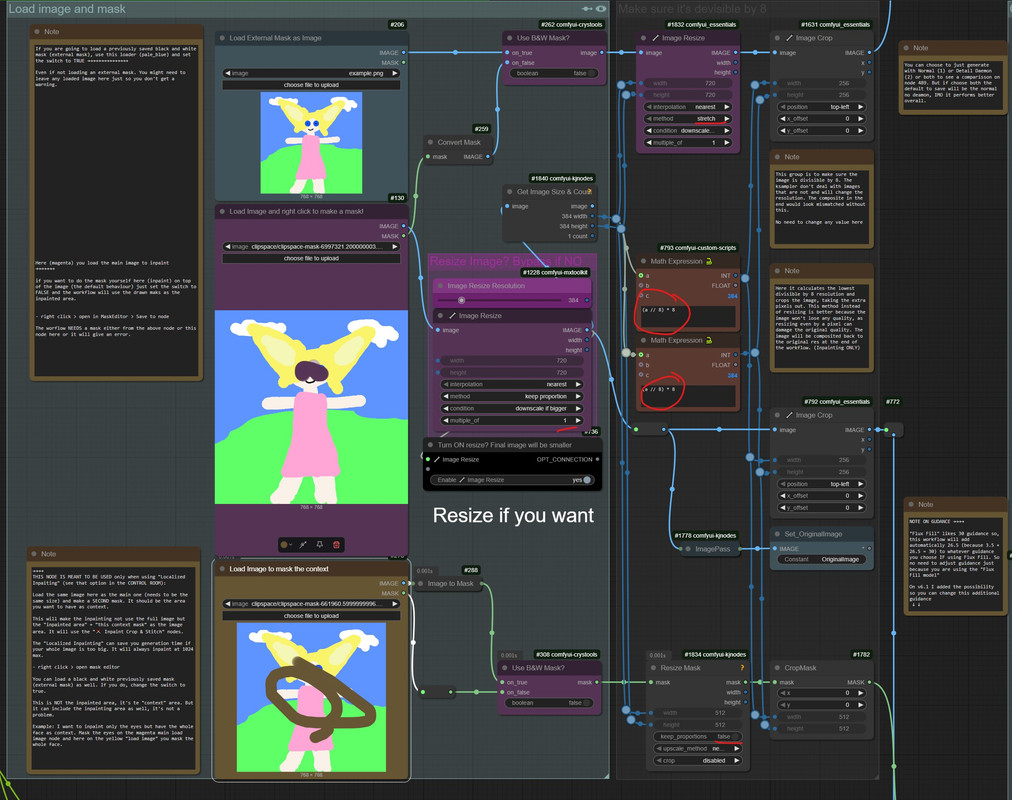
The note says no settings need to be changed in the group, but the resize method is set to Stretch. Shouldn’t it be changed to Keep Proportions instead? In the video, it was also set to Keep Proportions.
You are talking about the masks right? Now thinking about it, you are correct. I was thinking about compatibility, if for any reason a person input a mismatched mask it wouldn't error out. But since resizing the main image already makes it a multiple of 8 on node #732, it will crop, and using that already cropped width and height will cause it to stretch the masks in a different proportion, making a slight mismatch.
To keep it correct, I either need to also "keep proportions" on the mask resize, as you pointed out... or on the "resize image" node #732, not allow it to be a multiple 8 (or anything), so it resizes the image without cropping (since cropping will happen later)... anyway. I'll rethink it and correct it on the next version. It's a small thing that won't cause too much problem right now, but it should be corrected. Thanks!
I think the better solution is to make #732 a multiple of 1 always instead of 8 like it is now. Because the workflow will correct it anyway to a multiple of 8 later. And by doing this the masks will always stretch in a proportional way anyway on the #1832 and #1834 (if the image is proportional to begin with, and if it is not, it won't error out)... or I should leave it to error out, so the user knows their masks are not proportional... I'm not sure yet what is better.
@diogod As you suggested, I set the "Keep Proportions" option and set the multiple to 1 on node #732.
I did the same for #1832 and #1834, setting keep proportions and the multiple to 1 as well.
But even then, I sometimes get a message saying that the resolution doesn't match.
(Just to clarify, I didn’t load any external mask image above.)
Also, regarding the part where the final process adjusts everything to a multiple of 8 —
does that mean there's a node somewhere that crops the image to a multiple of 8 immediately after the resize?
I haven’t fully grasped the structure yet, so I’m not sure where that part happens.
But if that’s the case, then setting the multiple to 1 when resizing both the full-size image and the mask might be the simplest and least error-prone approach.
By the way, I have a question:
I’m using a 14th-gen Intel CPU, 64GB RAM, and an RTX 4090 with 24GB VRAM.
I’ve been using Q8 or Q6 models, but sometimes it takes 30 minutes to over an hour and still nothing gets generated.
It’s been slow for a while, and I’m wondering — is it just because my workflow has too many nodes?
Or is there something more critical going on?
There’s no error message, but it feels like the KSampler is just stuck and not progressing at all.
One more thing — I spent quite a while trying to figure out why the resize control node wasn’t showing up.
Turns out, it was a bug in a custom node, and this has already been reported several times to the developer.
I also reported it myself, and I got a reply saying the issue was with comfyui-mixlab-nodes.
After that, I downloaded everything again directly from GitHub and reinstalled — that finally fixed the problem.
@fruitpaster
1- You are understanding it very correctly. There is a crop node right after the resize. The workflow calculates (#793, #794) what is the best resolution multiple of 8, and then it crops the image at #792 (on the "Make sure it's devisible by 8" group right after resize). And after that, In the end, right before saving, the workflow composite it backs so you end up with your original resolution. This is just to be a purist, because it would be better to just end up with the image divisable by 8, but it might confuse people to why their original image is being changed. This happens on the group called "Composite back the cropped divisible by 8 image to the original image"
2- If you set #732 (the main resize node) to make the image a multiple of 1 instead of 8, this is enough. You should keep #1832 and #1834 as it is (with stretch and multiple of 1 as it was originally). Why? Because it receives the width and height of the resized image on the #732, so it does not need to keep proportion anymore. The crop and making sure it is divisible by 8 happens after it, on #792 (for the image), #1631 for the mask, and #1782 for the context mask. This should not make any error if set this way.
3- There is something wrong, for sure. The workflow is big, but the flow is fast, after it loads it should take from 19-60 seconds at most using Fp8. It depends on how many steps, batch and resolution you choose. It's not that slow, specially for a 4090. You should not need to use Q8 on model for your GPU. Use the normal model loaded at FP8-Fast it should fit your memory.
Check if your GPU memory is completely full at generation (when it is stuck on the ksampler), and if it is using any of the "shared memory". You can check this on windows task manager. If it is full, lower your batch size and resolution (use localized area inpainting if you don't want to change your original image resolution). But there is something definitively wrong. You should not wait more than 2 minutes, even on the first run (when it loads the model)
One other tip, increase your shared memory on windows to something really large, specially if you have 64RAM (just like me). After I put 50GB of shared memory on windows (on the driver ComfyUI is installed) I never got a crash anymore when switching models.
4- What do you mean by "resize control node" not showing up? You mean node #732 ? I don't think I use comfyui-mixlab-nodes. Do you mean, you use it and it was making problems for you using another custom node on this workflow? This might be an useful information to warn other users if that is the case.
@diogod I’ll just respond briefly to point 4 since it’s time for me to sleep.
I’ve been using GPT to help with translation, but sometimes it applies too much creative interpretation, which has led to me sending inaccurate messages. I apologize for not reviewing it properly.
What I actually meant is this:
There’s a bug where the slider of the node used to adjust image size doesn’t show up or work properly.
However, I’ve already reported a few things to the developers.
Interestingly, the issue was caused by the comfyui-mixlab node pack. After downloading it again directly from GitHub and reinstalling it, the problem was resolved.
@diogod
Regarding item 2,
I think there might be an error in the original workflow.
In node #1832, the default value is set to 8.
According to your explanation, the setting should be stretch with a scale of 1.
Or were you trying to say that it should match the same scale as the main resize node (#732)?
Also, I tried setting the scale to 1 and ran the generation,
but I got the following error:
[KSampler]
The new shape must be larger than the original tensor in all dimensions
I’m not sure what’s causing this.
I’ll attach a screenshot link showing the settings I used related to resizing:
And another thing:
The cfg value in node #1453 is set to 1.01,
but as far as I know, Flux shouldn’t go above 1.
Is this incorrect?
Lastly, about the seed value—
if I set it in the Main Control Room,
does it override the fixed seed value in the KSampler and turn it into random?
(It seems like that’s what's happening.)
@fruitpaster Thanks so much, I love that you are actually interested in the workflow. I don't mind answering any of your questions.
The CFG being 1.01 on #1453 is definitively wrong! I saw it as well, I have no idea why it is changed. Please set it to 1.
But one bug I encounter on easy-use "float" nodes is it never set "1.0" it always changes the value to "1.0000000000000002". I don't know if it makes any practical difference, but it should be "1.0". This is a bug in many float nodes and I don't know why. I'll have to change it to another node, maybe using a core node like primitives (In the old days of ComfyUI primitives used to give a lot of problems, but I think they work ok now).
Now, about the mask and resize, your screenshot seams ok. That was my suggestion. #1832 should be "stretch" and scale of 1. #732 should be set to "Keep proportion" (this is important) and multiple_of 1 (this is what needs to be changed on the next version). With these settings it should not be giving any errors. If it is, could you please send me your image so I can test it?
This is how it should be: https://i.postimg.cc/6prDRMc3/Captura-de-tela-2025-05-21-182842.jpg
About the seed value: Yes, that is exactly it. The seed on the control-room is the seed applied to the ksampler. It uses the set and gets nodes to carry it there. Before, it was using the Anything Everywhere nodes, but I removed them. It does not need to be random, you can set a specific seed if you want (on the control room).

@diogod
Thank you for taking the time to answer my many questions. I truly appreciate your valuable time.
I followed the settings exactly as shown in your screenshot, but I'm still getting the same error message:
[KSampler]
The new shape must be larger than the original tensor in all dimensions.
Just in case, I tried reconnecting the KSampler, but it still doesn’t work.
and I added about 50GB of shared memory using an SSD.
But was 64GB of RAM really not enough?
I don’t recall ever seeing the memory usage reach its maximum.
I asked GPT about the CFG value, and it said that while computers can represent the value 1.0 exactly, there are cases where, due to how it's processed, stored, or loaded, some floating-point numbers don’t align perfectly with binary representation and get slightly altered.
I’m not sure if that’s true, but apparently it just looks like that and still functions as 1 in practice. GPT did say that, but since it often lies or makes mistakes, I’d take it with a grain of salt.
Anyway, this is a topic related to computer science, so if you're curious, you can look it up using GPT yourself. The explanation can get long, so I’ll leave it at that.
@fruitpaster That is weird, would you mind sharing me your exact json (export it so I can use it) and an image with directions on what you want to inpaint, so I can try to reproduce this error?
Also about the shared memory, from my understanding, if you have more RAM you might actually need to have more shared memory. IDK why, I think windows is just dumb with its resource handling. 64GB is enough, but windows still crashes ComfyUI if you don't have enough shared memory. That is my experience with it. With 50GB of shared memory on top of my 64GB Ram I finally got to switch models without comfyui crashing.
@diogod
This is a workflow file,
but I don’t think it really matters—because even when I run the original workflow with only the model and CUDA settings changed, I get the same result.
password 1234
I tried running the compact version just in case, and fortunately, it worked well.
When I rendered using the original settings, it showed that it took about 218 seconds.
It’s slow, but I think it can be used effectively with a quantized model.
From what I can tell, the compact version hides the workflow layout, minimizes the visual size, and removes the memo nodes. Other than that, it seems identical.
For now, I’ll keep using this version while I wait for the full-size workflow to be released, and then I’ll switch to that when it's available.
The reason I want to use the full-size version is because this workflow helps me study and learn more deeply.
It looks very well-constructed, and I feel like I can understand it better by working with it directly.
I've looked at several workflows, but this is the first one I’ve seen that supports multiple models, considers 8x scaling, includes detailing, inpainting, and outpainting — and even integrates ControlNet.
Just by exploring this, I’ve learned so much about what’s needed and how everything fits together.
@diogod Ah, I found the cause. In the rgthree node pack, when I set the seed value to -1 in the seed node (in the compact version, it's node #1587) to make it random, the same error window as the full-size version appeared.
@diogod Ah… never mind. In the full-size version, the error still appears even when the noise value is not set to -1.
By the way, if this issue gets resolved, I’d like to try adding the Redux function as well.
Structurally, would that be possible?
If I can just identify the appropriate nodes and connect them properly, would it work?
@diogod The workflow that had been working fine in the compact version suddenly stopped working and showed the same error again.
There was a bug in the frontend’s tab window, and in order to update it, I modified the requirements and ran an update in the virtual environment.
Could this be related to the sudden malfunction? I don’t think so… but maybe.
Just to be sure, I downloaded and ran the original compact version of the workflow again, and I confirmed that it works properly.
Here are some possible causes I can think of:
Maybe the images had to be reloaded every time the workflow was loaded.
↳ But this doesn’t seem to be the case — when I reloaded the workflow and ran it right away, there were no issues.
The frontend bug earlier might have broken the workflow.
↳ This seems like the most likely cause.
I may have unknowingly changed a setting that introduced a bug.
↳ I'm not sure about this, so I haven't been able to test it yet.
For reference, I tried setting the seed to -1 again and tested it — this time, it worked fine.
So overall, I think cause #2 is the most probable one.
In any case, since it seems to be working normally again now, I’ll continue using it for the time being.
@diogod I downloaded the full-size workflow again and tested it — it works well.
It seems likely that a bug in the frontend was causing the issue.
There was a bug where, when closing a tab, the adjacent tab’s name would get swapped or mixed up.
While testing various things, a few questions came up:
Q1
I tried drawing the mask in the context image node smaller than the original image’s mask.
However, it seems like the localized area is still determined by the mask on the original image, regardless of the context image’s mask size.
Is that correct?
Q2
The inpainting is using LoRA.
If I enable both Depth and Canny, and set their intensities to 0.35 and 0.35,
would that effectively allow me to use both Depth and Canny together?
Q3
Node #1579 also has an image resizing option.
Here, the aspect ratio is set to fixed,
and the scale multiplier is set to 0.
If 0 means no scaling is applied, then it should be fine.
But if not, wouldn’t it make more sense to set it to 1 for a more natural result?
Just mentioning it in case it matters.
Let me know if you want the answers to these questions as well.
@fruitpaster Those are great questions. I’ll try to answer each one separately.
1- By looking at your workflow I already identified a very important problem. You are loading model option 2, the gguf, but that is NOT supposed to be a Flux Fill model. The whole workflow deals with that as a normal Dev model and will load Alimama control-net with it. Which is probably what is causing you trouble, since Flux Tools LoRas won’t work with Flux Fill. The GGUF needs to be a normal Dev quantization, not Fill. IF you want to use a quantized Fill model (that I’ve personally didn’t even know it existed), you should delete the “Load Diffusion Model” #690 and add a Unet Loader (GGUF) there instead, since using Fill for the model needs to be Option 3. This Integer(index) "3" is an information passed to the whole workflow to allow it to choose between using Alimama or not, to disable Flux Tool Loras or not, and so on.
And that might be my fault. I need to make this more clear in the next versions. Maybe even add a 4th option meaning GGUF for Flux Fill, which right now, doesn’t exist.
2- Yes, Compact is meant to be the exact same thing, but with a more simpler look (and with less confusing options). Not necessarily worse. But it hides all the nodes. I don’t think this is a good practice. But for end users who don’t want to understand how things work, all the connections and nodes might be overwhelming. So using the compact makes it cleaner and easier for them... even for me sometimes I prefer to use it.
3- You are using a batch of 6! That will take a lot of your VRAM. Specially with Flux + Control-Net. I recommend doing a batch of 2 at most. That is probably why you are having slow generations.
4- I really don't think the seed being -1 on #1587 makes any difference. I doubt this would cause any problems at all. But I don't know I'll test it.
5- Adding Redux is probably feasible. It's just that I have never tried it yet. But after I end up adding loops (another used requested this) I might look into it.
6- Updating frontend is always a big gamble. It more often than not breaks some custom nodes... so yes it might be it. I'm still holding on to 1.18.10 for now.
Q1- Yes. Localized area inpainting size is determined by both the original mask and the context mask. But the real mask is just the one on the original image. Making a context smaller than the original area will never work, it won’t make a difference. It only expands the context, only, it does not make it smaller. So, if you want to inpaint a smaller area, just make a small mask on the main node and don’t use anything on the context node. Think of context mask as a way to increase the area to give the ksampler more knowledge of the surrounding areas around your main mask, while the mask that count’s is always the mask on the main load node. That is why you don’t need to make it accurate or anything because this mask is just used to expand the other mask unpainted area size but not the masked area itself. I hope this makes sense.
Q2- No. You can never use both LoRas on this workflow. I don’t remember anymore, but I’m pretty sure it is feasible, I don’t think I’ve tested it, but I don’t see why it wouldn’t work. I didn’t add that option though. You either use one or the other. To use both you would need to load both loras at the same time and probably use two InstructPixToPixCondutioning. My workflow always disables one LoRa if you choose the other on the control room. I have this video, I don’t know if you watched it: https://youtu.be/cPg49GoHpSI?t=689
I did it like that because I thought using both might be confusing and I don’t know if Start and End of conditioning would work. I was more interested in that option. But I might explore this in the future.
Q3- Node #1579 is used on the Canny or Depth control image, that was previously resized to 1024 resolution (to make things faster) by the pre-processors, so #1579 change it back to be the same size of the original image again. This is needed because it will be used again for outpainting as well, so it can’t be on the 1024 downsized resolution or else it would cause a mismatch. If not for outpaintining this wouldn’t matter as I think a 1024 resolution is better for instrucPixtoPix.
0 means basically the same of 1, as far as I know. No adjustments will be made on the image by choosing 0 or 1.
@diogod Ah, I see.
It was simply a mistake to load the FILL GGUF into model 2.
Setting the batch size to 6 wasn't intentional on my part—I thought that was the default value.
That's why I was puzzled about why six identical control maps were being generated.
It might have automatically changed due to a frontend error.
I asked about using two LoRAs because I was wondering if mixing two might improve performance.
From what I remember, in another workflow it worked as long as the total strength didn’t exceed 1.
Hi,
I've been using your workflow for inpainting and it's been fantastic! However, I've encountered a limitation - it can only handle one inpaint job at a time. This can be time-consuming when I need to apply multiple inpaints with different prompts to different areas of an image.
The Challenge:
I've tried modifying the workflow using loop back nodes, but it's too complex for me to edit. I'm looking for a more streamlined solution.
The Request:
Could you update the workflow to allow for:
1. Uploading a single image
2. Creating multiple masks on the image
3. Applying a unique prompt to each mask
4. The workflow processing each mask one by one, applying the corresponding prompt
5. Returning the final image with all inpaints applied
Potential Solution:
I found some nodes on GitHub ((https://github.com/WainWong/ComfyUI-Loop-image)) that might be able to achieve this functionality. I'd love to see this feature implemented in your workflow.
I appreciate your work on this workflow and would be thrilled to see this enhancement. Thank you for considering my request!
I'll look into it. But it looks hard to implement. Specially because the whole initial purpose of this workflow was to inpaint with batches. Meaning, you can inpaint with one mask and receives like 4 different inpaint variations at once.
Your proposal seam to be making sequential inpaintings for different masks, doing each mask inpainting one after the other. Problem I see with this:
1- I don't know any way of doing multiple masks at once in an image. The only thing I can think of is making like 4 "paintings" on the image with different colors and then separating each color as a different mask. This could be achieved. But that would need a "painting" node instead of an edit mask node. The original integrated mask solution of ComfyUI doesn't allow multiple masks at once.
2- Your idea would mean it would not work with batches anymore. Since it would need to go with 1 inpainting after the other. That kills the idea of this workflow, but could be an idea for a separate workflow.
3- Also, I never managed to get a good "loop" experience with comfyui... It works best to chain multiple Ksamplers one after the other instead of looping with multiple automatic runs.
Anyway, I'll check the suggested node and see what I can do and get back to you.
And to be honest, do you really feel like gambling with 4 different inpaintings in a row is such a great idea?
I mean, you can have a success on your 1 masked area, a mediocre result on the 2, the 3 might be fantastic, and the 4th might be a complete failure. So now you end up with an image that needs to inpaint the bad inpainted area...
Makes more sense to me to inpaint one at a time, analyze the results, and do the next manually. Don't you think?
There is also the possibility to apply multiple different prompts to different areas on a single inpaint. Like a "regional" inpainting. But that is not what you are asking for, is it?
OK After I studied ComfyUI-Loop-image I think it can be implemented somehow. It solves the problem of separating masks and the loop works. I don't know If I'll officially add it here or on another workflow just for it, but it's doable.
@diogod Your workflow is great and works much better than others, especially with the 4 variations for inpainting. I think it would be even more powerful if you could add a loop back feature. This would let you set up a process where the workflow shows the output, asks you to select an option, and then continues based on your choice. I'm trying to remember the specific node that does this, but I'm not sure what it's called. I believe a solution exists, and it would be really helpful to have this feature.
@noorhamadani I managed to implement it yesterday, but so far what I did is simply disable batch_size when using loops. So whenever you use loops you get one final image only. I'm having trouble now organizing the nodes in a non chaotic way... And comfyUI simply reset my unsaved workflow to hours of work back when I tried to save it yesterday 😭
Your idea to pick one from a batch and go from there to the next loop could work... the challenge will be to implement it only when using loops and not stopping the workflow when a person is not using it. I'll have to check to see if it is achievable....
But I never liked the "picker" node because it used to make the whole workflow restart always (even when you made no change to it)... from a user perspective it might not be a problem though. I'll look into it.
I might focus on releasing a loop version that disables batch size and then check if a picker node is feasible later.
@diogod Yessss, progress! 🎉..... Batch output is an important feature, so let's keep it. Here's an idea: we can add a "picker" node after the batch output. This node would let us select specific outputs from the batch and pass them to the loop. By doing this, we can keep the batch functionality and still make the loop work smoothly. This approach seems promising and worth exploring further.
@noorhamadani Just so you know, the loop inpaint workflow is coming out great! Your idea was really great and the implementation worked perfectly. I managed to also implement the "image choose" node and it is working way better than what I expected. It's very useful specially together with "area inpainting"
I'm just putting the final touches, but I won't publish it here anymore. I'm migrating out of Civitai.
I'll probably develop this workflow on GitHub, or maybe a discord channel, I'm not sure yet.
@noorhamadani Hi. Just to let you know. I've released v8 with loops with batches support as well. Thanks for the amazing idea. It's released on github. Check it out and let me know what you think of it on the Discord channel. Thanks! I won't be supporting this workflow here anymore. I hope you understand.
@diogod My man.. thx for taking my suggestion seriously! my approach comes from real world experience, where i've been creating virtual photoshoots for big campaigns using your WF. ill definitely use ur workflow and test it out in a real world scenario, with a super critical eye. i'll give u feedback asap, promise... gonna put ur workflow thru a tough test and will get back to u with my thoughts. thx again for ur help!