
🛠️ Purpose & Design Philosophy
This workflow is a high-fidelity environment built for Illustrious. It prioritizes stability and professional texture over generation speed. It follows an "all-in-one" philosophy: configure your prompts, hit queue, and let the workflow handle the multi-stage refinement from start to finish.
Not for Speed: This is a heavy-duty refinement tool. If you want 2-second previews, use a basic workflow.
Personal Use: Built for my specific production needs. It is shared as-is for those who want a "set-and-forget" pipeline for Illustrious. Adjust the settings and models to fit your needs. The defaults on v19+ will be what I used for the sample images.
All-in-One Logic: The workflow handles generation, detailing, and upscaling in one continuous pass.
If you're needing something with more features: Try checking out Silly All-in-one, Multiple Characters With Regional Loras which is on civitai. I have no plans to implement additional features.
⚠️ Disclaimer & Compatibility
Install at Your Own Risk: Custom nodes can break your environment. I am not responsible for troubleshooting your specific installation.
ComfyUI: Built and tested on the non-app version. Desktop app users may face additional hurdles.
The "Your Version" Factor: Your node versions and environment are 99.9% likely to differ from mine.
Nodes 2.0: I do not recommend using Nodes 2.0. It creates unpredictable UI behavior; I will not provide support for issues involving this feature.
🤝 Support & Boundaries
I have not and never will monetize my workflow. CivitAI is the only platform I am maintaining this workflow on. If you find a version of my workflow posted and/or monetized anywhere and use it, then whoever posted it is responsible for providing you any support. This is the main reason why I don't monetize this: I don't want to be or feel obligated to provide support.
No DMs: DMs are disabled due to repeat spam. Please check the Discussions tab below; most questions have already been answered.
Modifications: You are free to hack this workflow apart. However, you are responsible for fixing it if it breaks.
Custom Requests: I do not make private workflows. If you need a custom solution, post a Bounty on CivitAI. There are many talented creators ready to help you for a fee.
Description
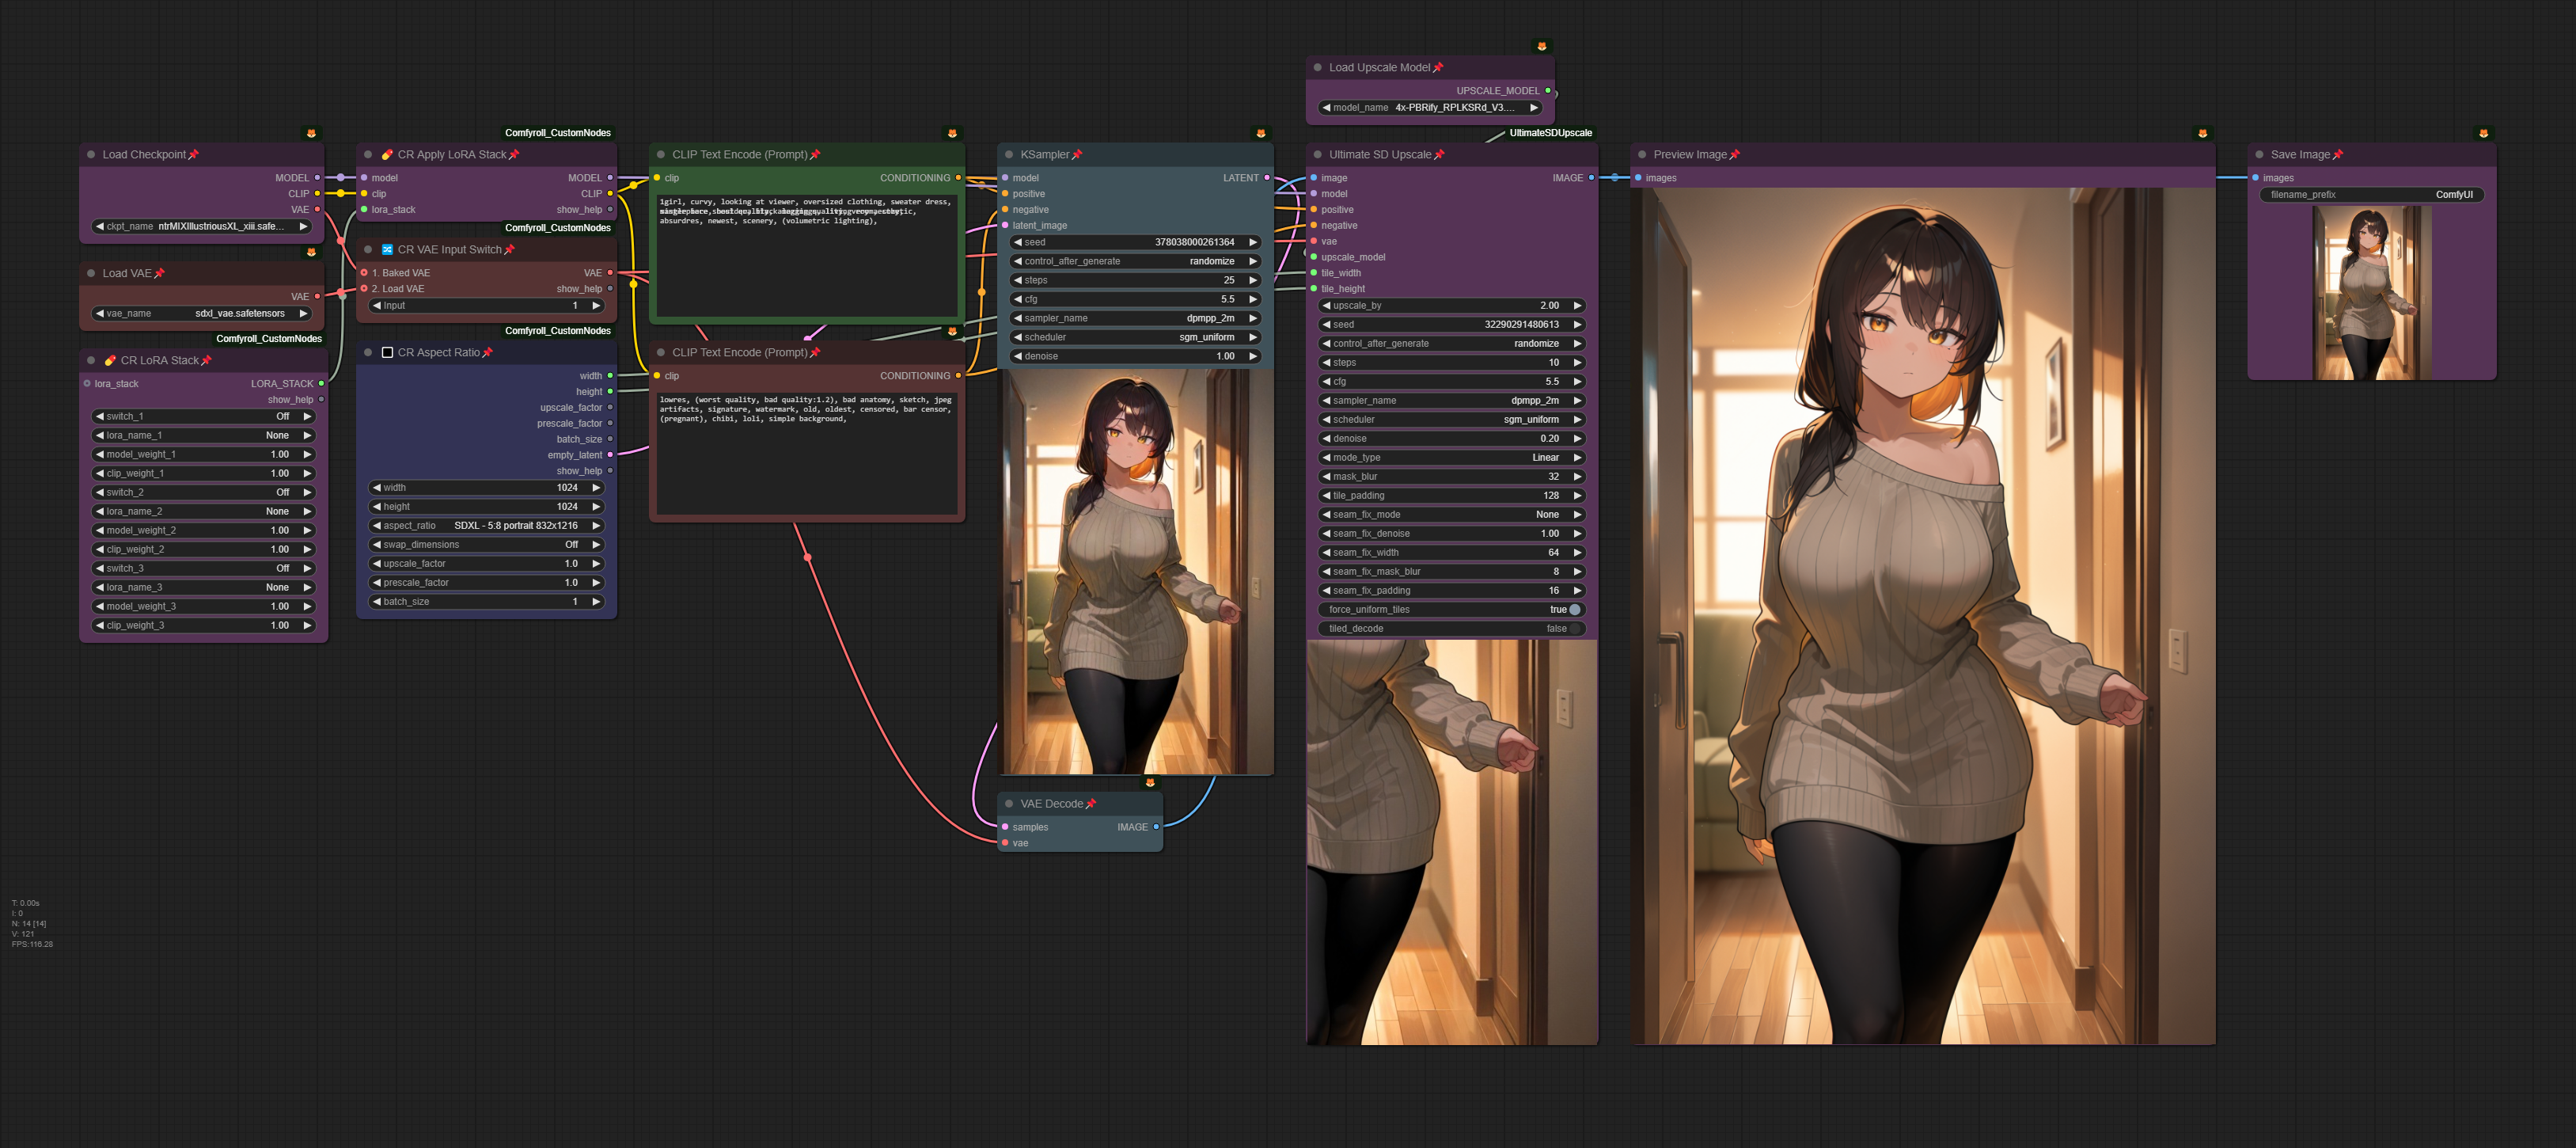
This is a "no-frills" workflow.
Basic Image Generation
Option to use up to 3 loras
Upscale via Ultimate SD Upscale.
Standard upscaling can be more complicated when using the normal "Upscale Image by" node. Why? Resolution varies depending on the upscale model. Using upscale by 2, for example, while using a 1x upscale model versus a 4x upscale model do not result in the same resolution. So in the name of "keeping it simple", but still having the upscale option I am using Ultimate SD Upscale.
The only custom nodes needed to download are ComfyUI_Comfyroll_CustomNodes and ComfyUI_UltimateSDUpscale.
FAQ
Comments (9)
thanks for the workflow, is there an article or something that shows how to get the vpred models to work? im still cant wrap my head around those
I tried NoobAI and a couple models/merges based off their v-pred model. The only actual article I see is here. I believe originally, they had a link to their huggingface page for the guide.
I didn't see any mention of the Model Sampling Discrete node in that article, but I do recall seeing it on one of the workflows from a sample image on NoobAI. Using the node does give better results (for me), but I still wasn't really satisfied.
Honestly, I gave up on using the v-pred models. I will probably try again once they do a full release, but for now I am sticking to EPS models instead. I will probably upload an update workflow soon without that node. In the meantime, if that node isn't useful, it can just be deleted.
@Gladas gotcha, thanks :)
V3 is awesome but I just realized there's no lora node or I'm blind idk? ;-;
Thanks. There is no standalone LoRa node.
You load the loras where you enter your prompts. You'll see toward the bottom of the node where it will say, "select the LoRa to add to the text". The it will add it to the prompt, similar to how A1111 does/did.
You can change the weight be adding your numbers to the end of the lora prompt like this: <lora:IAMALORA:0.7>
@Gladas Thank you for replying! Ah, I see now, sorry to bother you. :3
no problem!
If you are running into an excessive amount of artifacts with Ultimate SD Upscale or it's making things too blurry, you can try bypassing the "TTPlanet Tile Preprocessor Simple" node by dragging the image input noodle directly to the "Apply ControlNet" node's image input and see if that works for you.
I'm thinking of just removing that preprocessor node from the workflow.
Some more testing with USDU. Increasing the tile padding can help, but does increase the time taken. From what I am seeing the padding is actually making the tile bigger. So if you were to set the padding to 512, it basically is adding that many more pixels to the tile size. Tested this both with and without the tile preprocessor node and the results definitely vary. Sometimes it's better with and sometimes without.